
To see all available sizes of the FREE Elf Coat pattern, as well as all the available add-ons to this design, please visit the Elf Coat FAQ page for links!
It’s finally here you guys! This page contains the FREE PLUS SIZES pattern for the Elf Coat, my most popular pattern <3 And it’s all thanks to you! Your encouragement, feedback, and testing (and of course LOVE) powered me through all the work necessary to get this design expanded for plus sizes. I simply can’t wait to see what you all make!
Although this pattern is written for XL and 2XL, the sizes are oversized, meaning that 2XL measurements cover the standard measurements for 3XL as well! Please see the Sizes section in the notes for more details on that 😉 If you need a reference for the sizing standards I use, those can be found here!
The portable, printable, ad-free PDF for this crochet pattern is also available in my Etsy Shop , Ko-fi Shop, and Ravelry Store – purchasing the paid version of this pattern is a great way to directly support my art! Or if you don’t need the PDF, consider leaving a tip in the Tip Jar if you feel it’s worth it! 🙂

If you want to show off your awesome Elf Coat, have you joined our super nice and supportive Facebook Group, the Magic Fantastic Crochet Atelier? They (and I) would love to see your work!

Elf Coat Plus Sizes XL – 2XL / 3XL

Materials & Notes
6.5 (K) Tunisian hook
3.50 mm regular hook
King Cole Riot DK (#3 weight, 100 g / 324 yds, 30% wool, 70% acrylic) – 17, 19 skeins
Pockets: 1 extra skein makes inset pockets, ~ ½ a skein makes outside pockets.
Gauge for Riot DK: 9 sts & 10 rows = 2”
Red Heart Boutique Unforgettable (#4 weight, 100 g / 270 yds, 100% acrylic – color shown is Meadow) – 21, 23 skeins
Gauge for Unforgettable: = 8 sts & 9 rows = 2”
Sizes: X-Large, 2XL/3XL. Pattern instructional variations are given for each size, in this order. Where no variation occurs, instructions apply to all sizes. Please see notes below the finished measurement section for more details.
Finished Measurements:
Measurements are approximate and given for the original gauge using Riot DK. Substituting a different yarn or gauge may result in different measurements.Waist: ~50″, 57”
Bust: ~50″, 57”
Hip: ~56″, 64”
Sleeve: 22″ (measured armpit to hem), 22”
Length: ~40″
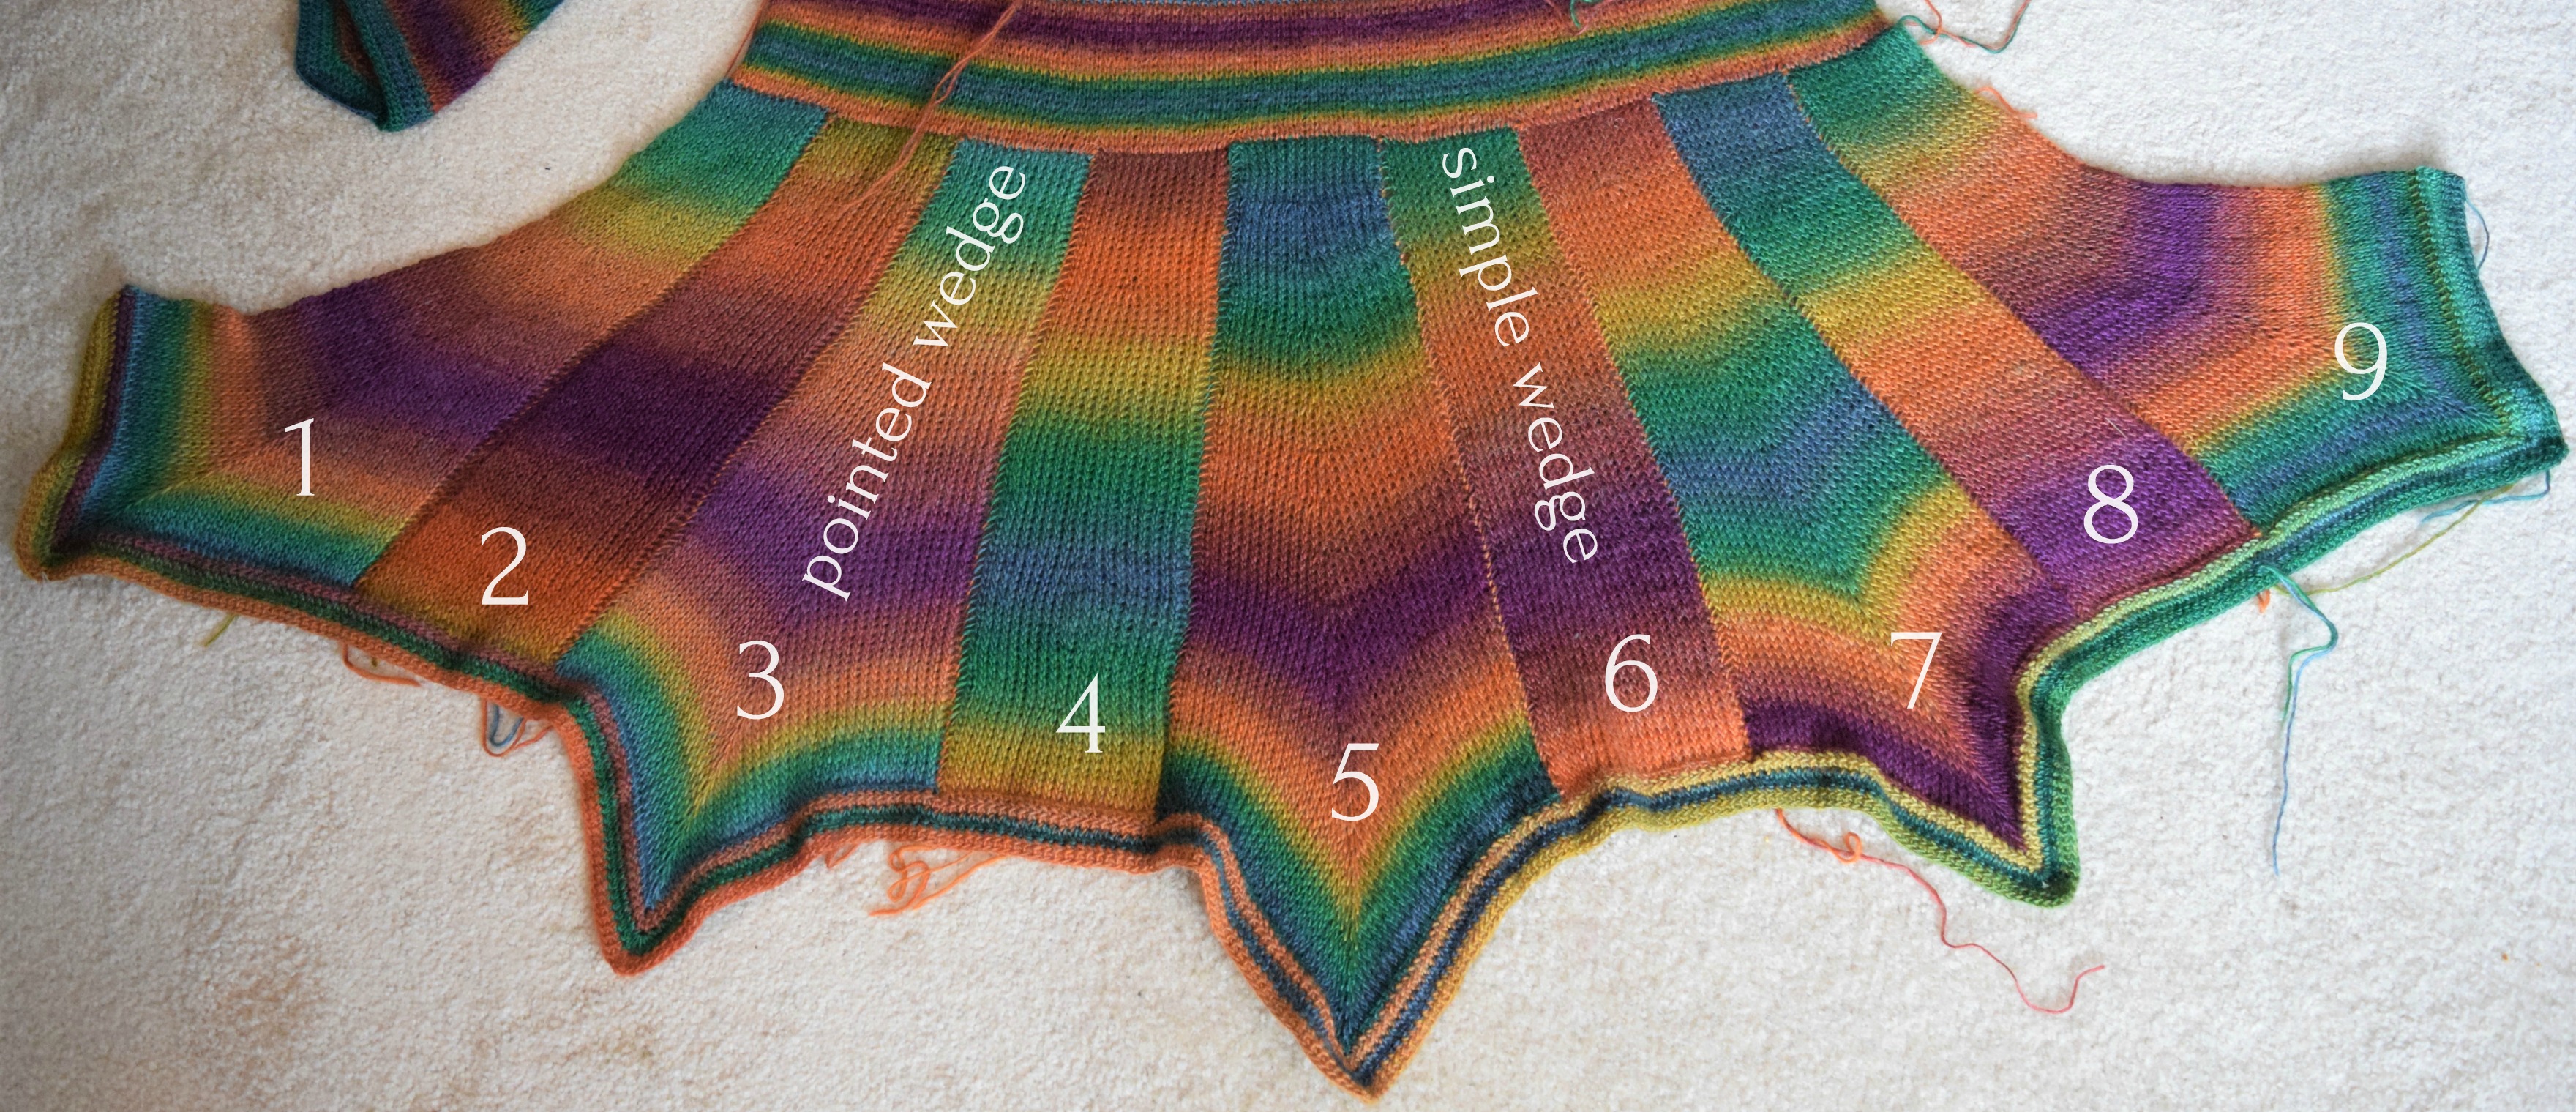
Sizing Notes: This pattern is based on the number of wedges in the skirt, making 15 wedges (7 pointed, 8 simple) for the XL size, and 17 wedges (8 simple, 9 pointed) for the 2XL size. Please note that due to this incremental difference between all sizes (2 extra skirt panels per each size up) means that the Plus Sizes are actually oversized. This is why 3XL is included under 2XL – the 2XL is already bigger than the 3XL’s standard measurements based on this sizing system. Please be sure to measure your actual body size and compare to the measurements given for each size to determine which size to make. Bigger coats can also be adjusted to fit using the optional corset back lacing and belt tie additions included in this pattern.
Some parts of the pattern include areas where lengthening or shortening is an option (the bottom of the front & back panels, the height of the waistband, and the crochet trim). Please be aware that if you need the coat length adjusted these options are available!

Size medium

Notes on yarn, gauge, and sizing:
Yarn: I chose King Cole Riot DK yarn for this pattern because of its long color changes and pretty one-ply structure that makes the colors and the stitches well defined. The DK weight and 30% wool content creates a sleek and lightweight fabric that is also very warm. However, the big box hobby stores in the U.S do not carry this yarn – I get it from a UK website called LoveKnitting.com (which I highly recommend!).
So, I wanted to find a substitute yarn that is more commercially available and the closest I could find was Red Heart Unforgettable, which also looks gorgeous for this design. RH Unforgettable is 100% acrylic, which has the benefit of zero felting, and being allergy/vegan friendly. It is also a #4 weight yarn which means it will gauge differently.

Gauge: Since the two yarns gauge differently, I have listed the gauges for each yarn individually under the materials section. These are using the 6.50 mm hook listed. If you use Unforgettable following it’s gauge, you can get a slightly bigger coat using the same stitch counts listed in the pattern.

9 stitches = 2″ in Riot DK

10 rows = 2″ in Riot DK

8 sts = 2″ in RH Unforgettable. It’s really more like 8.5 stitches, but we’re calling it 8 because of stretch!

9 rows = 2″
It’s also an option to change the hook size for Unforgettable to obtain the gauge given for Riot DK, if you want to use the alternate yarn but still get the size pictured.
NOTE FOR LEFTIES: If you are left-handed, your pattern pieces will be mirrored – for instance, your left panel for the torso of the jacket will be worked from the Right Panel pattern, and vice versa.
Techniques Used:
Chain (ch)
Tunisian Knit Stitch (TKS) – stitch used for each coat piece. Tutorial can be found on my blog here: https://moralefiber.blog/2019/01/28/tunisian-knit-stitch-tutorial/
TKS Increase (TKS inc): Increasing in Tunisian Knit Stitch. Tutorial here: – https://moralefiber.blog/2019/01/28/tunisian-knit-stitch-tutorial/
TKS Decrease (TKS dec): Decreasing in Tunisian Knit stitch – tutorial here: https://moralefiber.blog/2019/01/28/tunisian-knit-stitch-tutorial/
Linked Double Crochet (LDC): Creating a row of double crochet that are linked in the middle. Tutorial here: https://moralefiber.blog/2018/02/02/linked-double-crochet-tutorial/
Slip Stitch (Sl st): Used selectively for seaming
Whip Stitch: Sewing stitch made with a tapestry needle with yarn as thread, used for seaming.
Video Tutorials: I have created a playlist of video tutorials for working all the Tunisian stitches and other special techniques needed for this design, please refer to those on my YouTube channel at the link below! 😊
https://www.youtube.com/watch?v=_i8JEaMwoXg&list=PLwudTTp1E52YwgmfEmdmNSDgKJGbejoOm
Technique Notes: Tunisian stitch is a wonderful crochet technique and I love it and highly recommend learning if you haven’t. But since this piece uses a simple stitch pattern (it’s just rows of regular stitches with some increases and decreases – that’s really it) a different technique can easily be substituted in. As long as your stitches match the gauge given, you could work this pattern in regular single crochet or regular knit stitch.
One Tunisian stitch = one regular single crochet or one regular knit/purl stitch.
I tested out some Riot DK in rows of single crochet, and obtained a closely matching gauge using a 4.0 mm hook.
If you are working this pattern in a regular crochet stitch, keep in mind that Tunisian crochet does not ever turn, so your rows will be alternately “opposite” what the Tunisian instructions are. For instance, a piece that decreases at the beginning of every row in Tunisian, will alternately decrease at the beginning and decrease at the end for a regular, turning stitch.
Blocking: Not absolutely necessary but it does wonders for your finished piece, especially with Tunisian crochet which tends to curl naturally. Blocking for this piece can be done simply by laying your piece out on a foam mat, using blocking pins to stretch it and make it lay flat and pretty and in the right shape. Using a spray bottle and plain water, wet the piece, then let dry. This works great with wool based yarns (King Cole Riot DK) and moderately well with acrylics (RH Unforgettable).
If you have any questions about any of the info given above (it’s a lot!), please don’t hesitate to contact me via e-mail at moralefiber@yahoo.com or on my blog Pattern Help and Support page here:
https://moralefiber.blog/pattern-help-support/
Or via Messenger on my FB page here:
www.facebook.com/MoraleFiber
Now on to the pattern!

Instructions
The pieces of this coat can be made in any order.
Simple Wedge (Make 8, 8)
Both the simple wedges and the pointed wedges can be shortened by subtracting 8 rows right after the initial Row 1.

Ch 15.
Row 1: Pick up a st in the 2nd ch from the hook and in the next 13 sts. Return pass (RP). – 15 stitches
Row 2: TKS in ea ch st across the row. RP. – 15 sts
Rows 3-18: TKS across, RP. – 15 sts
Row 19: TKS in the next 6 sts, pick up a lp in the next space to increase. TKS in the next st, pick up a lp in the next sp to increase. TKS in the next 7 sts. RP. – 17 sts
Rows 20-35: TKS across, RP. – 17 sts
Row 36: TKS in the next 7 sts, increase in the next sp. TKS in the next st, increase in the next sp. TKS in the next 8 sts. RP. – 19 sts.
Rows 37-52: TKS across, RP. – 19 sts
Row 53: TKS in the next 8 sts, increase in the next sp. TKS in the next st, increase in the next sp. TKS in the next 9 sts. RP. – 21 sts.
Row 54-69: TKS across, RP. – 21 sts
Row 70: TKS in the next 9 sts, increase in the next sp. TKS in the next st, increase in the next sp. TKS in the next 10 sts. RP. – 23 sts.
Row 71-80: TKS across, RP. – 23 sts
Cut yarn and tie off.
Pointed Wedge (Make 7, 9):
The point is formed by concentrating the increases in the center part of the wedge, with increasing frequency as the wedge gets larger. There are no decreases used to form the point. When the pointed wedge is finished and tied off, stretch the central point outward gently to fully accent the shape.

Ch 15.
Row 1: Pick up a st in the 2nd ch from the hook and in the next 13 sts. Return pass (RP). – 15 stitches
Row 2: In TKS, pick up a lp from ea st across the row. RP. – 15 sts
Rows 3-9: TKS across, RP. – 15 sts
Row 10: TKS in the next 6 sts, pick up a lp in the next space to increase. TKS in the next st, pick up a lp in the next sp to increase. TKS in the next 7 sts. RP. – 17 sts
Rows 11-18: TKS across, RP. – 17 sts
Row 19: TKS in the next 7 sts, inc in the next sp. TKS in the next st, inc in the next sp. TKS in the next 8 sts. RP. – 19 sts
Rows 20-27: TKS across, RP. – 19 sts
Row 28: TKS in the next 8 sts, inc in the next sp. TKS in the next st, inc in the next sp. TKS in the next 9 sts. RP. – 21 sts
Rows 29-32: TKS across, RP. – 21 sts
Row 33: TKS in the next 9 sts, inc in the next sp. TKS in the next st, inc in the next sp. TKS in the next 10 sts. RP. – 23 sts
Rows 34-37: TKS across, RP. – 23 sts
Row 38: TKS in the next 10 sts, inc in the next sp. TKS in the next st, inc in the next sp. TKS in the next 11 sts. RP. – 25 sts
Rows 39-42: TKS across, RP. – 25 sts
Row 43: TKS in the next 11 sts, inc in the next sp. TKS in the next st, inc in the next sp. TKS in the next 12 sts. RP. – 27 sts
Rows 44-47: TKS across, RP. – 27 sts
Row 48: TKS in the next 12 sts, inc in the next sp. TKS in the next st, inc in the next sp. TKS in the next 13 sts. RP. – 29 sts
Rows 49-50: TKS across, RP. – 29 sts
Row 51: TKS in the next 13 sts, inc in the next sp. TKS in the next st, inc in the next sp. TKS in the next 14 sts. RP. – 31 sts
Rows 52-53: TKS across, RP. – 31 sts
Row 54: TKS in the next 14 sts, inc in the next sp. TKS in the next st, inc in the next sp. TKS in the next 15 sts. RP. – 33 sts
Row 55: TKS across, RP. – 33 sts
Row 56: TKS in the next 15 sts, inc in the next sp. TKS in the next st, inc in the next sp. TKS in the next 16 sts. RP. – 35 sts
Row 57: TKS across, RP. – 35 sts
Row 58: TKS in the next 16 sts, inc in the next sp. TKS in the next st, inc in the next sp. TKS in the next 17 sts. RP. – 37 sts
Row 59: TKS across, RP. – 37 sts
Row 60: TKS in the next 17 sts, inc in the next sp. TKS in the next st, inc in the next sp. TKS in the next 18 sts. RP. – 39 sts
Row 61: TKS across, RP. – 39 sts
Row 62: TKS in the next 18 sts, inc in the next sp. TKS in the next st, inc in the next sp. TKS in the next 19 sts. RP. – 41 sts
Row 63: TKS across, RP. – 41 sts
Row 64: TKS in the next 19 sts, inc in the next sp. TKS in the next st, inc in the next sp. TKS in the next 20 sts. RP. – 43 sts
Row 65: TKS across, RP. – 43 sts
Row 66: TKS in the next 20 sts, inc in the next sp. TKS in the next st, inc in the next sp. TKS in the next 21 sts. RP. – 45 sts
Row 67: TKS in the next 21 sts, inc in the next sp. TKS in the next st, inc in the next sp. TKS in the next 22 sts. RP. – 47 sts
Row 68: TKS in the next 22 sts, inc in the next sp. TKS in the next st, inc in the next sp. TKS in the next 23 sts. RP. – 49 sts
Row 69: TKS in the next 23 sts, inc in the next sp. TKS in the next st, inc in the next sp. TKS in the next 24 sts. RP. – 51 sts
Row 70: TKS in the next 24 sts, inc in the next sp. TKS in the next st, inc in the next sp. TKS in the next 25 sts. RP. – 53 sts
Row 71: TKS in the next 25 sts, inc in the next sp. TKS in the next st, inc in the next sp. TKS in the next 26 sts. RP. – 55 sts
Row 72: TKS in the next 26 sts, inc in the next sp. TKS in the next st, inc in the next sp. TKS in the next 27 sts. RP. – 57 sts
Row 73: TKS in the next 27 sts, inc in the next sp. TKS in the next st, inc in the next sp. TKS in the next 28 sts. RP. – 59 sts
Row 74: TKS in the next 28 sts, inc in the next sp. TKS in the next st, inc in the next sp. TKS in the next 29 sts. RP. – 61 sts
Row 75: TKS in the next 29 sts, inc in the next sp. TKS in the next st, inc in the next sp. TKS in the next 30 sts. RP. – 63 sts
Row 76: TKS in the next 30 sts, inc in the next sp. TKS in the next st, inc in the next sp. TKS in the next 31 sts. RP. – 65 sts
Row 77: TKS in the next 31 sts, inc in the next sp. TKS in the next st, inc in the next sp. TKS in the next 32 sts. RP. – 67 sts
Row 78: TKS in the next 32 sts, inc in the next sp. TKS in the next st, inc in the next sp. TKS in the next 33 sts. RP. – 69 sts
Row 79: TKS in the next 33 sts, inc in the next sp. TKS in the next st, inc in the next sp. TKS in the next 34 sts. RP. – 71 sts
Row 80: TKS in the next 34 sts, inc in the next sp. TKS in the next st, inc in the next sp. TKS in the next 35 sts. RP. – 73 sts
Cut yarn and tie off.
Skirt Construction
Alternating simple wedges with pointed wedges as shown, seam all blocks together with a whip stitch using a tapestry needle and a length of yarn.

Waist length for the size Small.
After stitching the wedges, the stretch at the seams will add width to the length of the coat bottom. This will be corrected by the waist stitching later.
Skirt Border:

The skirt border consists of 3 rows of Linked Double Crochet, worked back and forth, with increases at the point of each pointed wedge.
With 3.50 mm hook, attach yarn at one end of the skirt hem.
Row 1: Ch 3, LDC in each stitch across, inserting hook as if to TKS. 3 LDC at the point of each pointed wedge, mark the middle stitch of this increase.
Row 2: Ch 3, turn. LDC in ea st across working (2 LDC, ch 1, 2 LDC) at each point where the increase was marked.
Row 3: Ch 3, turn. LDC in ea st across working (2 LDC, ch 1, 2 LDC) in each ch-1 from the increase points of the previous row.
Once third row is completed, cut yarn and tie off. You can work extra border here if you want the skirt longer!

Close-up of the increases placed at the point of each pointed wedge
WAIST:
The waist is worked directly onto the top of the wedges that make up the skirt. One stitch is skipped on every block, to create a slight decrease in width to accentuate the waist.

Waist size for Small
Row 1: RS facing, attach yarn at end of the line of the seamed wedges by pulling up a loop from the foundation chain or first row of stitches using TKS. With 6.50 mm Tunisian hook, pick up a loop using TKS from ea of the next 13 sts. Sk next st and seam. (Pick up a loop from ea of the next 14 sts, sk next st and seam) 14, 16 times. RP. – 210, 238 sts
To modify the size here, add or subtract any rows after the first one to make it longer or shorter. To create inset pockets, see “Pockets” Instructions, before completing the waistband. Outside pockets may be completed after the waistband is finished.
Rows 2 – 17: TKS in ea st across. RP.
Bodice – Front & Back Panels
Note on Size for the Front & Back Panels:
All sizes work 26 rows of TKS before beginning to decrease and shape the collar and shoulder area. You can add or subtract rows from the total of 26 in order to modify the length of the coat.
The bodice panels should reach from the shoulders down to cover the bust and end just under the bust line. However many rows you work, be sure to work the same amount of TKS rows in the beginning for each panel!
Back Panel:
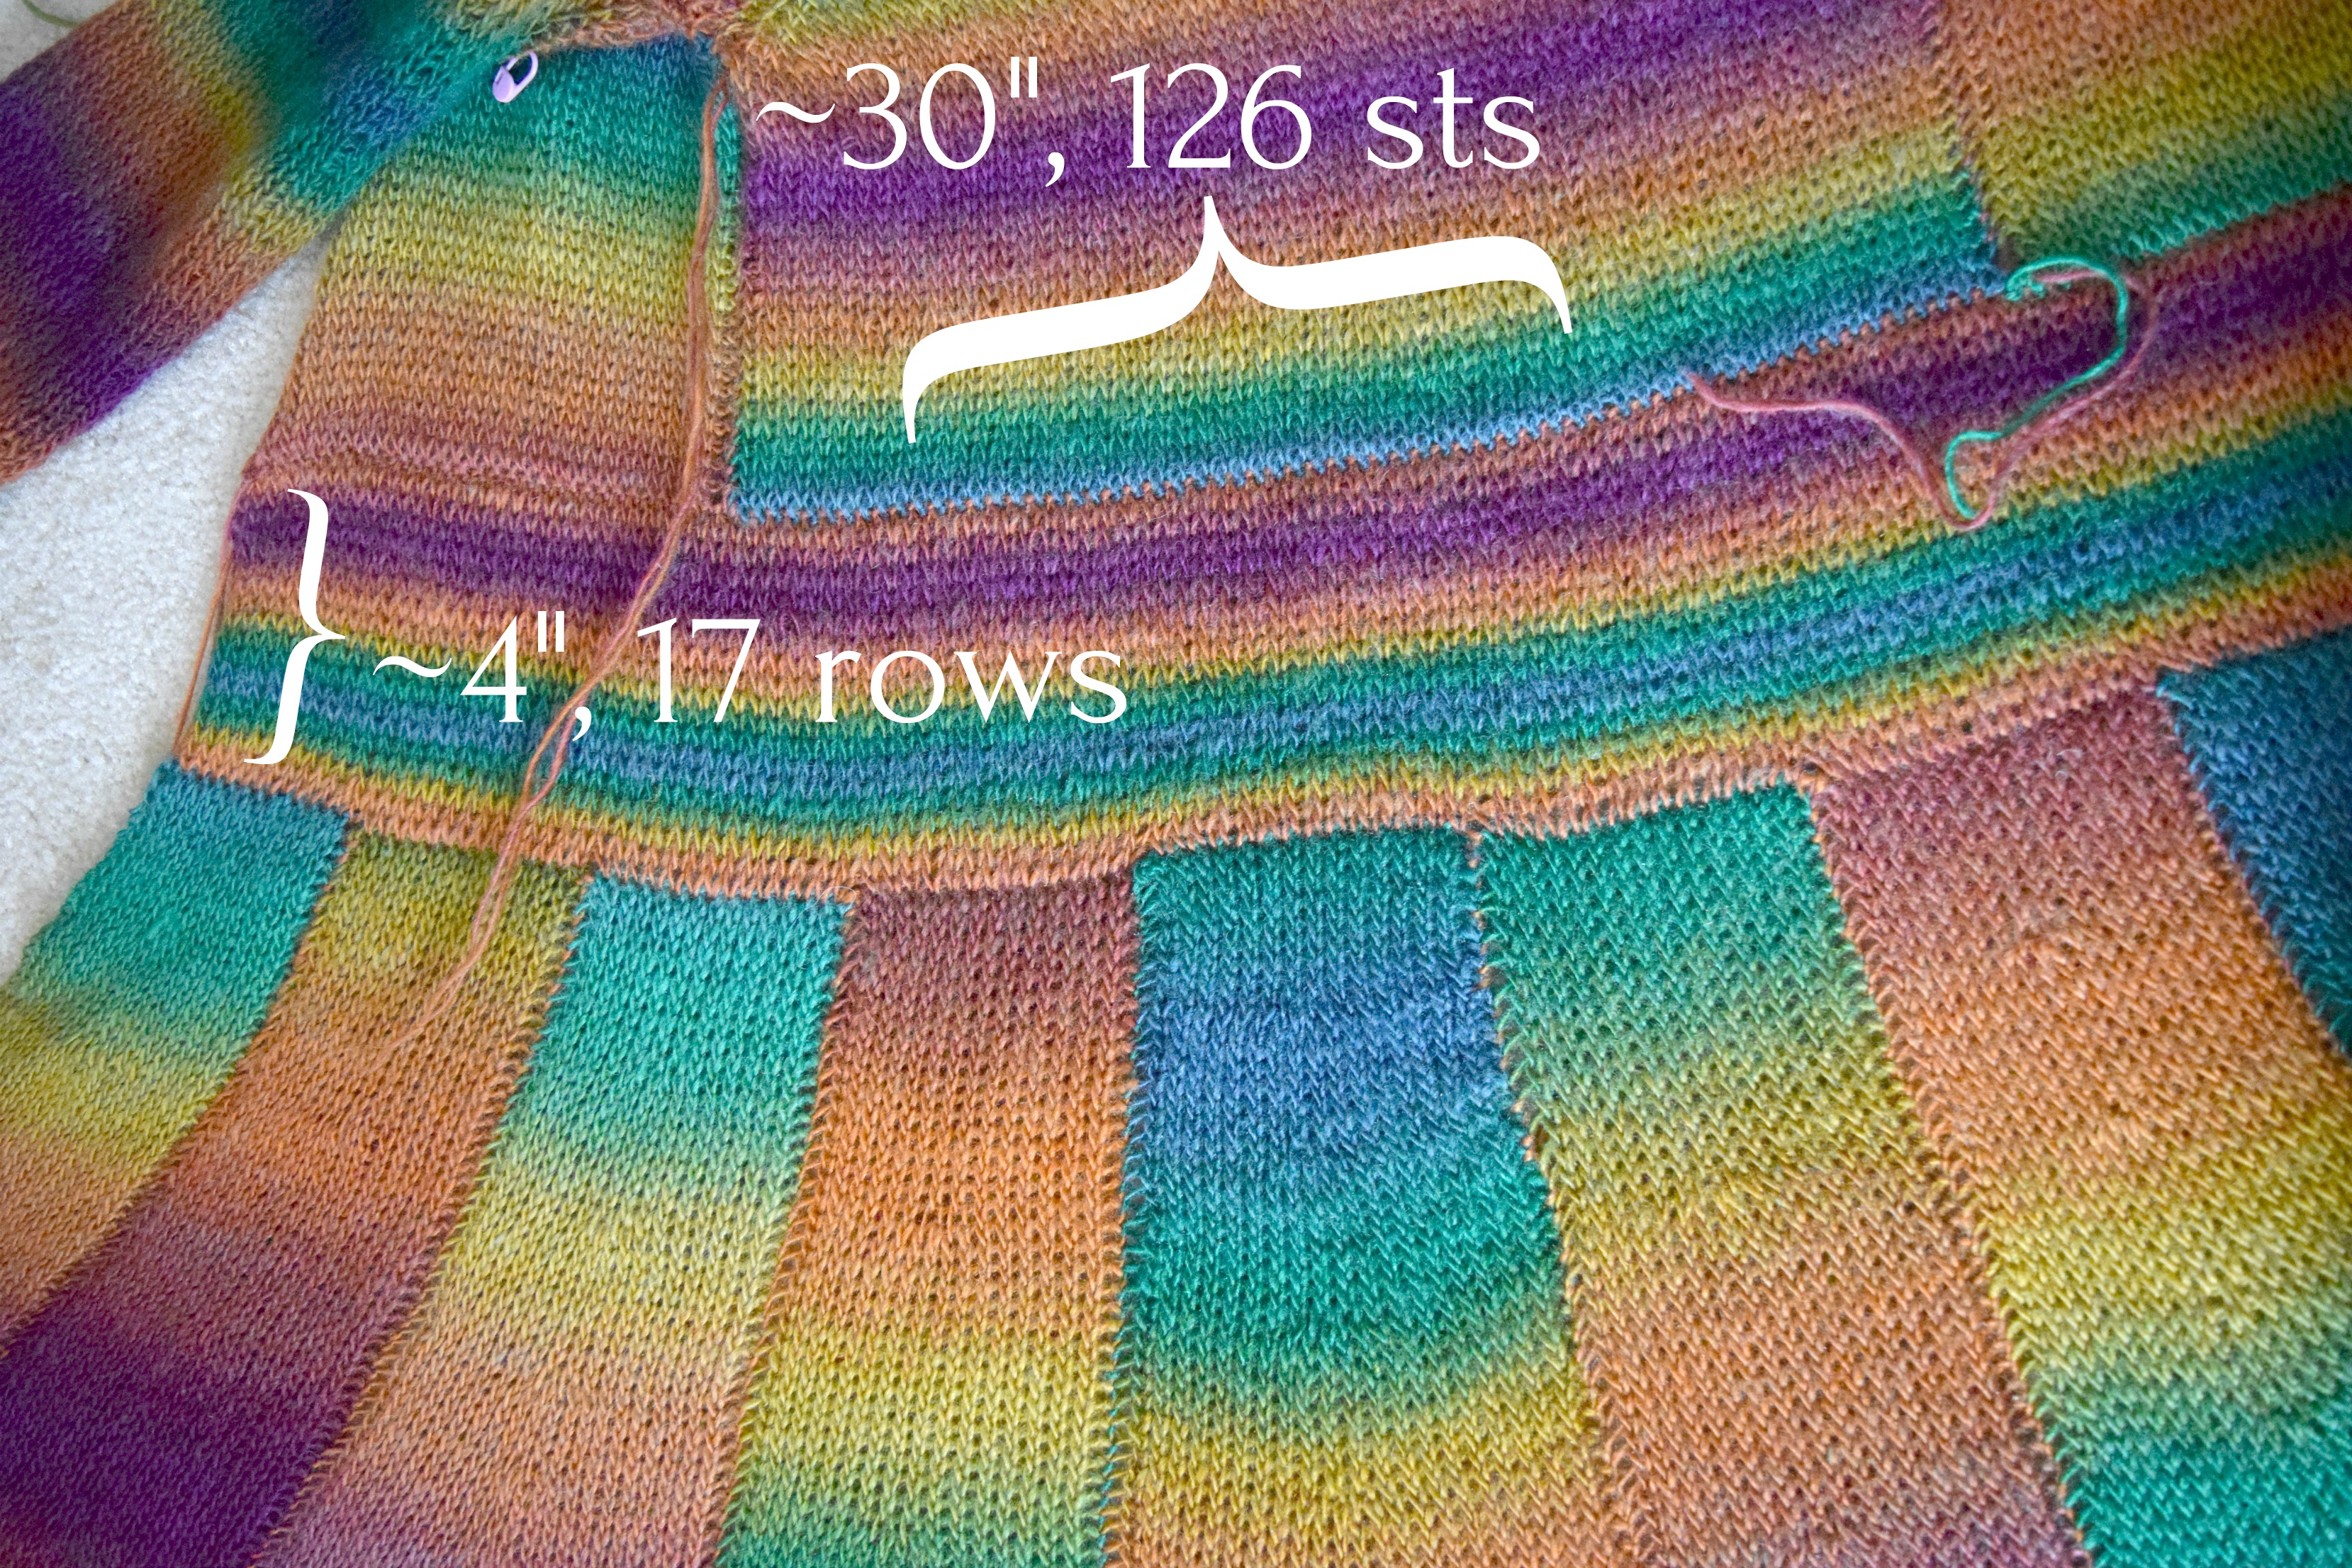
The back panel is worked the length of stitches that equals half of the number of stitches in the waist. In size XL, the waist is 210 sts. Divided in half, that’s 105. In 2XL, the waist is 238 sts, divided in half that’s 119.
The completed Back Panel should be approximately 13.5 inches tall for XL, and 14.5 for 2XL. If you need a longer measurement here (should reach just below the bust), add more rows where indicated in the pattern.

Back panel, Small

With 6.50 mm Tunisian Hook, Ch 105, 119
Row 1: Pick up a st in the 2nd ch from the hook and in the next 104, 118 sts. Return pass (RP). – 105, 119 stitches
Row 2: In TKS, pick up a lp from ea st across the row. RP. – 105, 119 sts
Rows 3 – 26: Rpt Row 2.
To increase length of the front & back panels, add more rows here.
Row 27: TKS in the next st, TKS dec over the next 2 sts. TKS in the next 97, 111 sts. TKS dec over the next 2 sts. TKS in the next 2 sts. RP. – 103, 117 sts
Row 28: TKS in the next st, TKS dec over the next 2 sts. TKS in the next 95, 109 sts. TKS dec over the next 2 sts. TKS in the next 2 sts. RP. – 101, 115 sts
Row 29: TKS in the next st, TKS dec over the next 2 sts. TKS in the next 93, 107 sts. TKS dec over the next 2 sts. TKS in the next 2 sts. RP. – 99, 113 sts
Row 30: TKS in the next st, TKS dec over the next 2 sts. TKS in the next 91, 105 sts. TKS dec over the next 2 sts. TKS in the next 2 sts. RP. – 97, 111 sts
Row 31: TKS in the next st, TKS dec over the next 2 sts. TKS in the next 89, 103 sts. TKS dec over the next 2 sts. TKS in the next 2 sts. RP. – 95, 109 sts
Row 32: TKS in the next st, TKS dec over the next 2 sts. TKS in the next 87, 101 sts. TKS dec over the next 2 sts. TKS in the next 2 sts. RP. – 93, 107 sts
Row 33: TKS in the next st, TKS dec over the next 2 sts. TKS in the next 85, 99 sts. TKS dec over the next 2 sts. Tks in the next 2 sts. RP. – 91, 105 sts
Row 34: TKS in the next st, TKS dec over the next 2 sts. TKS in the next 83, 97 sts. TKS dec over the next 2 sts. TKS in the next 2 sts. RP. – 89, 103 sts
Row 35: TKS in the next st, TKS dec over the next 2 sts. TKS in the next 81, 95 sts. TKS dec over the next 2 sts. Tks in the next 2 sts. RP. – 87, 101 sts
Row 36: TKS in the next st, TKS dec over the next 2 sts. TKS in the next 79, 93 sts. TKS dec over the next 2 sts. Tks in the next 2 sts. RP. – 85, 99 sts
Row 37: TKS in the next st, TKS dec over the next 2 sts. TKS in the next 77, 91 sts. TKS dec over the next 2 sts. Tks in the next 2 sts. RP. – 83, 97 sts
Row 38: TKS in the next st, TKS dec over the next 2 sts. TKS in the next 75, 89 sts. TKS dec over the next 2 sts. TKS in the next 2 sts. RP. – 81, 95 sts
Row 39: TKS in the next st, TKS dec over the next 2 sts. TKS in the next 73, 87 sts. TKS dec over the next 2 sts. TKS in the next 2 sts. RP. – 79, 93 sts
Row 40: TKS in the next st, TKS dec over the next 2 sts. TKS in the next 71, 85 sts. TKS dec over the next 2 sts. TKS in the next 2 sts. RP. – 77, 91 sts
Row 41: TKS in the next st, TKS dec over the next 2 sts. TKS in the next 69, 83 sts. TKS dec over the next 2 sts. TKS in the next 2 sts. RP – 75, 89 sts
Row 42: TKS in the next st, TKS dec over the next 2 sts. TKS in the next 67, 81 sts. TKS dec over the next 2 sts. TKS in the next 2 sts. RP – 73, 87 sts
Row 43: TKS in the next st, TKS dec over the next 2 sts. TKS in the next 65, 79 sts. TKS dec over the next 2 sts. TKS in the next 2 sts. RP – 71, 85 sts
Row 44: TKS in the next st, TKS dec over the next 2 sts. TKS in the next 63, 77 sts. TKS dec over the next 2 sts. TKS I the next 2 sts. RP – 69, 83 sts
Row 45: TKS in the next st, TKS dec over the next 2 sts. TKS in the next 61, 75 sts. TKS dec over the next 2 sts. TKS in the next 2 sts. RP – 67, 81 sts
Row 46: TKS in the next st, TKS dec over the next 2 sts. TKS in the next 59, 73 sts. TKs dec over the next 2 sts. TKS in the next 2 sts. RP – 65, 79 sts
Row 47: TKS in the next st, TKS dec over the next 2 sts. TKS in the next 57, 71 sts. TKS dec over the next 2 sts. TKS in the next 2 sts. RP – 63, 77 sts
Row 48: TKS in the next st, TKS dec over the next 2 sts. TKS in the next 55, 69 sts. TKS dec over the next 2 sts. TKS in the next 2 sts. RP – 61, 75 sts
Row 49: TKS in the next st, TKS dec over the next 2 sts. TKS in the next 53, 67 sts. TKS dec over the next 2 sts. TKS in the next 2 sts. RP – 59, 73 sts
Row 50: TKS in the next st, TKS dec over the next 2 sts. TKS in the next 51, 65 sts. TKS dec over the next 2 sts. TKS in the next 2 sts. RP – 57, 71 sts
Row 51: TKS in the next st, TKS dec over the next 2 sts. TKS in the next 49, 63 sts. TKS dec over the next 2 sts. TKS in the next 2 sts. RP – 55, 69 sts
Row 52: TKS in the next st, TKS dec over the next 2 sts. TKS in the next 47, 61 sts. TKS dec over the next 2 sts. TKS in the next 2 sts. RP – 53, 67 sts
Row 53: TKS in the next st, TKS dec over the next 2 sts. TKS in the next 45, 59 sts. TKS dec over the next 2 sts. TKS in the next 2 sts. RP – 51, 65 sts
Row 54: TKS in the next st, TKS dec over the next 2 sts. TKS in the next 43, 57 sts. TKS dec over the next 2 sts. TKS in the next 2 sts. RP – 49, 63 sts
Row 55: TKS in the next st, TKS dec over the next 2 sts. TKS in the next 41, 55 sts. TKS dec over the next 2 sts. TKS in the next 2 sts. RP – 47, 61 sts
Row 56: TKS in the next st, TKS dec over the next 2 sts. TKS in the next 39, 53 sts. TKS dec over the next 2 sts. TKS in the next 2 sts. RP – 45, 59 sts
Row 57: TKS in the next st, TKS dec over the next 2 sts. TKS in the next 37, 51 sts. TKS dec over the next 2 sts. TKS in the next 2 sts. RP – 43, 57 sts
Row 58: TKS in the next st, TKS dec over the next 2 sts. TKS in the next 35, 49 sts. TKS dec over the next 2 sts. TKS in the next 2 sts. RP – 41, 55 sts
Row 59: TKS in the next st, TKS dec over the next 2 sts. TKS in the next 33, 47 sts. TKS dec over the next 2 sts. TKS in the next 2 sts. RP – 39, 53 sts
Row 60: TKS in the next st, TKS dec over the next 2 sts. TKS in the next 31, 45 sts. TKS dec over the next 2 sts. TKS in the next 2 sts. RP – 37, 51 sts
Row 61: TKS in the next st, TKS dec over the next 2 sts. TKS in the next 29, 43 sts. TKS dec over the next 2 sts. TKS in the next 2 sts. RP – 35, 49 sts
Row 62: TKS in the next st, TKS dec over the next 2 sts. TKS in the next 27, 41 sts. TKS dec over the next 2 sts. TKS in the next 2 sts. RP – 33, 47 sts
Row 63: TKS in the next st, TKS dec over the next 2 sts. TKS in the next 25, 39 sts. TKS dec over the next 2 sts. TKS in the next 2 sts. RP – 31, 45 sts
Row 64: TKS in the next st, TKS dec over the next 2 sts. TKS in the next 23, 37 sts. TKS dec over the next 2 sts. TKS in the next 2 sts. RP – 29, 43 sts
Row 65: TKS in the next st, TKS dec over the next 2 sts. TKS in the next 21, 35 sts. TKS dec over the next 2 sts. TKS in the next 2 sts. RP – 27, 41 sts
Row 66: TKS in the next st, TKS dec over the next 2 sts. TKS in the next 19, 33 sts. TKS dec over the next 2 sts. TKS in the next 2 sts. RP – 25, 39 sts
XLs stop here and tie off, 2XLs proceed:
2XL Only
Row 68: TKS in the next st, TKS dec over the next 2 sts. TKS in the next 29 sts. TKS dec over the next 2 sts. TKS in the next 2 sts. RP – 35 sts
Row 69: TKS in the next st, TKS dec over the next 2 sts. TKS in the next 27 sts. TKS dec over the next 2 sts. TKS in the next 2 sts. RP – 33 sts
Row 70: TKS in the next st, TKS dec over the next 2 sts. TKS in the next 25 sts. TKS dec over the next 2 sts. TKS in the next 2 sts. RP. – 31 sts
Row 71: TKS in the next st, TKS dec over the next 2 sts. TKS in the next 25 sts. TKS dec over the next 2 sts. TKS in the next 2 sts. RP. – 29 sts
Row 72: TKS in the next st, TKS dec over the next 2 sts. TKS in the next 23 sts. TKS dec over the next 2 sts. TKS in the next 2 sts. RP. – 27 sts
Row 73: TKS in the next st, TKS dec over the next 2 sts. TKS in the next 21 sts. TKS dec over the next 2 sts. TKS in the next 2 sts. RP. – 25 sts.
Cut yarn and tie off.
Front Panel – Right:
The front panels are worked with the length of stitches equaling the half of the waistband that the back panel won’t be taking up. There’s two, so each panel will be a quarter of the total waistband stitches. For X-Larges, that’s 210 / 4 = 52.5. Since that’s not a whole number, I will round down to 52 and fudge the seam by one stitch. For 2X-Large, that’s 238 / 4 = 59. 5, again not a whole number so rounded down to 59.
The completed Front Panels should be approximately 13.5 inches in total length for XL, 14.5 for 2XL. If you need a longer measurement here (should reach to just below the bust), add extra rows where indicated in the pattern.


Front Panel, right, size small

Front Panels size medium

Front Panel, right, size large. Pictured is a panel with an alternate length of 38 rows in the beginning.
With 6.50 mm Tunisian Hook, Ch 52, 59.
Row 1: Pick up a st in the 2nd ch from the hook and in the next 50, 57 sts. Return pass (RP). – 52, 59 stitches
Row 2: TKS in ea st across the row. RP. – 52, 59 sts
Rows 3 – 26: Rpt Row 2.
To increase length of the front & back panels, add more rows here.
Row 27: TKS in ea of the next 48, 55 sts. TKS dec over the next 2 sts. TKS in the final st. RP – 51, 58 sts.
Row 28: TKS in ea of the next 47, 54 sts. TKS dec over the next 2 sts. TKS in the final st. RP – 50, 57 sts.
Row 29: TKS in ea of the next 46, 53 sts. TKS dec over the next 2 sts. TKS in the final st. RP – 49, 56 sts.
Row 30: TKS in ea of the next 45, 52 sts. TKS dec over the next 2 sts. TKS in the final st. RP – 48, 55 sts.
Row 31: TKS in ea of the next 44, 51 sts. TKS dec over the next 2 sts. TKS in the final st. RP – 47, 54 sts.
Row 32: TKS in ea of the next 43, 50 sts. TKS dec over the next 2 sts. TKS in the final st. RP – 46, 53 sts.
Row 33: TKS in ea of the next 42, 49 sts. TKS dec over the next 2 sts. TKS in the final st. RP – 45, 52 sts.
Row 34: TKS in ea of the next 41, 48 sts. TKS dec over the next 2 sts. TKS in the final st. RP – 44, 51 sts.
Row 35: TKS in ea of the next 40, 47 sts. TKS dec over the next 2 sts. TKS in the final st. RP – 43, 50 sts.
Row 36: TKS in ea of the next 39, 46 sts. TKS dec over the next 2 sts. TKS in the final st. RP – 42, 49 sts.
Row 37: TKS in ea of the next 38, 45. TKS dec over the next 2 sts. TKS in the final st. RP – 41, 48 sts.
Row 38: TKS in ea of the next 37, 44 sts. TKS dec over the next 2 sts. TKS in the final st. RP – 40, 47 sts.
Row 39: TKS in ea of the next 36, 43 sts. TKS dec over the next 2 sts. TKS in the final st. RP – 39, 46 sts
Row 40: TKS in ea of the next 35, 42 sts. TKS dec over the next 2 sts. TKS in the final st. RP – 38, 45 sts
Row 41: TKS in ea of the next 34, 41 sts. TKS dec over the next 2 sts. TKS in the final st. RP – 37, 44 sts
Row 42: TKS in ea of the next 33, 40 sts. TKS dec over the next 2 sts. TKS in the final st. RP – 36, 43 sts
Row 43: TKS in ea of the next 32, 39 sts. TKS dec over the next 2 sts. TKS in the final st. RP – 35, 42 sts
Row 44: TKS in ea of the next 31, 38 sts. TKS dec over the next 2 sts. TKS in the final st. RP – 34, 41 sts
Row 45: TKS in ea of the next 30, 37 sts. TKS dec over the next 2 sts. TKS in the final st. RP – 33, 40 sts
Row 46: TKS in ea of the next 29, 36 sts. TKS dec over the next 2 sts. TKS in the final st. RP – 32, 39 sts
Row 47: TKS in ea of the next 28, 35 sts. TKS dec over the next 2 sts. TKS in the final st. RP – 31, 38 sts
Row 48: TKS in ea of the next 27, 34 sts. TKS dec over the next 2 sts. TKS in the final st. RP – 30, 37 sts
Row 49: TKS in ea of the next 26, 33 sts. TKS dec over the next 2 sts. TKS in the final st. RP – 29, 36 sts
Row 50: TKS in ea of the next 25, 32 sts. TKS dec over the next 2 sts. TKS in the final st. RP – 28, 35 sts
Row 51: TKS in ea of the next 24, 31 sts. TKS dec over the next 2 sts. TKS in the final st. RP – 27, 34 sts
Row 52: TKS in ea of the next 23, 30 sts. TKS dec over the next 2 sts. TKS in the final st. RP – 26, 33 sts
Row 53: TKS in ea of the next 22, 29 sts. TKS dec over the next 2 sts. TKS in the final st. RP – 25, 32 sts
Row 54: TKS in ea of the next 21, 28 sts. TKS dec over the next 2 sts. TKS in the final st. RP – 24, 31 sts
Row 55: TKS in ea of the next 20, 27 sts. TKS dec over the next 2 sts. TKS in the final st. RP – 23, 30 sts
Row 56: TKS in ea of the next 19, 26 sts. TKS dec over the next 2 sts. TKS in the final st. RP – 22, 29 sts
Row 57: TKS in ea of the next 18, 25 sts. TKS dec over the next 2 sts. TKS in the final st. RP – 21, 28 sts
Row 58: TKS in ea of the next 17, 24 sts. TKS dec over the next 2 sts. TKS in the final st. RP – 20, 27 sts
Row 59: TKS in ea of the next 16, 23 sts. TKS dec over the next 2 sts. TKS in the final st. RP – 19, 26 sts
XL stop here, resume at “All Sizes”
2XL Only
Row 60: TKS in ea of the next 22 sts. TKS dec over the next 2 sts. TKS in the final st. RP – 25 sts
Row 61: TKs in ea of the next 21 sts. TKS dec over the next 2 sts. TKS in the final st. RP – 24 sts
Row 62: TKs in ea of the next 20 sts. TKS dec over the next 2 sts. TKS in the final st. RP – 23 sts
Row 63: TKS in ea of the next 19 sts. TKS dec over the next 2 sts. TKS in the final st. RP – 22 sts
Row 64: TKS in ea of the next 18 sts. TKS dec over the next 2 sts. TKS in the final st. RP – 21 sts
Row 65: TKS in ea of the next 17 sts. TKS dec over the next 2 sts. TKS in the final st. RP – 20 sts
Row 66: TKS in ea of the next 16 sts. TKS dec over the next 2 sts. TKS in the final st. RP – 19 sts
All Sizes:
Row 60, 67: TKS dec over the next 2 sts. TKS in ea of the next 13 sts. TKS dec over the next 2 sts. TKS in the final st. RP. – 17 sts
Row 61, 68: TKS dec over the next 2 sts. TKS in ea of the next 11 sts. TKS dec over the next 2 sts. TKS in the final st. RP. – 15 sts
Row 62, 69: TKS dec over the next 2 sts. TKS in ea of the next 9 sts. TKS dec over the next 2 sts. TKS in the final st. RP. – 13 sts
Row 63, 70: TKS dec over the next 2 sts. TKS in ea of the next 7 sts. TKS dec over the next 2 sts. TKS in the final st. RP. – 11 sts
Row 64, 71: TKS dec over the next 2 sts. TKS in ea of the next 5 sts. TKS dec over the next 2 sts. TKS in the final st. RP. – 9 sts
Row 65, 72: TKS dec over the next 2 sts. TKS in ea of the next 3 sts. TKS dec over the next 2 sts. TKS in the final st. RP. – 7 sts
Row 66, 73: TKS dec over the next 2 sts. TKS in the next st. TKS dec over the next 2 sts. TKS in the final st. RP. – 5 sts
Cut yarn and tie off.
Front Panel – Left:
With 6.50 mm Tunisian Hook, Ch 52, 59.
Row 1: Pick up a st in the 2nd ch from the hook and in the next 50, 57 sts. Return pass (RP). – 52, 59 stitches
Row 2: TKS in ea st across the row. RP. – 52, 59 sts
Rows 3 – 26: Rpt Row 2.
To increase length of the front & back panels, add more rows here.
Row 27: TKS dec over the next 2 sts. TKS in ea of the next 49, 56 sts. RP – 51, 58 sts.
Row 28: TKS dec over the next 2 sts. TKS in ea of the next 48, 55 sts. RP – 50, 57 sts.
Row 29: TKS dec over the next 2 sts. TKS in ea of the next 47, 54 sts. RP – 49, 56 sts.
Row 30: TKS dec over the next 2 sts. TKS in ea of the next 46, 53 sts. RP – 48, 55 sts.
Row 31: TKS dec over the next 2 sts. TKS in ea of the next 45, 52 sts. RP – 47, 54 sts.
Row 32: TKS dec over the next 2 sts. TKS in ea of the next 44, 51 sts. RP – 46, 53 sts.
Row 33: TKS dec over the next 2 sts. TKS in ea of the next 43, 50 sts. RP – 45, 52 sts.
Row 34: TKS dec over the next 2 sts. TKS in ea of the next 42, 49 sts. RP – 44, 51 sts.
Row 35: TKS dec over the next 2 sts. TKS in ea of the next 41, 48 sts. RP – 43, 50 sts.
Row 36: TKS dec over the next 2 sts. TKS in ea of the next 40, 47 sts. RP – 42, 49 sts.
Row 37: TKS dec over the next 2 sts. TKS in ea of the next 39, 46 sts. RP – 41, 48 sts.
Row 38: TKS dec over the next 2 sts. TKS in ea of the next 38, 45 sts. RP – 40, 47 sts.
Row 39: TKS dec over the next 2 sts. TKS in ea of the next 37, 44 sts. RP. – 39, 46 sts
Row 40: TKS dec over the next 2 sts. TKS in ea of the next 36, 43 sts. RP. – 38, 45 sts
Row 41: TKS dec over the next 2 sts. TKS in ea of the next 35, 42 sts. RP. – 37, 44 sts
Row 42: TKS dec over the next 2 sts. TKS in ea of the next 34, 41 sts. RP. – 36, 43 sts
Row 43: TKS dec over the next 2 sts. TKS in ea of the next 33, 40 sts. RP. – 35, 42 sts
Row 44: TKS dec over the next 2 sts. TKS in ea of the next 32, 39 sts. RP. – 34, 41 sts
Row 45: TKS dec over the next 2 sts. TKS in ea of the next 31, 38 sts. RP. – 33, 40 sts
Row 46: TKS dec over the next 2 sts. TKS in ea of the next 30, 37 sts. RP. – 32, 39 sts
Row 47: TKS dec over the next 2 sts. TKS in ea of the next 29, 36 sts. RP. – 31, 38 sts
Row 48: TKS dec over the next 2 sts. TKS in ea of the next 28, 35 sts. RP. – 30, 37 sts
Row 49: TKS dec over the next 2 sts. TKS in ea of the next 27, 34 sts. RP. – 29, 36 sts
Row 50: TKS dec over the next 2 sts. TKS in ea of the next 26, 33 sts. RP. – 28, 35 sts
Row 51: TKS dec over the next 2 sts. TKS in ea of the next 25, 32 sts. RP. – 27, 34 sts
Row 52: TKS dec over the next 2 sts. TKS in ea of the next 24, 31 sts. RP. – 26, 33 sts
Row 53: TKS dec over the next 2 sts. TKS in ea of the next 23, 30 sts. RP – 25, 32 sts
Row 54: TKS dec over the next 2 sts. TKS in ea of the next 22, 29 sts. RP – 24, 31 sts
Row 55: TKS dec over the next 2 sts. TKS in ea of the next 21, 28 sts. RP – 23, 30 sts
Row 56: TKS dec over the next 2 sts. TKS in ea of the next 20, 27 sts. RP – 22, 29 sts
Row 57: TKS dec over the next 2 sts. TKS in ea of the next 19, 26 sts. RP – 21, 28 sts
Row 58: TKS dec over the next 2 sts. TKS in ea of the next 18, 25 sts. RP – 20, 27 sts
Row 59: TKS dec over the next 2 sts. TKS in ea of the next 17, 24 sts. RP – 19, 26 sts
X-Larges stop here and resume at “All Sizes”
2X-Large Only
Row 60: TKS dec over the next 2 sts. TKS in ea of the next 23 sts. RP – 25 sts
Row 61: TKS dec over the next 2 sts. TKS in ea of the next 22 sts. RP – 24 sts
Row 62: TKS dec over the next 2 sts. TKS in ea of the next 21 sts. RP – 23 sts
Row 63: TKS dec over the next 2 sts. TKS in ea of the next 20 sts. RP – 22 sts
Row 64: TKS dec over the next 2 sts. TKS in ea of the next 19 sts. RP – 21 sts
Row 65: TKS dec over the next 2 sts. TKS in ea of the next 18 sts. RP – 20 sts
Row 66: TKS dec over the next 2 sts. TKS in ea of the next 17 sts. RP – 19 sts
All Sizes:
Row 60, 67: TKS dec over the next 2 sts. TKS in ea of the next 13 sts. Dec over the next 2 sts. TKS in the final st. RP. – 17 sts
Row 61, 68: TKS dec over the next 2 sts. TKs in ea of the next 11 sts. Dec over the next 2 sts. TKS in the final st. RP. – 15 sts
Row 62, 69: TKS dec over the next 2 sts. TKS in ea of the next 9 sts. Dec over the next 2 sts. TKS in the final st. RP. – 13 sts
Row 63, 70: TKS dec over the next 2 sts. TKS in ea of the next 7 sts. Dec over the next 2 sts. TKS in the final st. RP. – 11 sts
Row 64, 71: TKS dec over the next 2 sts. TKS in ea of the next 5 sts. Dec over the next 2 sts. TKS in the final st. RP. – 9 sts
Row 65, 72: TKS dec over the next 2 sts. TKS in ea of the next 3 sts. Dec over the next 2 sts. TKS in the final st. RP. – 7 sts
Row 66, 73: TKS dec over the next 2 sts. TKS in ea of the next st. Dec over the next 2 sts. TKS in the final st. RP. – 5 sts
Cut yarn and tie off.
Seaming the Back & Front Panels and Adding the Skirt
Using a tapestry needle and a length of yarn, whip stitch the sides of the panels together so that the long angles face each other. Stitch together the straight sides, but not the angles. Once the bodice is sewn together, line the flat bottom up with the waist of the skirt and attach using a 5.50 mm crochet hook and a ball of yarn by working a slip stitch through both pieces – you may also use a whip stitch seam here, but I prefer the slip stitch seam at the waist because it’s sturdier.


SLEEVE (Make 2):

The sleeves for all sizes begin with a 16-chain length, then work a portion of increases creating a slant that lines up with the slanted edge of the bodice. The sleeve then works decreases to size down for the main part of the arm (worked evenly), then increases again for the flared sleeve.
The former design placed the decrease portion at the ends of the rows, but the new 2.0 version is written so that the decreases are placed centrally, in the middle of the row. This allows the fabric to slant downward to follow the natural line of the shoulder. If you prefer working the old style, simply place the decreases at the ends of the rows instead 😊

Sleeve size small (old style decreases pictured)

Sleeve size large, new style decreases

Sleeve size small, with the new style of decreasing (above and below)

Ch 16.
Row 1: Pick up a lp in the 2nd ch from the hk and in ea of the next 14 ch sts. RP. – 16 sts
Row 2: TKS in the next st, TKS inc in the next sp. TKS in the next 12 sts, TKS inc in the next sp. TKS in the final 2 sts. RP. – 18 sts
Row 3: TKS in the next st, TKS inc in the next sp. TKS in the next 14 sts, TKS inc in the next sp. TKS in the final 2 sts. RP. – 20 sts
Row 4: TKS in the next st, TKS inc in the next sp. TKS in the next 16 sts, TKS inc in the next sp. TKS in the final 2 sts. RP. – 22 sts
Row 5: TKS in the next st, TKS inc in the next sp. TKS in the next 18 sts, TKS inc in the next sp. TKS in the final 2 sts. RP. – 24 sts
Row 6: TKS in the next st, TKS inc in the next sp. TKS in the next 20 sts, TKS inc in the next sp. TKS in the final 2 sts. RP. – 26 sts
Row 7: TKS in the next st, TKS inc in the next sp. TKS in the next 22 sts, TKS inc in the next sp. TKS in the final 2 sts. RP. – 28 sts
Row 8: TKS in the next st, TKS inc in the next sp. TKS in the next 24 sts, TKS inc in the next sp. TKS in the final 2 sts. RP. – 30 sts
Row 9: TKS in the next st, TKS inc in the next sp. TKS in the next 26 sts, TKS inc in the next sp. TKS in the final 2 sts. RP. – 32 sts
Row 10: TKS in the next st, TKS inc in the next sp. TKS in the next 28 sts, TKS inc in the next sp. TKS in the final 2 sts. RP. – 34 sts
Row 11: TKS in the next st, TKS inc in the next sp. TKS in the next 30 sts, TKS inc in the next sp. TKS in the final 2 sts. RP. – 36 sts
Row 12: TKS in the next st, TKS inc in the next sp. TKS in the next 32 sts, TKS inc in the next sp. TKS in the final 2 sts. RP. – 38 sts
Row 13: TKS in the next st, TKS inc in the next sp. TKS in the next 34 sts, TKS inc in the next sp. TKS in the final 2 sts. RP. – 40 sts
Row 14: TKS in the next st, TKS inc in the next sp. TKS in the next 36 sts, TKS inc in the next sp. TKS in the final 2 sts. RP. – 42 sts
Row 15: TKS in the next st, TKS inc in the next sp. TKS in the next 38 sts, TKS inc in the next sp. TKS in the final 2 sts. RP. – 44 sts
Row 16: TKS in the next st, TKS inc in the next sp. TKS in the next 40 sts, TKS inc in the next sp. TKS in the final 2 sts. RP. – 46 sts
Row 17: TKS in the next st, TKS inc in the next sp. TKS in the next 42 sts, TKS inc in the next sp. TKS in the final 2 sts. RP. – 48 sts
Row 18: TKS in the next st, TKS inc in the next sp. TKS in the next 44 sts, TKS inc in the next sp. TKS in the final 2 sts. RP. – 50 sts
Row 19: TKS in the next st, TKS inc in the next sp. TKS in the next 46 sts, TKS inc in the next sp. TKS in the final 2 sts. RP. – 52 sts
Row 20: TKS in the next st, TKS inc in the next sp. TKS in the next 48 sts, TKS inc in the next sp. TKS in the final 2 sts. RP. – 54 sts
Row 21: TKS in the next st, TKS inc in the next sp. TKS in the next 50 sts, TKS inc in the next sp. TKS in the final 2 sts. RP. – 56 sts
Row 22: TKS in the next st, TKS inc in the next sp. TKS in the next 52 sts, TKS inc in the next sp. TKS in the final 2 sts. RP. – 58 sts
Row 23: TKS in the next st, TKS inc in the next sp. TKS in the next 54 sts, TKS inc in the next sp. TKS in the final 2 sts. RP. – 60 sts
Row 24: TKS in the next st, TKS inc in the next sp. TKS in the next 56 sts, TKS inc in the next sp. TKS in the final 2 sts. RP. – 62 sts
Row 25: TKS in the next st, TKS inc in the next sp. TKS in the next 58 sts, TKS inc in the next sp. TKS in the final 2 sts. RP. – 64 sts
Row 26: TKS in ea st across. RP. – 64 sts
Row 27: TKS in the next st, TKS inc in the next sp. TKS in the next 60 sts, TKS inc in the next sp. TKS in the final 2 sts. RP. – 66 sts
Row 28: TKS in ea st across. RP – 66 sts
Row 29: TKS in the next st, TKS inc in the next sp. TKS in the next 62 sts, TKS inc in the next sp. TKS in the final 2 sts. RP. – 68 sts.
Row 30: TKS in ea st across. RP. – 68 sts
Row 31: TKS in the next st, TKS inc in the next sp. TKS in the next 64 sts, TKS inc in the next sp. TKS in the final 2 sts. RP. – 70 sts
Row 32: TKS in ea st across. RP – 70 sts
Row 33: TKS in the next st, TKS inc in the next sp. TKS in the next 66 sts, TKS inc in the next sp. TKS in the final 2 sts. RP. – 72 sts
Row 34: TKS in ea st across. RP – 72 sts
Row 35: TKS in the next st, TKS inc in the next sp. TKS in the next 68 sts, TKS inc in the next sp. TKS in the final 2 sts. RP. – 74 sts
Row 36: TKS in ea st across. RP – 74 sts
Row 37: TKS in the next st, TKS inc in the next sp. TKS in the next 70 sts, TKS inc in the next sp. TKS in the final 2 sts. RP. – 76 sts
Row 38: TKS in ea st across. RP. – 76 sts
Row 39: TKS in the next st, TKS inc in the next sp. TKS in the next 72 sts, TKS inc in the next sp. TKS in the final 2 sts. RP. – 78 sts
Row 40: TKS in ea st across. RP. – 78 sts
X-Larges Stop here, resume at All Sizes
2X-Larges Only
Row 41: TKS in the next st, TKS inc in the next sp. TKS in the next 74 sts, TKS inc in the next sp. TKS in the final 2 sts. RP. – 80 sts
Row 42: TKS in ea st across. RP. – 80 sts
Row 43: TKS in the next st, TKS inc in the next sp. TKS in the next 76 sts, TKS inc in the next sp. TKS in the final 2 sts. RP. – 82 sts
Row 44: TKS in ea st across. RP. – 82 sts
Row 45: TKS in the next st, TKS inc in the next sp. TKS in the next 78 sts, TKS inc in the next sp. TKS in the final 2 sts. RP. – 84 sts
Row 46: TKS in ea st across. RP. – 84 sts
Row 47: TKS in the next st, TKS inc in the next sp. TKS in the next 80 sts, TKS inc in the next sp. TKS in the final 2 sts. RP. – 86 sts.
All Sizes:
Row 41, 48: TKS in ea of the next 29, 33 sts. TKS dec over the next 2 sts. TKS in the next 14 sts. TKS dec over the next 2 sts. TKS in ea of the next 30, 34 sts. RP. – 76, 84 sts
Row 42, 49: TKS in ea of the next 28, 32 sts. TKS dec over the next 2 sts. TKS in the next 14 sts. TKS dec over the next 2 sts. TKS in the next 29, 33 sts. RP. – 74, 82 sts
Row 43, 50: TKS in ea of the next 27, 31 sts. TKS dec over the next 2 sts. TKS in the next 14 sts. TKS dec over the next 2 sts. TKS in the next 28, 32 sts. RP. – 72, 80 sts
Row 44, 51: TKS in ea of the next 26, 30 sts. TKS dec over the next 2 sts. TKS in the next 14 sts. TKS dec over the next 2 sts. TKS in the next 27, 31 sts. RP. – 70, 78 sts
Row 45, 52: TKS in ea of the next 25, 29 sts. TKS dec over the next 2 sts. TKS in the next 14 sts. TKS dec over the next 2 sts. TKS in the next 26, 30 sts. RP. – 68, 76 sts
Row 46, 53: TKS in ea of the next 24, 28 sts. TKS dec over the next 2 sts. TKS in the next 14 sts. TKS dec over the next 2 sts. TKS in the next 25, 29 sts. RP. – 66, 74 sts
Rows 47-87, 54 – 94: TKS in ea st across. RP. – 66, 74 sts
Row 88, 95: TKS in the next 2 sts, TKS inc in the next sp. TKS in ea of the next 60, 68 sts. TKS inc in the next sp. TKS in ea of the next 3 sts. RP. – 68, 76 sts
Row 89, 96: TKS in ea st across. RP. – 68, 76 sts
Row 90, 97: TKS in the next 2 sts, TKS inc in the next sp. TKS in ea of the next 62, 70 sts. TKS inc in the next sp. TKS in ea of the next 3 sts. RP. – 70, 78 sts
Row 91, 98: TKS in ea st across. RP. – 70, 78 sts
Row 92, 99: TKS in the next 2 sts, TKS inc in the next sp. TKS in ea of the next 64, 72 sts. TKS inc in the next sp. TKS in ea of the next 3 sts. RP. – 72, 80 sts
Row 93, 100: TKS in ea st across. RP. – 72, 80 sts
Row 94, 101: TKS in the next 2 sts, TKS inc in the next sp. TKS in ea of the next 66, 74 sts. TKS inc in the next sp. TKS in ea of the next 3 sts. RP. – 74, 82 sts
Row 95, 102: TKS in ea st across. RP. – 74, 82 sts
Row 96, 103: TKS in the next 2 sts, TKS inc in the next sp. TKS in ea of the next 68, 76 sts. TKS inc in the next sp. TKS in ea of the next 3 sts. RP. – 76, 84 sts
Row 97, 104: TKS in ea st across. RP. – 76, 84 sts
Row 98, 105: TKS in the next 2 sts, TKS inc in the next sp. TKS in ea of the next 70, 78 sts. TKS inc in the next sp. TKS in ea of the next 3 sts. RP. – 78, 86 sts
Row 99, 106: TKS in ea st across. RP. – 78, 86 sts
Row 100, 107: TKS in the next 2 sts, TKS inc in the next sp. TKS in ea of the next 72, 80 sts. TKS inc in the next sp. TKS in ea of the next 3 sts. RP. – 80, 88 sts
Row 101, 108: TKS in ea st across. RP. – 80, 88 sts
Row 102, 109: TKS in the next 2 sts, TKS inc in the next sp. TKS in ea of the next 74, 82 sts. TKS inc in the next sp. TKS in ea of the next 3 sts. RP. – 82, 90 sts
Row 103, 110: TKS in ea st across. RP. – 82, 90 sts
Row 104, 111: TKS in the next 2 sts, TKS inc in the next sp. TKS in ea of the next 76, 84 sts. TKS inc in the next sp. TKS in ea of the next 3 sts. RP. – 84, 92 sts
Row 105, 112: TKS in ea st across. RP. – 84, 92 sts
Row 106, 113: TKS in the next 2 sts, TKS inc in the next sp. TKS in ea of the next 78, 86 sts. TKS inc in the next sp. TKS in ea of the next 3 sts. RP. – 86, 94 sts
Row 107, 114: TKS in ea st across. RP. – 86, 94 sts
Row 108, 115: TKS in the next 2 sts, TKS inc in the next sp. TKS in ea of the next 80, 88 sts. TKS inc in the next sp. TKS in ea of the next 3 sts. RP. – 88, 96 sts
Row 109, 116: TKS in ea st across. RP. – 88, 96 sts
Row 110, 117: TKS in the next 2 sts, TKS inc in the next sp. TKS in ea of the next 82, 90 sts. TKS inc in the next sp. TKS in ea of the next 3 sts. RP. – 90, 98 sts
Row 111, 118: TKS in ea st across. RP. – 90, 98 sts
Row 112, 119: TKS in the next 2 sts, TKS inc in the next sp. TKS in ea of the next 84, 92 sts. TKS inc in the next sp. TKS in ea of the next 3 sts. RP. – 92, 100 sts
Row 113, 120: TKS in ea st across. RP. – 92, 100 sts
Row 114, 121: TKS in the next 2 sts, TKS inc in the next sp. TKS in ea of the next 86, 94 sts. TKS inc in the next sp. TKS in ea of the next 3 sts. RP. – 94, 102 sts
Row 115, 122: TKS in ea st across. RP. – 94, 102 sts
Row 116, 123: TKS in the next 2 sts, TKS inc in the next sp. TKS in ea of the next 88, 96 sts. TKS inc in the next sp. TKS in ea of the next 3 sts. RP. – 96, 104 sts
Row 117, 124: TKS in ea st across. RP. – 96, 104 sts
Row 118, 125: TKS in the next 2 sts, TKS inc in the next sp. TKS in ea of the next 90, 98 sts. TKS inc in the next sp. TKS in ea of the next 3 sts. RP. – 98, 106 sts
Row 119, 126: TKS in ea st across. RP. – 98, 106 sts
Row 120, 127: TKS in the next 2 sts, TKS inc in the next sp. TKS in ea of the next 92, 100 sts. TKS inc in the next sp. TKS in ea of the next 3 sts. RP. – 100, 108 sts
Row 121, 128: TKS in ea st across. RP. – 100, 108 sts
Row 122, 129: TKS in the next 2 sts, TKS inc in the next sp. TKS in ea of the next 94, 102 sts. TKS inc in the next sp. TKS in ea of the next 3 sts. RP. – 102, 110 sts
Row 123, 130: TKS in ea st across. RP. – 102, 110 sts
Row 124, 131: TKS in the next 2 sts, TKS inc in the next sp. TKS in ea of the next 96, 104 sts. TKS inc in the next sp. TKS in ea of the next 3 sts. RP. – 104, 112 sts
Row 125, 132: TKS in ea st across. RP. – 104, 112 sts
Cut yarn and tie off.
Seaming the Sleeve:
Fold the sleeve in half down the length of the piece. Seam together using a whip stitch, starting at the flare of the sleeve and moving toward the shoulder. At the underarm of the sleeve, leave 44, 51 rows unseamed on either side. Match the remaining opening to the front and back panel sides, using the top 4 rows to cap the tops of the panels, overlapping the tops of the front & back panels by 4 stitches.

Sleeve seaming size small (old style sleeve pictured)


Sleeve fitting size Large, new style sleeve pictured. 4 of the 5 stitches at the top of the front panel are overlapped by the top 4 rows of the sleeve.
Seam the sleeve using a whip stitch around the front and back panels, using a one-to-one row/stitch ratio.

Close-up of the sleeve fitting.
Sleeve Border

With 3.50 mm hook, attach yarn at the seam where the sleeve is sewn together.
Row 1: Ch 3 (does not count as first st), LDC 3 times in the same stitch, inserting hook as if to TKS. LDC in ea stitch around the sleeve. Join with a slip stitch in the top of the first dc.
Row 2: Ch 3 (does not count) LDC in the first stitch and 3 times in the next st. LDC in ea stitch around. Join with a slip stitch.
Row 3: Ch 3 (does not count), LDC in ea of the next 2 stitches. LDC 3 times in the next st. LDC in ea stitch around. Join with a slip stitch.
Cut yarn and tie off. You can make the sleeves longer here by adding extra border rounds of LDC.

Close-up of the sleeve border joining seam.
HOOD:
The hood is worked as a separate piece consisting of one large triangle, folded in half when complete. This hood is has a very long point – it’s a lot of hood! If you prefer a slightly shorter hood, seed “Half Hood” instructions below the regular hood instructions. Either size hood can be made and attached to any size Elf Coat.
Working a Shortened Hood (Formerly the Half Hood): This is the alternative to the full size hood design which conserves a little yarn. Like the full hood, it is worked as a separate piece consisting of one large triangle, folded in half when complete and seamed. To shorten it somewhat, I removed one of the two non-increase rows after each increase row in the first part of the design. You can use either hood interchangeably when creating your coat, though, no matter which size you are making! To work the Shortened Hood, skip one of the two non-increase rows between each increase row for the first 76 rows written. Then, resume the Hood pattern as normal at Row 77.

Shortened Hood, above

Full Hood, above
Ch 3.
Row 1: Draw up a loop from the back of each of the next 2 chain stitches. RP. – 3 sts
Row 2: TKS inc in the first space. TKS in the next st. TKS inc in the next space. TKS in the final st. RP. – 5 sts
Rows 3-4: TKS in ea st across. RP. – 5 sts
Row 5: TKS inc in the first space. TKS in the next
3 sts. TKS inc in the next sp. TKS in the final st. RP. – 7 sts
Rows 6-7: TKS in ea st across. RP. – 7 sts
Row 8: TKS inc in the first sp. TKS in the next 5 sts. TKS inc in the next sp. TKS in the final st. RP. – 9 sts.
Rows 9-10: TKS in ea st across. RP. – 9 sts
Row 11: TKS inc in the first sp. TKS in the next 7 sts. TKS inc in the next sp. TKS in the final st. RP. – 11 sts
Row 12-13: TKS in ea st across. RP. – 11 sts
Row 14: TKS inc in the first sp. TKS in the next 9 sts. TKS inc in the next sp. TKS in the final st. RP. – 13 sts
Rows 15-16: TKS in ea st across. RP. – 13 sts
Row 17: TKS inc in the first sp. TKS in the next 11 sts. TKS inc in the next sp. TKS in the final st. RP. – 15 sts
Rows 18-19: TKS in ea st across. RP. – 15 sts
Row 20: TKS inc in the first sp. TKS in the next 13 sts. TKS inc in the next sp. TKS in the final st. RP. – 17 sts
Row 21-22: TKS in ea st across. RP. – 17 sts
Row 23: TKS inc in the first sp. TKS in the next 15 sts. TKS inc in the next sp. TKS in the final st. RP. – 19 sts
Rows 24-25: TKS in ea st across. RP. – 19 sts
Row 26: TKS inc in the first sp. TKS in the next 17 sts. TKS inc in the next sp. TKS in the final st. RP. – 21 sts
Rows 27-28: TKS in ea st across. RP. – 21 sts
Row 29: TKS inc in the first sp. TKS in the next 19 sts. TKS inc in the next sp. TKS in the final st. RP. – 23 sts
Rows 30-31: TKS in ea st across. RP. – 23 sts
Row 32: TKS inc in the first sp. TKS in the next 21 sts. TKS inc in the next sp. TKS in the final st. RP. – 25 sts
Rows 33-34: TKS in ea st across. RP. – 25 sts
Row 35: TKS inc in the first sp. TKS in the next 23 sts. TKS inc in the next sp. TKS in the final st. RP. – 27 sts
Rows 36-37: TKS in ea st across. RP. – 27 sts
Row 38: TKS inc in the first sp. TKS in the next 25 sts. TKS inc in the next sp. TKS in the final st. RP. – 29 sts
Rows 39-40: TKS in ea st across. RP. – 29 sts
Row 41: TKS inc in the first sp. TKS in the next 27 sts. TKS inc in the next sp. TKS in the final st. RP. – 31 sts
Rows 42-43: TKS in ea st across. RP. – 31 sts
Row 44: TKS inc in the first sp. TKS in the next 29 sts. TKS inc in the next sp. TKS in the final st. RP. – 33 sts
Row 45-46: TKS in ea st across. RP. – 33 sts
Row 47: TKS inc in the first sp. TKS in the next 31 sts. TKS inc in the next sp. TKS in the final st. RP. – 35 sts.
Rows 48-49: TKS in ea st across. RP. – 35 sts
Row 50: TKS inc in the first sp. TKS in the next 33 sts. TKS inc in the next sp. TKS in the final st. RP. – 37 sts.
Rows 51-52: TKS in ea st across. RP. – 37 sts
Row 53: TKS inc in the first sp. TKS in the next 35 sts. TKS inc in the next sp. TKS in the final st. RP. – 39 sts
Rows 54-55: TKS in ea st across. RP. – 39 sts
Row 56: TKS inc in the first sp. TKS in the next 37 sts. TKS inc in the next sp. TKS in the final st. RP. – 41 sts
Rows 57-58: TKS in ea st across. RP. – 41 sts
Row 59: TKS inc in the first sp. TKS in the next 39 sts. TKS inc in the next sp. TKS in the final st. RP. – 43 sts
Rows 60-61: TKS in ea st across. RP. – 43 sts
Row 62: TKS inc in the first sp. TKS in the next 41 sts. TKS inc in the next sp. TKS in the final st. RP. – 45 sts
Rows 63-64: TKS in ea st across. RP. – 45 sts
Row 65: TKS inc in the first sp. TKS in the next 43 sts. TKS inc in the next sp. TKS in the final st. RP. – 47 sts
Rows 66-67: TKS in ea st across. RP. – 47 sts
Row 68: TKS inc in the first sp. TKS in the next 45 sts. TKS inc in the next sp. TKS in the final st. RP. – 49 sts
Rows 69-70: TKS in ea st across. RP. – 49 sts
Row 71: TKS inc in the first sp. TKS in the next 47 sts. TKS inc in the next sp. TKS in the final st. RP. – 51 sts
Rows 72-73: TKS in ea st across. RP. – 51 sts
Row 74: TKS inc in the first sp. TKS in the next 49 sts. TKS inc in the next sp. TKS in the final st. RP. – 53 sts
Rows 75-76: TKS in ea st across. RP. – 53 sts.
Row 77: TKS inc in the first sp. TKS in ea of the next 12 sts. (TKS inc in the next sp. TKS in ea of the next 13 sts) 3 times. TKS inc in the next sp. TKS in the final st. RP. – 58 sts
Rows 78-79: TKS in ea st across. RP. – 58 sts
Row 80: TKS inc in the next sp. TKS in ea of the next 14 sts. (TKS inc in the next sp. TKS in ea of the next 14 sts) 3 times. TKS inc in the next sp. TKS in the final st. RP. – 63 sts
Rows 81-82: TKS in ea st across. RP. – 63 sts
Row 83: TKS inc in the next sp. (TKS in ea of the next 15 sts. TKS inc in the next sp) 4 times. TKS in ea of the next 2 sts. RP. – 68 sts
Rows 84-85: TKS in ea st across. RP. – 68 sts
Row 86: TKS in the next st. (TKS inc in the next sp. TKS in ea of the next 16 sts) 4 times. TKS inc in the next sp. TKS in ea of the next 2 sts. RP. – 73 sts
Rows 87-88: TKS in ea st across. RP. – 73 sts
Row 89: TKS in the next st. (TKS inc in the next sp. TKS in ea of the next 17 sts) 4 times. TKS inc in the next sp. TKS in the next 3 sts. RP. – 78 sts
Rows 90-91: TKS in ea st across. RP. – 78 sts
Row 92: TKS in ea of the next 2 sts. (TKS inc in the next sp. TKS in ea of the next 18 sts) 4 times. TKS inc in the next sp. TKS in the next 3 sts. RP. – 83 sts
Rows 93-94: TKS in ea st across. RP. – 83 sts
Row 95: TKS in ea of the next 2 sts. (TKS inc in the next sp. TKS in ea of the next 19 sts) 4 times. TKS inc in the next sp. TKS in ea of the next 4 sts. RP. – 88 sts
Rows 96-97: TKS in ea st across. RP. – 88 sts
Row 98: TKS in ea of the next 3 sts. (TKS inc in the next sp. TKS in ea of the next 20 sts) 4 times. TKS inc in the next sp. TKS in ea of the next 4 sts. RP. – 93 sts
Rows 99-100: TKS in ea st across. RP. – 93 sts
Row 101: TKS in ea of the next 3 sts. (TKS inc in the next sp. TKS in ea of the next 21 sts) 4 times. TKS inc in the next sp. TKS in ea of the next 5 sts. RP. – 98 sts
Rows 102-103: TKS in ea st across. RP. – 98 sts
Row 104: TKS in ea of the next 4 sts. (TKS inc in the next sp. TKS in ea of the next 22 sts) 4 times. TKS inc in the next sp. TKS in ea of the next 5 sts. RP. – 103 sts
Rows 105-106: TKS in ea st across. RP. – 103 sts
Row 107: TKS in ea of the next 4 sts. (TKS inc in the next sp. TKS in ea of the next 23 sts) 4 times. TKS inc in the next sp. TKS in ea of the next 6 sts. RP. – 108 sts
Rows 108-109: TKS in ea st across. RP. – 108 sts
Row 110: TKS in ea of the next 5 sts. (TKS inc in the next sp. TKS in ea of the next 24 sts) 4 times. TKS inc in the next sp. TKS in ea of the next 6 sts. RP. – 113 sts
Rows 111 – 112: TKS in ea st across. RP. – 113 sts
Row 113: TKS in ea of the next 5 sts. (TKS inc in the next sp. TKS in ea of the next 25 sts) 4 times. TKS inc in the next sp. TKS in ea of the next 7 sts. RP. – 118 sts
Rows 114 – 115: TKS in ea st across. RP. – 118 sts
Row 116: TKS in ea of the next 6 sts. (TKS inc in the next sp. TKS in ea of the next 26 sts) 4 times. TKS inc in the next sp. TKS in ea of the next 7 sts. RP. – 123
Rows 117 – 118: TKS in ea st across. RP. – 123 sts
Row 119: TKS in ea of the next 6 sts. (TKS inc in the next sp. TKS in ea of the next 27 sts) 4 times. TKS inc in the next sp. TKS in ea of the next 8 sts. RP. – 128 sts
Rows 120-121: TKS in ea st across. RP. – 128 sts
Row 122: TKS in ea of the next 7 sts. (TKS inc in the next sp. TKS in ea of the next 28 sts) 4 times. TKS inc in the next sp. TKS in ea of the next 8 sts. RP. – 133 sts
Rows 123-124: TKS in ea st across. RP. – 133 sts
Row 125: TKS in ea of the next 7 sts. (TKS inc in the next sp. TKS in ea of the next 29 sts) 4 times. TKS inc in the next sp. TKS in ea of the next 9 sts. RP. – 138 sts
Rows 126-127: TKS in ea st across. RP. – 138 sts
Row 128: TKS in ea of the next 8 sts. (TKS inc in the next sp. TKS in ea of the next 30 sts) 4 times. TKS inc in the next sp. TKS in ea of the next 9 sts. RP. – 143 sts
Rows 129-130: TKS in ea st across. RP. – 143 sts
Row 131: TKS in ea of the next 8 sts. (TKS inc in the next sp. TKS in ea of the next 31 sts) 4 times. TKS inc in the next sp. TKS in ea of the next 10 sts. RP. – 148 sts
Rows 132-133: TKS in ea st across. RP. – 148 sts
Row 134: TKS in ea of the next 9 sts. (TKS inc in the next sp. TKS in ea of the next 32 sts) 4 times. TKS inc in the next sp. TKS in ea of the next 10 sts. RP. – 153 sts
Rows 135 – 151: TKS in ea st across. RP. – 153 sts
Cut yarn and tie off.
Seaming the Hood
Fold the large triangle down the center length so that the right sides of the fabric are facing each other and the wrong sides are out.
Using stitch markers, count from the opening of the hood (the long side) 33 rows down on each side. Mark the 33rd row on each side.
With a tapestry needle and a length of yarn, make a whip stitch seam starting at the point of the hood and seaming toward the opening of the hood.
Seam the hood until you reach the rows marked with stitch markers. Cut yarn. Turn your hood inside out so that the right sides are facing out again. This leaves 33 rows left unseamed on either side.

Shortened Hood pictured above
How did I get the number of rows to leave unseamed? It’s (8+8) to account for the small angled part on each side of the front panel, plus (16+16) to cover the tops of the sleeves, then (25- 8 = 17) to cover the portion of the top of the back panel not already covered by the cap of the sleeves. This equals 65, but I rounded up to 66 to get an whole number when I halved it – so 33 rows left unseamed on either side of the hood.
The hood then is seamed to the collar of the garment (once all sleeves and bodice have been seamed) using a tapestry needle and a length of yarn. Whip stitch the hood, matching the points of the hood opening indicated by the red dots to the beginning of the collar on the front, also indicated by red dots.

Seam the hood around the collar opening, matching stitch for stitch.
Front Border and Closures
We’re almost done! Next up is to use four rows of LDC to add a border across the entire front opening, beginning with the hem, working up the opening of the garment, going around the edge of the hood, and working back down the other side of the front opening. After the third row, we’ll stop and mark the placement of the buttons. For traditional buttonholes, stop to mark the placement after the second row.

Using a 3.50 mm hook, join yarn in the side of the skirt border rows.
Ch 3.
Row 1: 2 LDC in the side of each LDC from the border rows (6 LDC if you did 3 border rows.) 1 LDC in the side of each row across the next wedge, waist band, and front panel. 1 LDC in ea st across the brim of the hood. 1 LDC in the side of each row across the front panel, waist band, and the next wedge. 2 LDC in the side of each LDC of the skirt border.
Row 2: Ch 3, turn. 1 LDC in ea LDC of Row 1. Traditional buttonholes, mark placement here.
Row 3: Ch 3, turn. 1 LDC in ea LDC of Row 2. Loop buttonholes, mark placement here.

Close-up of LDC border
Mark where your buttons will be on one side, and mark an equidistant space on the other side of the border for where you will place your loops or buttonholes. I began with one button/closure on the top and bottom edge of the waist band, then used this measurement (17 sts between each placement) to space the other buttons. I made five button placements total.

Once your button placements have been marked, begin the rest of the rows.
Row 4: Ch 3, turn. 1 LDC in ea st across until you reach a button/closure marker. If you are on the button side, keep working LDC’s. If you are on the closure side, there are two options: You can chain a couple stitches and skip over working a couple stitches, which creates a buttonhole within the band and a tighter closure. I opted to use a loop closure for the small, which leaves the front a little more open when buttoned.
If using a loop closure, chain a loop just big enough to fit the button through, then slip stitch in the same stitch. Continue working LDC’s across the band, stopping to work a chain loop at any point where a closure is marked.
If making traditional buttonholes, stop LDC and chain one before a marked stitch. Skip marked stitch and resume LDC until you reach the next marked stitch, repeat.
Cut yarn and tie off.


Stopping to chain a loop closure

Traditional buttonholes
After finishing the final border row, use a tapestry needle and a length of yarn to attach each button at the marked location on the opposite side of the closures.


