Fur Hats & Summer Stats

This summer is flying by, fueled by the need to commune and see my loved ones after the isolation and uncertainty of 2020. I keep in mind I’m lucky enough to have access to the vaccine, as there are many places that struggled to get their populations vaccinated and still so many people in danger of getting Covid 19 or the variant strains. As usual, gratitude is the name of the game.

Pictured above: the Yearling Headband spotted in natural habitat

So it’s been a busy season, and in addition to the full dance card I’ve managed a number of new designs and projects. This will be one of my “wrap-up and reflect” posts sharing my latest patterns, some new spins on old designs, and anything else that comes to mind 🙂

Faux Fur Hats

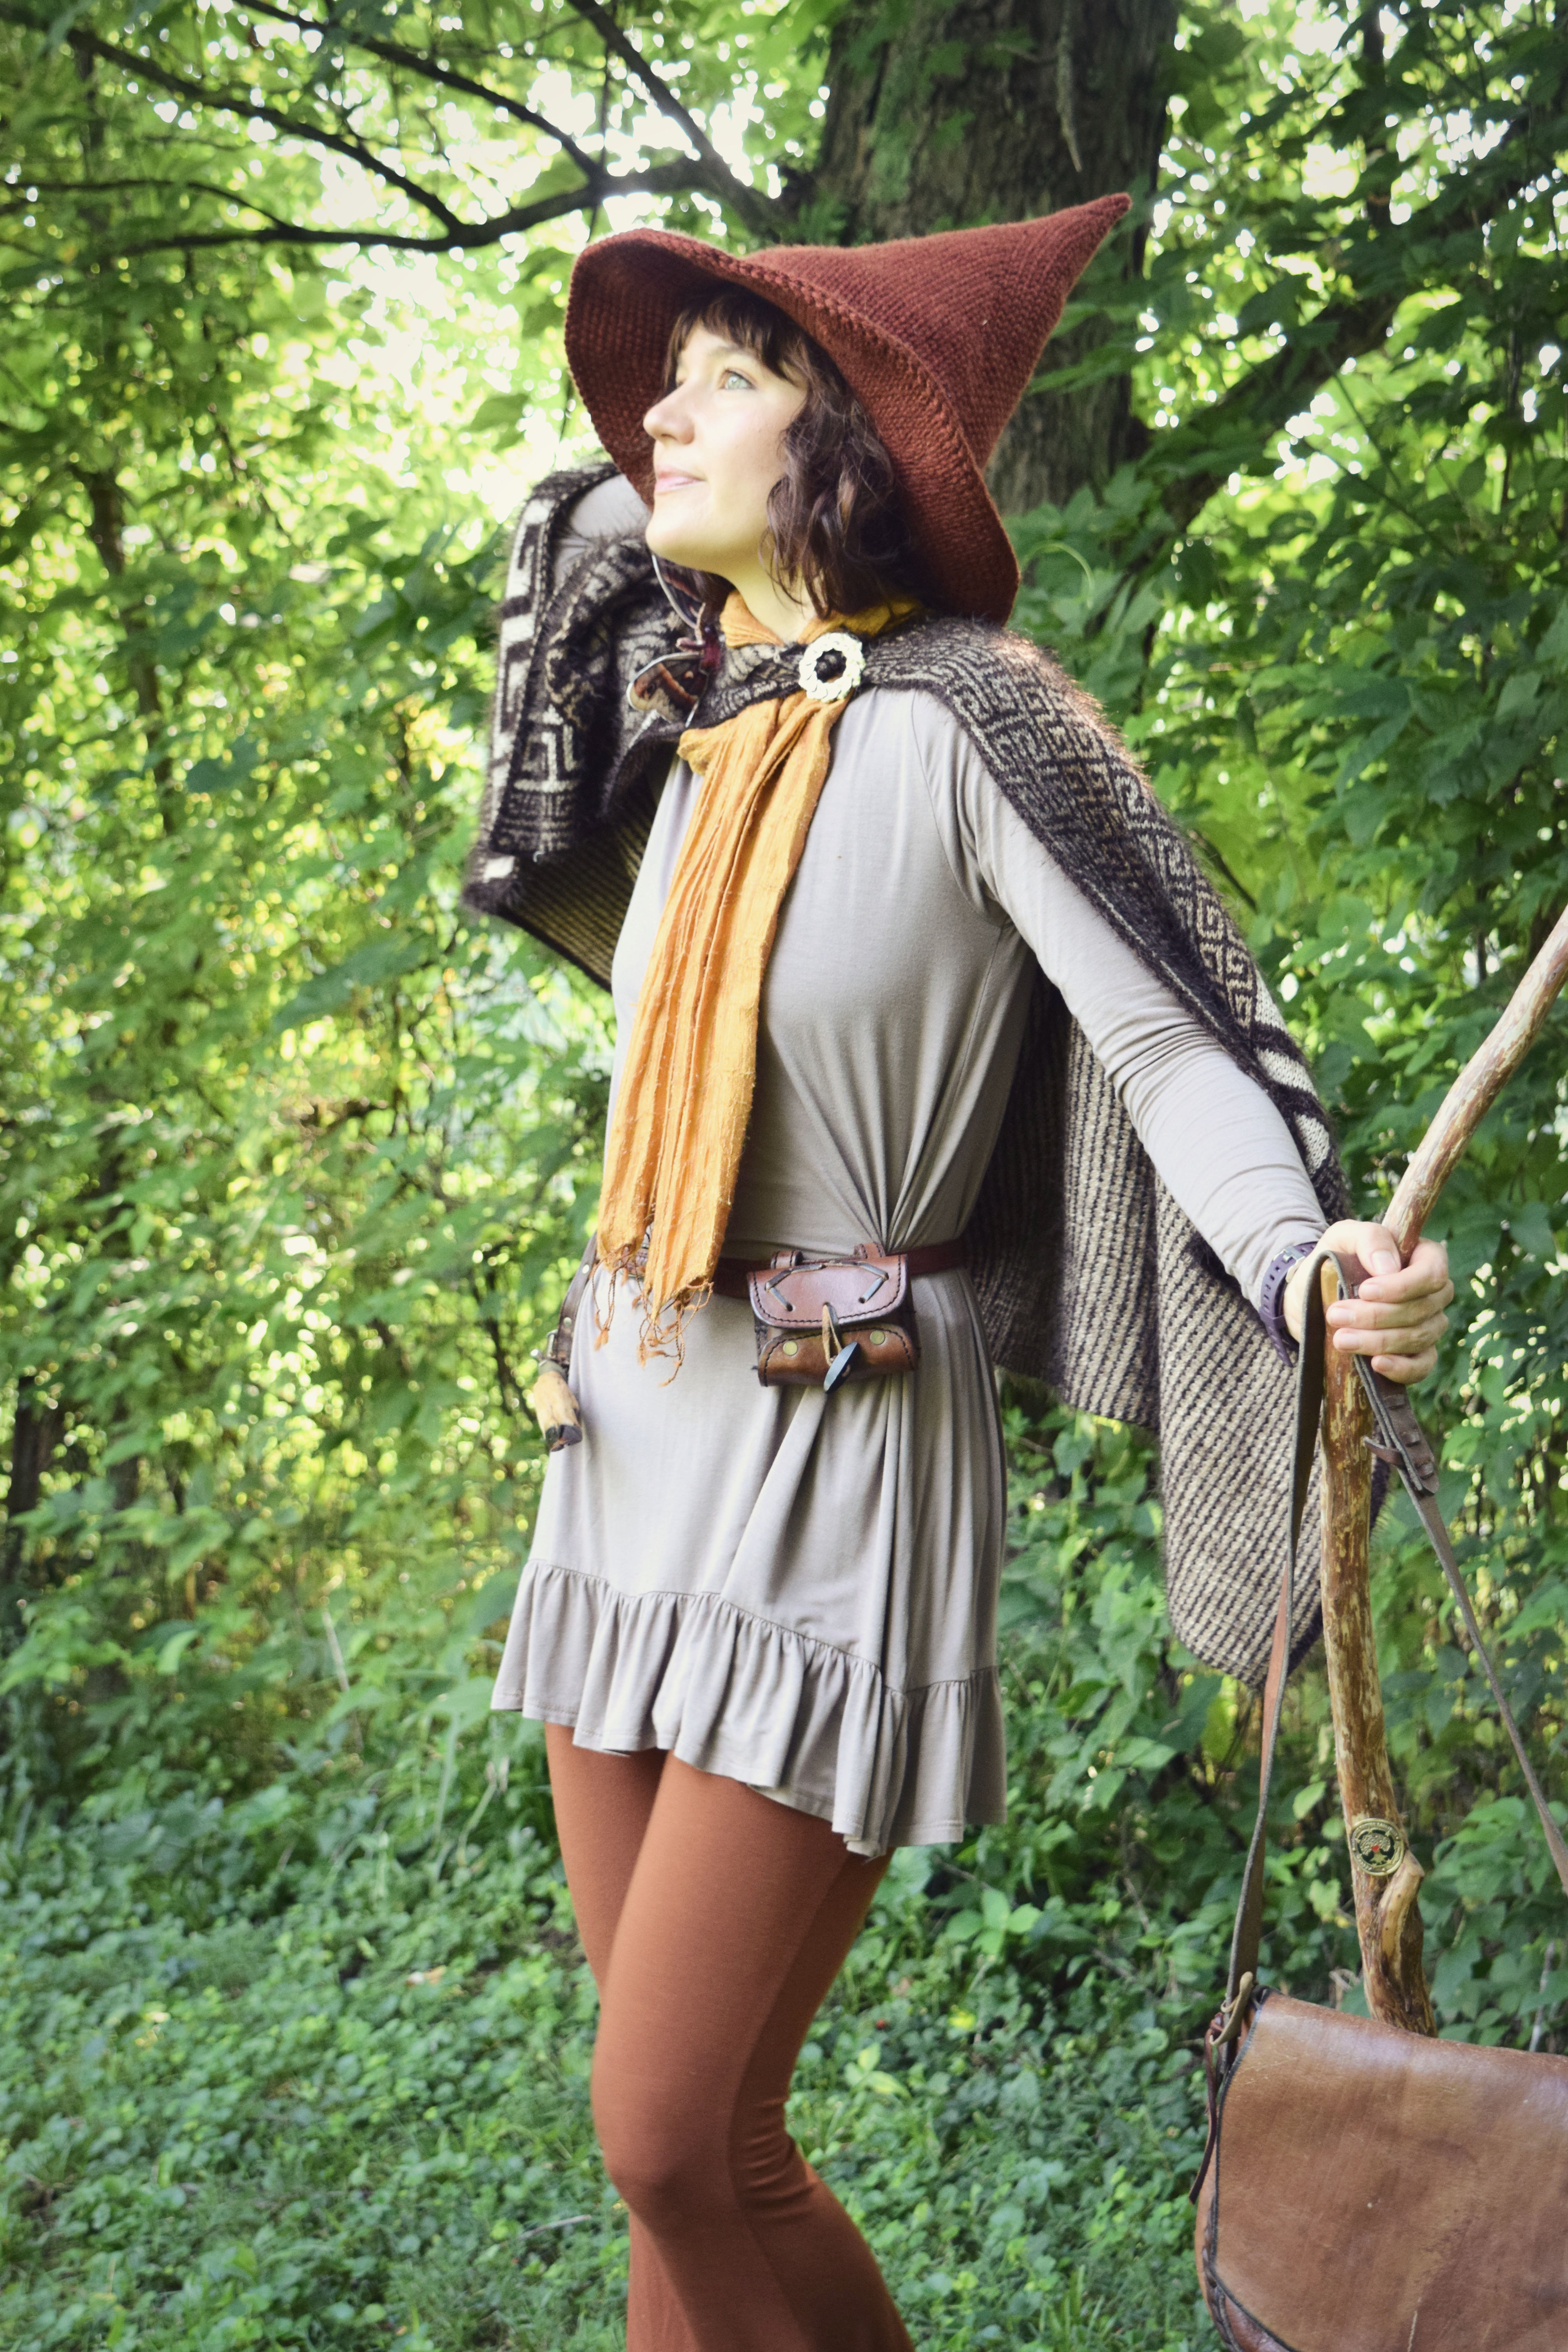
Having stashed plenty of the Lion Brand Go for Faux Thick & Quick yarn last winter, I decided to make some room on my yarn shelf by busting out two new Ushanka hats from my totally free Ushanka Hat & Muff pattern. I’ve been getting ideas from the interestingly styled images on my vintage fashion & mori kei Pinterest board, in which mountain girls sport colorful accessorized layers paired with fur hats and boots. It was a bit hot out for that sort of thing, but I did get creative with my styling and layers in order to show off these two new Ushankas!

The first is a traditional Ushanka, with the earflaps attaching to the sides of the hat with buttons instead of ties on top as with the original one I made. The big Jumbo yarn and the huge hook make these hats doable in just a fraction of a day!

The second faux fur hat I made, I modified the original crochet pattern just a little by adding an extra round of stitches on top (following the formula of increases to continue with the flat circle). I wanted a slightly bigger profile on this one, and a more rigid “turn” from the top of the hat to the sides. To accomplish this sharp top edge, I worked the first non-increase round in Back Post Double Crochet instead of regular double crochet, which helped the stitches turn inward more sharply.

I also left the earflaps off of this one to give it a more “military” and less of a “trapper” look.

Of course, I had to include some more layered accessories so this outfit included my Cottage Vest design which was published this year and my Ramblers’ Mitts too! Those super neat bug tights are from MyTightsShop on Etsy.

Velvet Bralettes

As you can see with the Ramblers’ Mitts above, I’ve really been enjoying the variety of “velvet” or chenille type yarns this year, and I knew I had to make the Basic Bralette design in that ultra-cushy soft texture too. It came out as luxe as I imagined in Bernat Baby Velvet, the smaller (#4 weight) yarn version of their popular #5 weight yarn.

I got some more of the same Baby Velvet to make another! I also used the regular Bernat Velvet in black to make a super special Basic Bralette – I wanted to test the capacity of the Basic Bralette (and it’s modifier, the Curvey Bralette) design to go up to bigger cup sizes and it worked out beautifully! My friend wears an H cup size bra and with some modifications (which have now been added into the written portion of the main pattern) it was no problem to make the design fit.

Unfortunately, due to the aforementioned busy-ness, I haven’t gotten to take pictures of her in it yet. Hopefully those are coming soon. I am so pleased with how it looks, especially since I get questions about making the Basic Bralette in larger sizes a lot and now I can answer them more thoroughly, having done it myself 🙂

Shown with this bralette, of course, is the Snapdragon Pixie Belt, which you can read more about by following the link 🙂

Cottagecore Girlfriend Dress

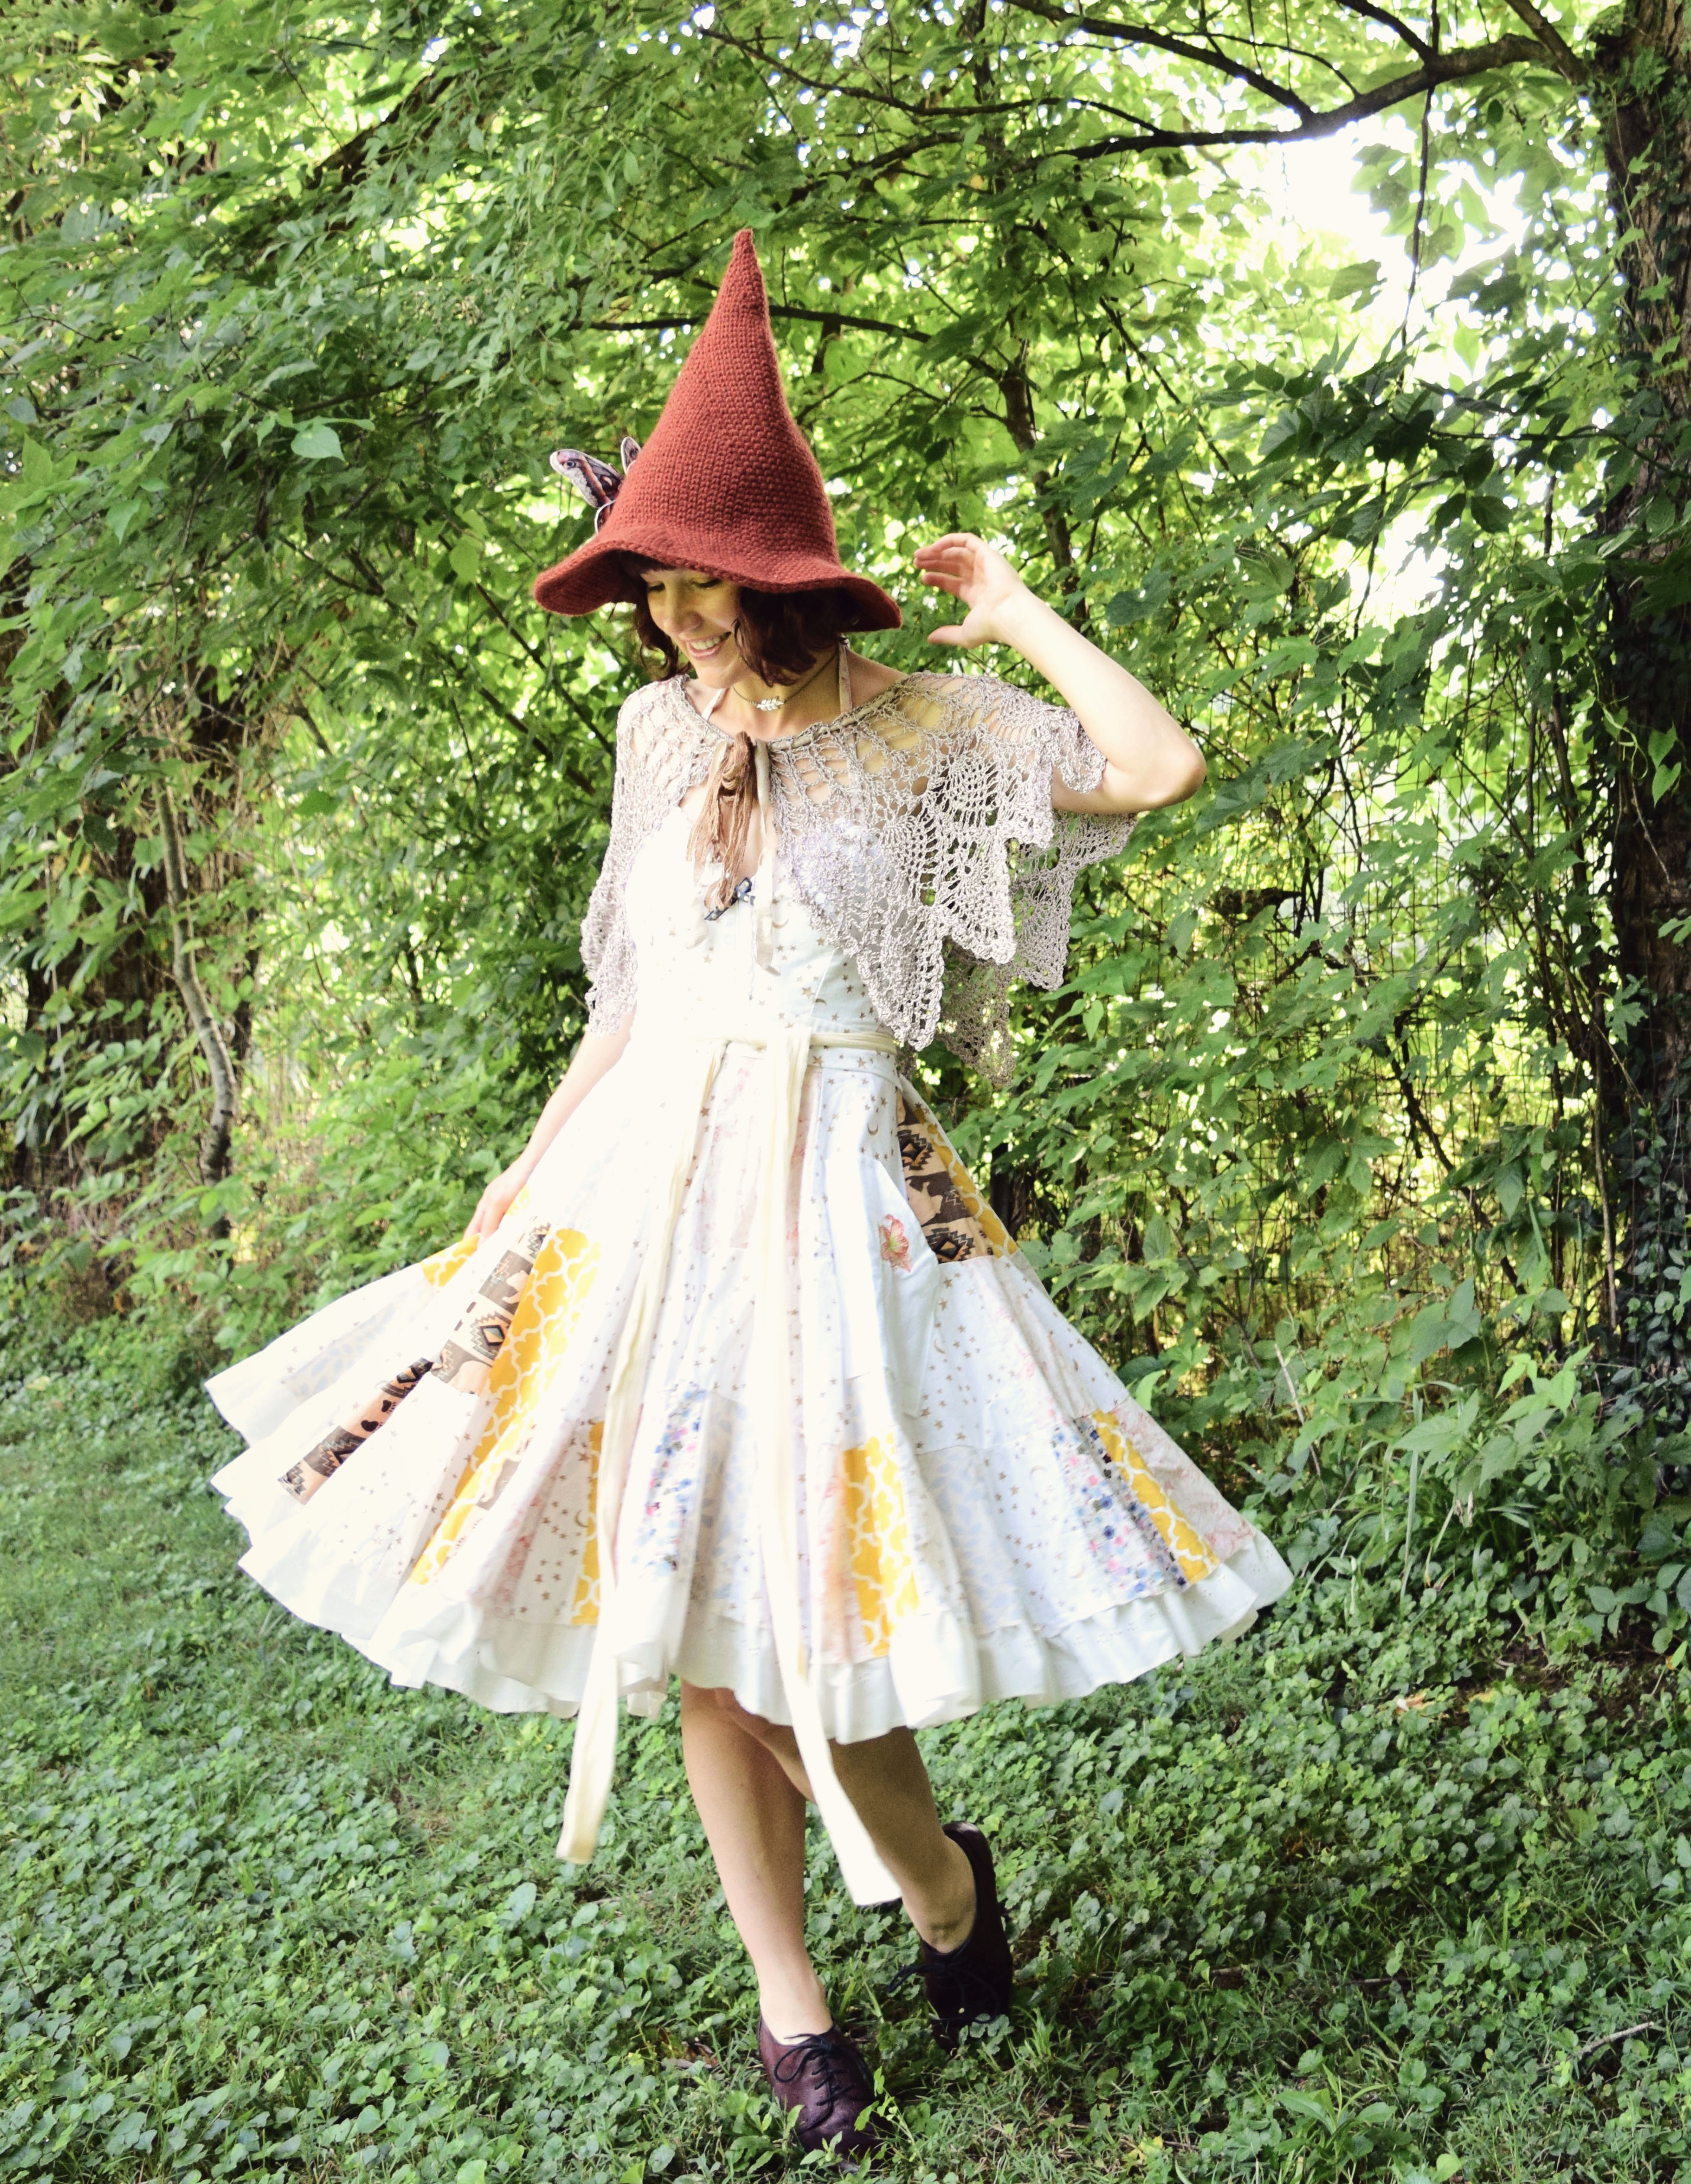
I’ve loved taking short breaks with bits of sewing, particularly when it means I get to clean out some leftovers and fabric-stash bust a little. I made this light, floaty and sweet patchwork dress using my favorite patchwork skirt pattern, melded with a bodice that I freehanded. A criss-cross back tie and adjustable waistband made this really comfortable, and I also added eyelet lace cotton trim in gathered ruffles on the hem and a vintage embroidered tea towel pocket!

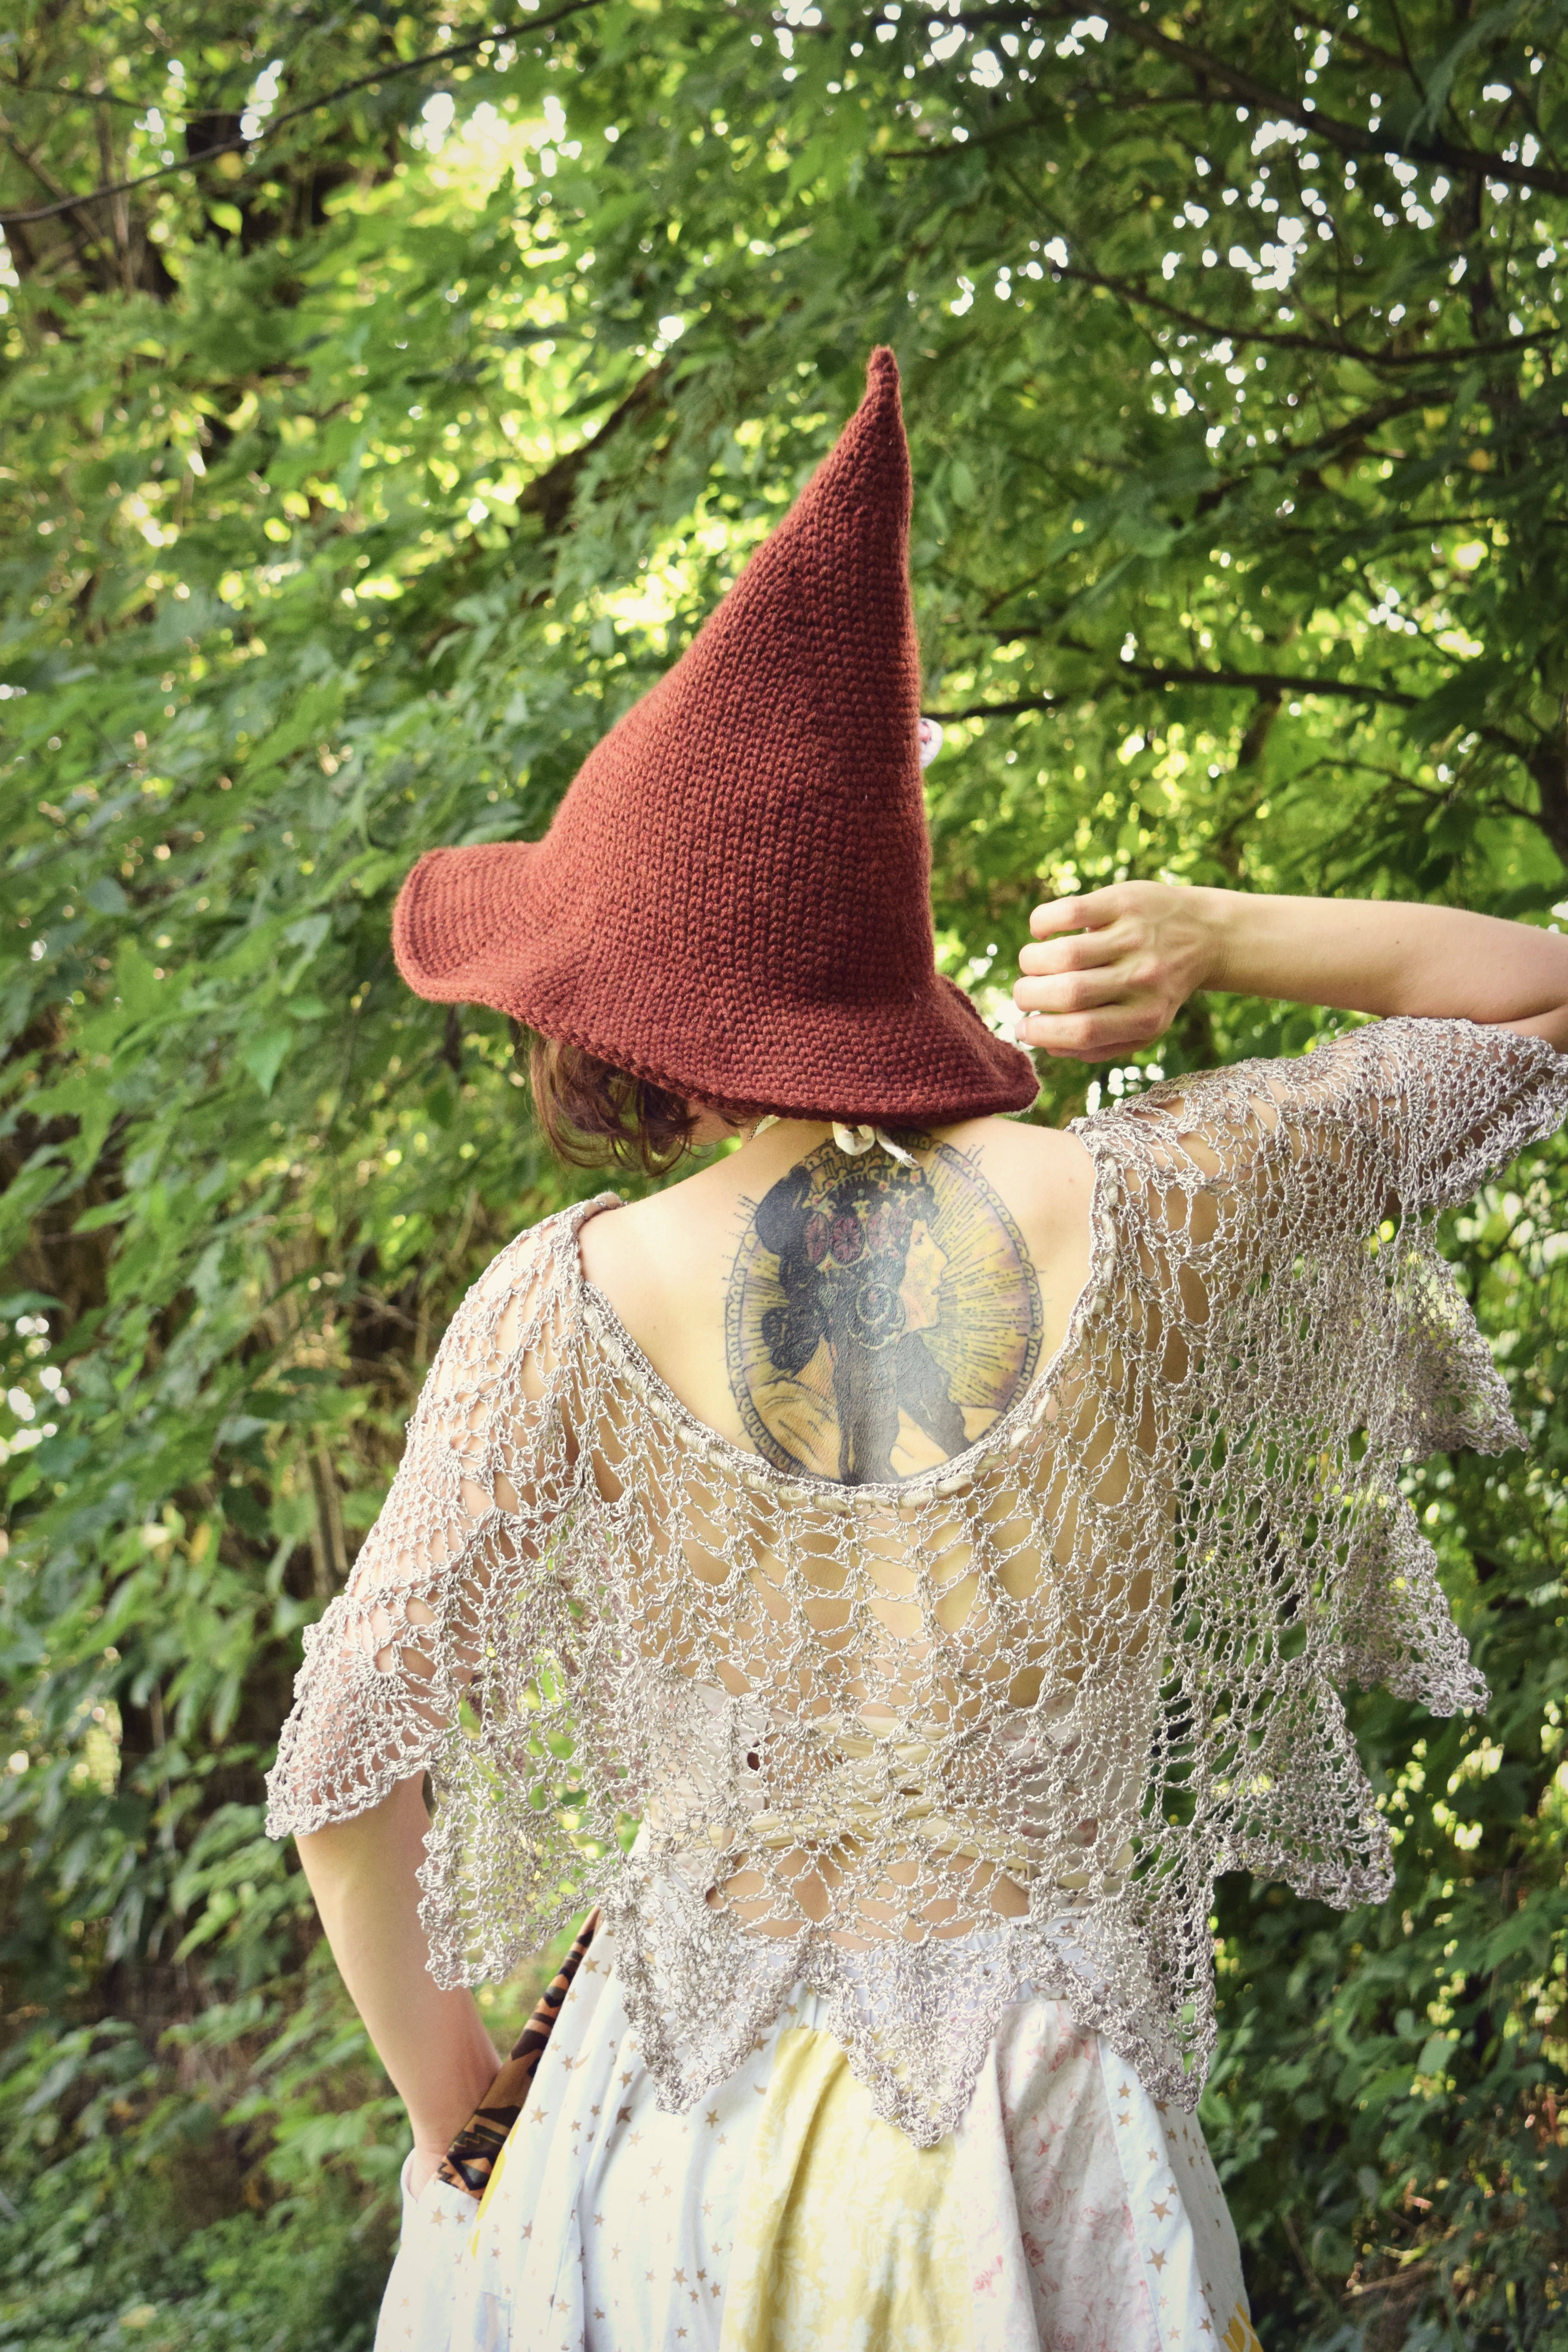
I called it my “Cottagecore Girlfriend” dress 🙂 I learned a lot making it and hopefully will be able to recreate the bodice part for later versions – meanwhile this one has been added to my costume closet and already made an appearance in my “Moth Wizard” photoshoot for the Wizard Hat crochet pattern, which was just released!

Elf Coat Updates

On of the most major projects I concluded this summer was getting the Elf Coat pattern expanded and updated. I created a major update for the regular sizes Small-Large which included some rewriting and some additional extras like belt and pockets, but the long awaited Plus Sizes option didn’t get released until recently in June! Good timing for that, as it gives people plenty of time to get started on their coats so that they can wear them this winter 🙂

You can find the directory to all the sizes and options for the Elf Coat through the page linked in the paragraph above – right now this includes sizes Small-2XL/3XL, corset back lacing, belt tie, and THREE types of pockets, all for FREE here on my blog (but you can also buy the full written patterns in my Etsy shop 😉 and there might be a sale if you read a little further! )

New Growth & Designs

Pictured here is as much as I’m willing to reveal about the new pattern I have in the works! I try not to give too much away usually, as I just like to keep things a surprise and also because I’m terrible at committing 😀 But after 4 total reworks to this piece, I’m confident to say it’s mostly finalized and so I’m moving into the fine-tuning stage of development.

As you can see, this next one will be based on my Tree of Life motif, which has proved to be a great little free design – I have just enjoyed it SO MUCH, seeing people’s little happy trees pop up on my Instagram feed! You can get the free pattern for the Tree of Life Mandala wall hanging by following the link above. This motif also appears in my Embla Vest, a premium pattern in sizes XS-XL <3

10K Sale!

Last but not least, my Etsy shop is ALMOST to 10,000 sales! Holy wow, I can’t believe it! We’ve got a few more to go though, so to incentivize I’ve created my “10K or Bust” sale which is running now through the end of next month – get ANY crochet pattern from my Etsy Shop 20% off, no coupon code needed!

I’m really excited to see that number roll over – I can still remember 10K sales on Etsy being some crazy, far-away dream of mine 😉 The sale is schedule to last until August 28, 2021 – although I may extend it depending on how close to 10K we get!

As always, thank you for all your likes, comments, purchases, reviews, and encouragement!

-MF

Wizard Hat Pattern

You’d think that with two different magical pointy hat crochet patterns already written, I wouldn’t feel the urge to create another. At least, that’s what I thought when I added the Classic Witch Hat to my portfolio a year after I came out with the Hedge Witch Hat.

But of course, I was wrong – I saw a beautiful image of an even larger, taller pointed magical hat in irresistible autumn colors, made of solid wool and sporting pretty felted forest mushrooms, and I had the urge to create a hat with a similar silhouette on which to meld extravagant woodland features – and the Wizard Hat was conceived.

You can get the portable, ad-free PDF crochet pattern for the Wizard Hat in my Ravelry Store , Etsy Shop , or Ko-Fi Shop now! Click the links in the text to head there directly or keep reading for more info on this newest design 🙂

I knew I needed a tight stitch to keep the tall crown of this hat upright, as well as provide a smooth surface texture, so I went with the extremely neat and handy Waistcoat Stitch for this design (click the link for the free tutorial). Worked in bulky wool blend yarn and a relatively small hook, the Wizard Hat took shape in no time and I’m very happy to be releasing this pattern today! More details on this pattern – plus info on the special sale – can be found below.

Wizard Hat

Don’t be caught at the wizard’s duel without an impressive hat! This extra-tall wizard or witch hat is the perfect headwear for serious magicians, wandering wise men, or your friendly village potion-maker. A plainly stitched hat makes a warm and fantastical accessory but is also a great canvas for extras such as hat bands, patches, and other fiber art embellishments.

The tall crown of the Wizard Hat is achieved with bulky weight yarn worked in the beautifully smooth and firm Waistcoat Stitch, an easy-to-learn technique that tweaks the placement of simple single crochet stitches to form a tight and unique fabric with a surface texture that looks like knit stitches. A full tutorial for Waistcoat stitch is available in the resources for this pattern, which also includes step by step written instructions and detailed photos.

Materials

5.50 mm hook (or size needed to obtain gauge)
Lion Brand Lion’s Pride Woolspun (#5 Bulky weight, 3.5 oz / 100 g, 127 yds, 80% Acrylic 20% wool) – color shown is Clay – 3 skeins
Stitch Marker
Tapestry Needle
Scissors

Finished Measurements: 13” tall from tip to crown, 23″ crown circumference, 46” brim circumference, brim width 3-3.5”

Language: English. Written in US crochet terminology

I’m offering a special BOGO deal for this hat pattern for one week only to celebrate the debut – you can get this brand new exclusive PDF for FREE when you buy any other crochet pattern from my Ravelry pattern store! This deal is only available through Ravelry through 7-29-21 – and you must use the code “WIZZARD” to get the discount <3 If you miss this deal, be sure to check out my multi-pattern discount codes which are ALWAYS available and offer a substantial bulk-buying markdown!

Morale Fiber Pattern Store Discount Codes
Valid for both Etsy and Ravelry!
15% off of 2: MF15OFF
20% off of 3-4: MF20OFF
25% off of 5-6: MF25OFF
30% off of 7+: MF30OFF

These femme wizard photos also include a few other things made by me! The shawl is a version of my Cobweb Wrap crochet pattern, which I altered in length (following the mathematical formula for altering provided in the pattern instructions) and did in rows instead of rounds (don’t have notes for that part, sorry!)

I’m loving the patchwork dress I made from scrap quilting cotton and some vintage linens and laces gifted to me by a friend 🙂 I periodically do sewing projects and am getting marginally better at them, and sometimes even meld them with crochet – I hope to be doing more of that in the future.

I haven’t had time to add my desired crocheted mushroom and forest-y felted embellishments to this hat design yet, so in the meantime I adorned my official wizard garb with one of my ethereal handmade moth clips from The Forest Fae.

As always, thank you for visiting and checking out my newest offerings! If you’d like to see ALL the Morale Fiber content, check out my handy Linktree!

<3
MF

Halter Top Pattern BOGO Sale

If you’re looking to kick-start your hot girl summer, you should try halter girl summer! Handmade crochet halter tops are the cutest hot-weather accessory and definitely a part of my summer wardrobe every year – so I’m offering Buy-One Get-One for all halter tops in my Ravelry Pattern store! Just put any of my halter top patterns in your cart when buying ANY other pattern (doesn’t have to be a halter top) and use the code “SUMMER21” 🦋🌻🌤🍒

This deal starts today and runs through Monday, May 31st ❤ Best of all, all the tops pictured below are made with #4 weight 100% cotton so they are both quick to make AND cool to wear 😁

From left to right across the top row: The Acanthus Top, the Sol Halter, the Valkyrie Halter.
Left to right across the bottom: The Plus Size Sol Halter, the Mehndi Halter, and the Blossom Vest

If you want something more complex, try out the Feather & Scale halter top, a beautiful magical piece worked in Fine weight yarn:

The PDF version of the Basic Bralette & the Curvy Bralette is also included in the sale – although I do have a free version of those on my blog!

That’s it for today – just the quick sale announcement! I’m working on a new halter top design at the moment so I was inspired to offer some of my previous creations <3 I hope you love!

-MF

Going the Distance

Happy Monday! I hope everyone out there is feeling well and healthy – I am, if just a touch stir crazy. But the weather is beautiful and I’ve been blessed with a lot of opportunities to hike out in the isolated woods recently 🙂

It’s been a few weeks since my last blog post, so I thought I’d write up a little summary of what’s on my schedule right now – a couple new projects and previews, plus giveaways! I’m lucky to have already been working from home when the stay-at-home order was put in my place to mitigate the spread of Covid-19 in my state, so I have plenty in the works and more on the horizon for as long as my yarn stash holds out (even then, the emergency reserves are flush...)

So, cheers! Be sure to subscribe to my blog, and like & follow my Facebook Page for more fun crochet stuff!

Star & Moon Twirling Gown:

Another project made from the very well-appreciated Wendy Kay’s No-Sew Gypsy Skirt pattern, which I purchased from Etsy years ago and have used a LOT. I think this is my eighth skirt from that pattern.

Modeled by the lovely Sarina Newbold, this celestial piece is 100% cotton fabric donated by a friend, and I used the long-wedge version of the pattern to create a gown-length mega-skirt that adjusts from XS up to XXL at the waistband.

As you can see, it is just KILLER for twirling in. I am patiently building my sewing skills, because I have some really neat ideas for more crochet/fabric fusion clothing <3 in the future!

Hedge Witch Hat PDF:

Sarina also modeled her new custom hat made from the free Hedge Witch Hat pattern on my blog:

Too. CUTE.

I plan to go over the pattern once more, then turn this popular design into a downloadable, ad-free PDF! I’m looking to expand my PDF offerings to include more available free patterns, for those that like to the portability and convenience – if there’s one you’d like to see, let me know 🙂

Fundraisers & Giveaways

I’ve recently began offering some of my premium, normally paid-only crochet patterns for FREE as special deals to help people stay safe & sane during this period of self-isolation (which I have begun to call Free Range Captivity). In return, I ask those who can do so to consider making a small donation to a worthy cause.

The first Free Pattern Fundraiser offered the Valkyrie Top gratis in support of The Trevor Project. The offer is ended now, thank you to everyone who supported this important service! Keep reading for the current free offering 🙂

The Valkyrie Top was also part of a recent Instagram Giveaway I participated in, hosted by the incredible Starlily Creations featuring some of my personal favorite crochet artists and heroes. Congratulations to Viv, winner of the deluxe halter top pattern pack!

My next Free Pattern Fundraiser is supporting the National Network to End Domestic Violence – use the code “ENDVIOLENCE” now through Wednesday, April 22 on the Ravelry checkout for the Mermaid Mitts and Sandals pattern and get it for FREE! And if you can, consider donating a small amount (they’ll take any amount, and you can use Paypal) to the worthy cause.

Mermaid Mitts & Sandals

Upcoming Designs

As I sometimes like to do in these rambling wrap-up posts, I have a couple sneak peeks on something that’s coming up soon! This design has been on my mind for years, though I lacked the persistence to do it until recently.

Mysterious, eh? Well, not really. It’s just crochet pineapples, that ubiquitous motif. Or is it?

I may have some tricks up my sleeve!

-MF

Vintage Derby PDF & Hat Sale!

I’m excited to announce that I’ve put together the downloadable, printable, ad-free PDF for the Vintage Derby crochet hat pattern, which is also available for free on my blog here 🙂

You can get it now in my Ravelry Store , Ko-Fi shop, or Etsy Shop! But, there’s a sale going on now too – read on for more info!

I loved making this little hat and I’m getting inspired to make more styles of hats now the the brisker weather is visiting, if not setting in (it’ll be in the 90’s next week 😛 ).

I mean, you know I’m a total hat fiend!

Anyway, I’m having a little sale through my Ravelry pattern store to celebrate – 50% off ANY hat pattern in my store, no maximum order and no coupon code needed! This sale is running through September 30 – so go grab some sweet hat patterns now! Here’s a peek at what I’ve got:

Filigree Lace Cap – based on my Lotus Mandala design!
Trickster Hood – a Tunisian crochet classic
A cute ribbed beanie design with a sweet little point at the top!
The Krampus – turn yourself into a yuletide demon!
Doe! A deer!
The Rhiannon Hooded Cowl – a hat AND a scarf!

Perhaps I shall go forge more hats now? I think yes.

-MF

Elderberry Pixie Belt & Sale

Hi friends! In addition to working diligently on the Elf Coat patterns, I’ve been having fun doing some experimentation in one of my favorite project categories, the upcycled crochet pixie belt.

If you don’t already know, you can get a ton of info on how to create original, freeform pixie pocket belts from my blog series, the Pixie Belt Tutorial. The full tutorial is also available in downloadable, printable, ad-free PDF format through my Ravelry store – and I’m using this post as a springboard for a pattern sale too!

Now through Aug. 12, through Ravelry only, you can get the Pixie Belt Tutorial pattern FREE with the purchase of any other pattern! 🙂 Just put both patterns in your cart and the discount is taken at checkout.

I had fun adding new hardware elements to this latest pixie belt piece – a metal mandala centerpiece I’ve had for years that came off of an old thrifted dress forms a focal point on the back, plus two D-rings on either side of the belt which hold a draped scarf really nicely for extra oomph around the hips. The best part is that the silver scarf is totally removable, so you can change out scarves!

There are also two pixie pockets: one circular pouch and one drawstring, as well as a detachable mushroom pouch <3 The skirting I’m especially proud of – one whole thrifted shirt made from dusky rose gauzy material, artfully ripped of course.

I’m very happy with how this belt came out, especially since I got pretty experimental with it! This encourages me in my other ideas – I’d love to bring in more diverse fiber elements like fabric and leather 🙂

Also it was fun to dress up this one – what do you think of my new background? I dig it!

If you’d like the see more unique, one of a kind pixie belt projects, be sure to check out the Pixie Belt Tutorial blog series!

-MF <3

Basic Bralette PDF and Pattern Sale

DSC_0088

Good news double whammy! Since the free Basic Bralette pattern continues to top the rankings for most popular posts here, I decided to offer it as a downloadable, printable, ad-free PDF also! It’s now available for purchase through my Ravelry Store , Ko-fi Shop, and my Etsy Shop <3  Read on for more info!

DSC_0078DSC_0059

The new PDF includes both the original Basic Bralette design and the modification for larger busts, the Curvy Bralette tutorial 🙂 AND there’s a super sweet sale going right now where you can get any of my halter top patterns from either Ravelry or Etsy for a whopping HALF OFF! Use the code “SUMMERSALE” now through July 28, 2019.

BraletteModA1

When dreaming up this design, I had some specific requirements in mind: that it be a simple “base” pattern from which many variations could be made, as well as being easily customized for many sizes, and last but not least – comfortable! After a few experiments, the pattern for the Basic Bralette was born.

I went with in-the-round triangle style cups for both the way they look and the ease of adjusting their size, plus a band through which the cross-back ties thread so that there is no pressure being put on the neck as with traditional bikini-style strap ties.

In addition, I added a bit of strappy flair along the inner cups, because TRENDY. Say hello to your next cute and comfy summer crochet project!

Now, there’s a teeny bit of math involved, fair warning. However, if you are confused about gauge and measurements, I’m here to help – or just wing it, and use the old “hold it up against yourself periodically while you work” method.

This PDF pattern includes written, step-by-step instructions and lots of clear tutorial photos as well as tips for modifying the pattern for different sizes. Both the Basic Bralette pattern and the Curvy Bralette pattern modification are included in the file!

Materials:
3.50 mm hook
#4 weight cotton yarn (although you can make it with any weight yarn / hook size combo as long as you know your gauge!) 1-3 skeins depending on size made
Stitch markers
Scissors & Tapestry Needle
Measuring Tape

Measurements Needed:
Band Size (measured around the rib cage just under the bust): For example, my measurement would be 32”
Measurement A : (Band size “ / 4) – 2” = Length of each side of completed triangle cup ( My example would be [32 / 4] – 2 = 6”). Therefore, my Measurement A = 6″
Measurement B: (Measurement A) / 2 = My Measurement B would be 3”

Size:
The original Basic Bralette pattern can be modified in size to any size that you like, but because of the flatter nature of the cups it really works best for sizes Small – Medium (32A – 34). The pattern ALSO includes the Curvy Bralette Mod, which is a modification for larger busts. This mod uses a border to draw the cups in more, creating a deeper cup for larger busts and works better for C cups and some B cups depending on the shape. I haven’t personally made any cup sizes larger than D in this pattern, though I’m sure it can be done.

Written in US terminology.
Language: ENGLISH

DSC_0093

I’m thinking about making more of my original free designs available as purchasable PDF crochet patterns, and also adding some originally purchasable patterns into the free blog pattern mix! Are there any particular designs you’d like to see available in both formats?

DSC_0067

<3 <3 <3 As always, a huge thank you to everyone who supports my art by purchasing patterns from me! Paid patterns make up the majority of my income for my art and allow me to keep designing crochet both for free and for sale. It’s really what I love best and you all make it possible!

-MF

Ch-ch-ch-changes

You may have noticed it’s been a touch quiet on the blog lately, at least for the summer time when I am normally busy crocheting my heart out during the break from school. Well, I’m still crocheting my heart out, but due to some recent changes I haven’t had as much time as I’d like to create and photograph and post.

I seem to have acquired an actual day job, like a responsible adult type person, at the local co-op grocery (which I am loving). Also, I moved again! And we all know how much fun that is, what with the throwing of the possessions into garbage bags (is there a better way to do that?).

crochetme

What I really do.

I do still have many awesome things planned both as far as paid crochet patterns and free tutorials and projects, but the work pace on those has slowed down a bit. More info on what’s coming up after the first big announcement:

Paid Pattern Price Change

Beginning in August, all of my paid digital PDF crochet patterns will change from 5.50 USD to 5.95 USD. This is something I have been waffling about for a few months now, but a recent announcement by Etsy that they are raising their percentage fees from shop sales (from 3% to 5%) made the decision for me.

However, I do intend to help mitigate this price change by hosting a HUGE SALE! From now until my price change goes into effect August 1, I will be offering ALL of my paid patterns for 37% off (a little over $2 off) through my Ravelry Pattern Store and 30% off ($1.65 off) through my Etsy Shop. No coupon code necessary – snap them all up while they are at this awesome price!

WindowBox13

There are also two older patterns I will be offering soon for free on the blog (so you don’t have to bother buying them if you don’t want the PDF version). The Rhiannon Hooded Cowl and the Mini Mandala Slouchy Tam will be making an appearance, with upgraded photos, gratis – keep an eye out for these freebies here in the future 🙂 And subscribe to the blog and follow me on Facebook for all the latest updates!

KendraHat3Kendrahat1

I’d love to take this chance to thank the wonderful customers that have bought my patterns, especially those that have taken time from their day to leave reviews:

“Almost finished with this sweater and I am so happy with the outcome!! The pattern is so easy to follow. This is maybe my second or third purchase from moralefiber and her patterns are just so clear and neat. Not to mention how cute and practical the designs are. Thank you!! <3”
-Kristin H. (Spiral Sweater)

“It is easy to understand and comes with a great amount of pictures as well as written instructions. I am using the yarn suggested in the pattern (white cotton/acrylic blend) and it works up real fast. I love it! 💖 Can’t wait to finish it! Thanks for making this pattern!”
-Diana (Lotus Duster)

“What a lovely shop owner! Very patient with my questions. Super cute pattern!! <3”
-Robin (Krampus Hat)

“Pattern is clearly written, hence easy to follow. Love this design, so versatile. Highly recommended; Thanks very much ;-)”
-Alexandra H. (Flower Child Pullover)

Also, thank you so much to all the wonderful people that have commented and messaged me directly about my work. There have seriously been days when your amazing and kind words have truly brightened my life. Thank you, thank you, thank you! <3

New PROJECTS and TUTORIALS:

Needless to say, with the addition of a day job, some of the things I had planned for this summer got re-arranged in priority. Here’s what’s definitely on the line right now!

New Halter Top Pattern:

I am so excited about this new design, which I have been fiddling with since January. I have made several of these beauties so far and am nearing the final stages of photographing and writing, and can’t wait to show you the final product! This design uses a fine gradient yarn and croc stitches to create a gorgeous scale top that is flattering on every figure, and includes FIVE sizes XS-XL, equivalent to cup sizes A-DD!

I just can’t resist a sneak peak featuring some of my lovely friends test-fitting some of the completed pieces:

DaiseyHalter1.jpg

Daisey, wearing size XS

KatyHalter1

Katy modeling size XL

Pixie  Belt Tutorial:

In response to many requests, I have begun working on creating a tutorial for my freeform ragtag crochet pixie belts! I hope to include a basic tutorial for the different shapes you can utilize, plus pictures on how I normally form the base belt, as well as inspiration on choosing colors and themes… It should be interesting – of course, these will be most fun if you cut loose and customize to your heart’s content, and my goal is to create a good guideline to springboard from!

Now, warning on this: it might take some time! So I’ve decided to come out with the tutorials in bits and pieces, beginning with the basics and working up from there.

Kelp6

Lotus Duster Video Tutorial:

Yes, this is definitely in the works. I have wanted to do this for a long time, so I intend to jump in and do it! The Video tutorial will be free on my blog, probably presented in episodes, and I’ll try to include as many of my tips and tricks as I can! Forgive me in advance for what I know will be amateurish video editing skills, but I’m gonna try 😉

LotusDuster1

I’ve got even more in the works, but I’m running out of time today 🙂 Back later, with more crochet goodness.<3

-MF

Window Box Sweater Pattern

Whew! The month of April – or Third February as I am calling it this year – is almost over, and I can’t say I’m too sad about it. I’ve been busily chipping away at final papers and such, but I did find enough time to complete a new (easy) crochet pattern design!

WindowBox8

It’s a super cute hippie-flavored crop sweater, the perfect topper for any lingering spring chill. The Window Box Sweater  is designed with easy-level crocheters in mind, and is available with 3 sizes – all in one pattern through my Etsy Shop , Ko-Fi Shop, or Ravelry Pattern Store

WindowBox10

WindowCover2

The Window Box Sweater is an airy layering piece full of movement and attitude! The trendy cropped length and loose fit is balanced by fun flared bell sleeves and a retro square collar.

Easy, in-the-round construction means no bulky seams or complicated finishing, and tons of tutorial photos make it a cinch to follow along even for inexperienced garment makers. This sweater is a quick project featuring simple stitches and a large hook, and the cotton DK weight yarn held double creates a trendy bold texture without sacrificing drape and softness.

The Window Box Sweater has THREE sizes, all written in detailed instructions with stitch counts for every size – no guesswork or vague modifying instructions!

Sizes:
Small: 38” Bust, 14” length, 26” sleeves
Medium: 42” Bust, 14” length, 26” sleeves
Large: 46” Bust, 15” length, 27” sleeves

Materials
6.50 mm hook
4 Stitch Markers
Scissors & Tapestry Needle

Yarn
2 Strands sport or DK weight held together: 1100 yds (1300 yds, 1500 yds) – 4 skeins Premier Cotton Fair or Universal Yarns Bamboo Pop

Instructions are written in English, using US crochet terminology.

WindowBox14

WindowBox9WindowBox2WindowCover3

Man, it was really hard to sit on this one until it was ready to release – I’m so excited its finally out! 🙂  Now on to the next one, of course!

-MF

Lotus Cardigan Sleeve Free Pattern

First off, I am having a PATTERN SALE through my Ravelry store from now until June 30, 2017! Buy one pattern, get one free with the coupon code SALESTICE. Hope you are having a lovely summer so far!

Secondly, as promised, here is the FREE pattern/tutorial on attaching a cardigan-style sleeve to the Lotus Mandala Vest! I can’t stop making these in every colorway of Lion Brand’s Shawl in a Ball 🙂

The sleeve pattern shown here is also now available as an adjunct PDF when you buy the PDF for the Lotus Vest (an option available for those who want a portable file rather than having to work from the free online version). If you already have bought the pattern, you should be able to access the new PDF through your purchases.


UnderSea1These instructions are for adding sleeves to the Lotus Mandala Circular Vest – the pattern is written for size small sleeves, but you can size up by skipping 1 dc in Rnd 2 instead of 2 dc and working fewer decreases throughout the pattern.

Materials:

5.5 mm hook

Lion Brand Shawl in a Ball – 3 skeins (2 for working the vest itself, 1 for adding the sleeves). Color show in Tutorial is “Prism”

Scissors and tapestry needle for weaving in ends.

To Begin:

Work the Lotus Vest in its entirety – with or without the extra rounds before the armholes is fine (the tutorial instructions are pictured WITH the 2 extra rounds). However, if you modified the length of the armhole chain & spacing, remember that the stitch counts for adding the sleeves will not be the same.

LotusSleeve1

Rnd 1: Join yarn in between the first 2 dc’s on the chain base of the upper part of the shoulder yoke. Ch-3.

LotusSleeve2

(1 Dc in between the next 2 dc sts) 39 times.

LotusSleeve3

2 dc under the side of the next dc.

LotusSleeve4

If you worked extra rounds: 2 dc in the same chain space occupied by the dc just worked into. 2 dc in each of the next 11 ch spaces. 2 dc in the next ch space (also occupied by the dc of the armhole round). 2 dc under the side of the next dc. Join with a sl st to the 3rd ch of beg ch-3. – 70 dc sts

LotusSleeve5

If you didn’t work extra rounds: 1 dc in the same st occupied by the dc just worked into. 1 dc in ea of the next 24 sts. 1 dc in the next dc (also occupied by the dc of the armhole round). 2 dc under the side of the next dc. Join with a sl st to the 3rd ch of beg ch-3. – 70 sts

LotusSleeve6

Rnd 2: Ch 4 – counts as first dc + ch-1. Sk next 2 sts. (1 dc in the next st, ch 1, sk next 2 sts) 22 times. 1 Dc in the next st, join with a hdc to the 3rd ch of beg ch-4. – 24 ch spaces

For a larger sleeve, skip only one st between dc stitches in Rnd 2.

Rnd 3: Ch 4 – counts as first dc + ch-1. (1 dc in the next space, ch 1) 22 times. 1 dc in the next space, join with a hdc in the 3rd ch of beg ch-4. – 24 ch spaces

LotusSleeve7LotusSleeve8

Rnds 4-7: Rpt Rnd 3.

LotusSleeve12

Rnd 8: Ch 4 – counts as first dc + ch-1. (1 dc in the next ch space, ch 1) 11 times. Dc2tog over the next 2 ch spaces, ch 1. (1 dc in the next ch space, ch 1) 9 times. 1 dc in the next space, join with a hdc in the 3rd ch of beg ch-3. – 23 spaces

LotusSleeve13

Rnd 9: Ch 4 – counts as first dc + ch-1. (1 dc in the next ch space, ch 1) 11 times. Dc2tog over the next 2 ch spaces, ch 1. (1 dc in the next ch space, ch 1) 8 times. 1 dc in the next space, join with a hdc in the 3rd ch of beg ch-3. – 22 spaces

Rnd 10: Ch 4 – counts as first dc + ch-1. (1 dc in the next ch space, ch 1) 20 times. 1 dc in the next space, join with a hdc in the 3rd ch of beg ch-3. – 22 spaces.

Rnds 11-14: Rpt Rnd 10

Rnd 15: Ch 4 – counts as first dc + ch-1. (1 dc in the next ch space, ch 1) 10 times. Dc2tog over the next 2 ch spaces, ch 1. (1 dc in the next ch space, ch 1) 8 times. 1 dc in the next space, joing with a hdc in the 3rd ch of beg ch-4. – 21 spaces. – 21 spaces

Rnd 16: Ch 4 – counts as first dc + ch-1. (1 dc in the next ch space, ch 1) 10 times. Dc2tog over the next 2 ch spaces, ch 1. (1 dc in the next ch space, ch 1) 7 times. 1 dc in the next space, joing with a hdc in the 3rd ch of beg ch-4. – 21 spaces. – 20 spaces

Rnd 17: Ch 4 – counts as first dc + ch-1. (1 dc in the next ch space, ch 1) 18 times. 1 dc in the next space, join with a hdc to the 3rd ch of the beg ch-4. – 20 spaces.

Rnds 18 – 34: Rpt Rnd 17.

Rnd 35: Ch 4 – counts as first dc + ch-1. (1 dc in the next ch space, ch 1) 19 times. Join with a sl st in the 3rd ch of beg ch-4. 20 spaces.

Rnd 36: (Sk next ch-1 space. In the next dc work 1 hdc, 1 dc, 1 tr, 1 dc, 1 hdc. Sk next ch-1 space, sl st in the next dc.) 10 times. Cut yarn and tie off. Repeat on the other side.

Weave in all ends.

LotusSleeve14

Undersea2

Next color up: Moonstone! They’re addictive 😉

-MF