You’d think that with two different magical pointy hat crochet patterns already written, I wouldn’t feel the urge to create another. At least, that’s what I thought when I added the Classic Witch Hat to my portfolio a year after I came out with the Hedge Witch Hat.
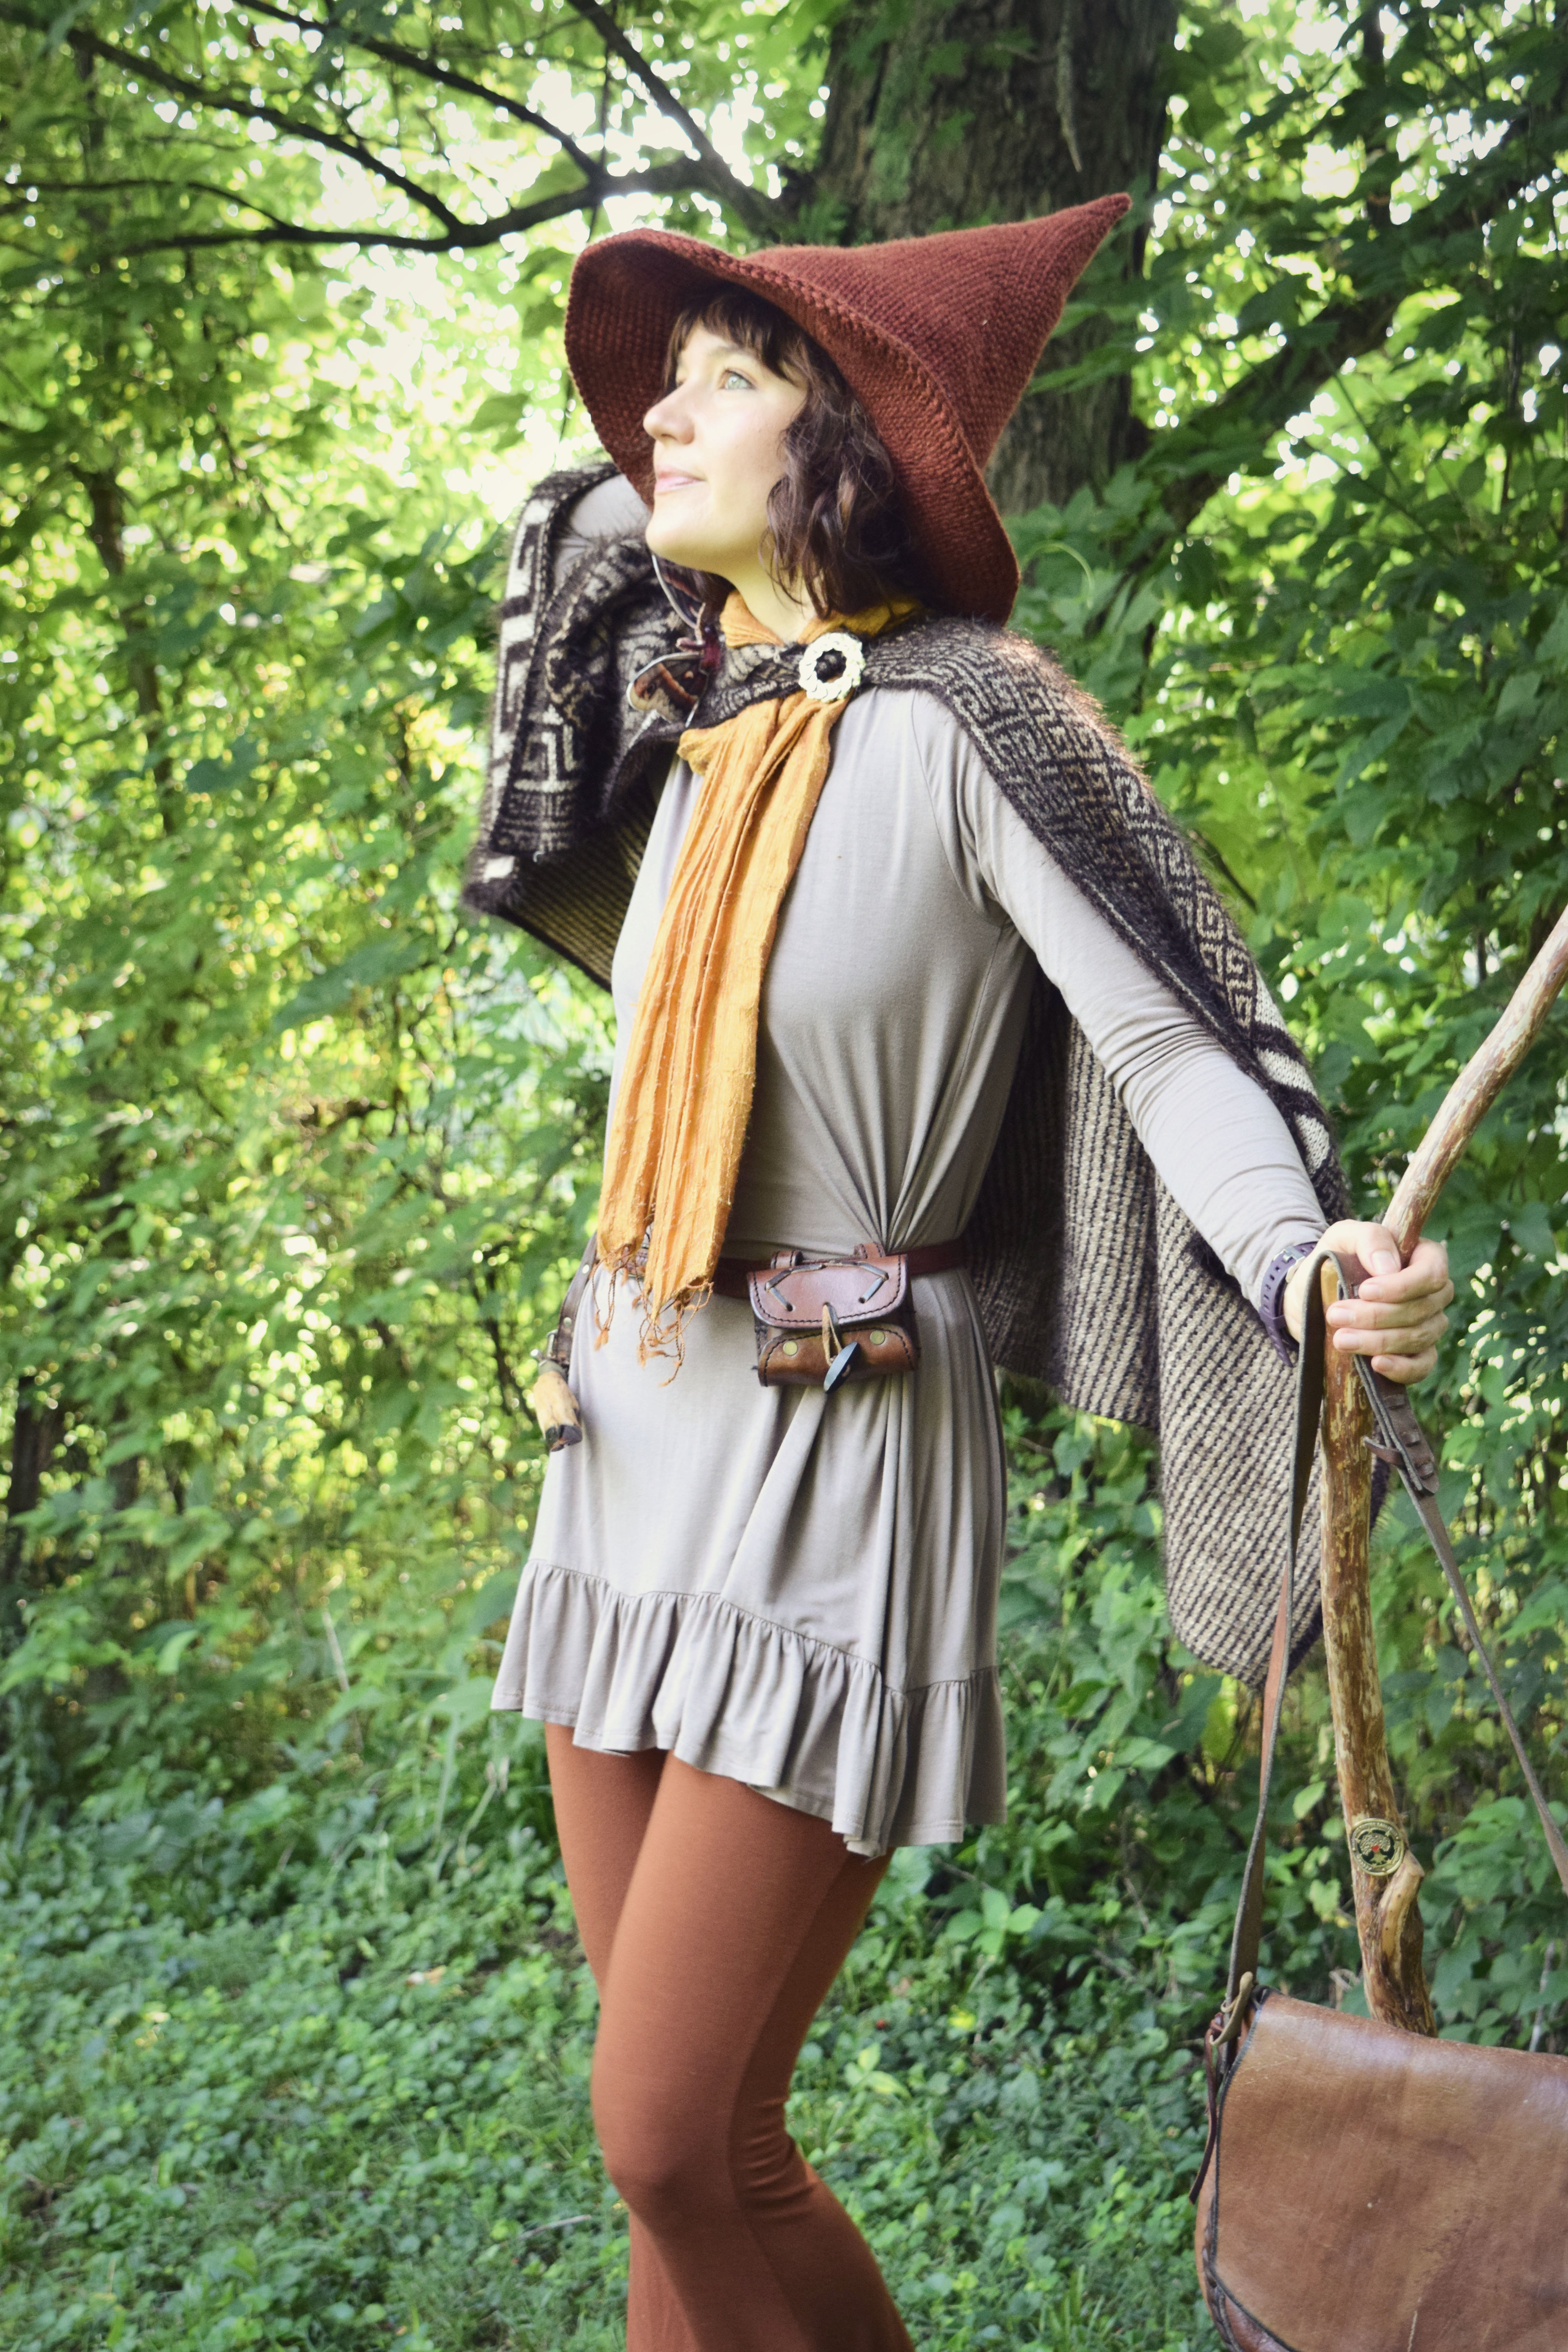
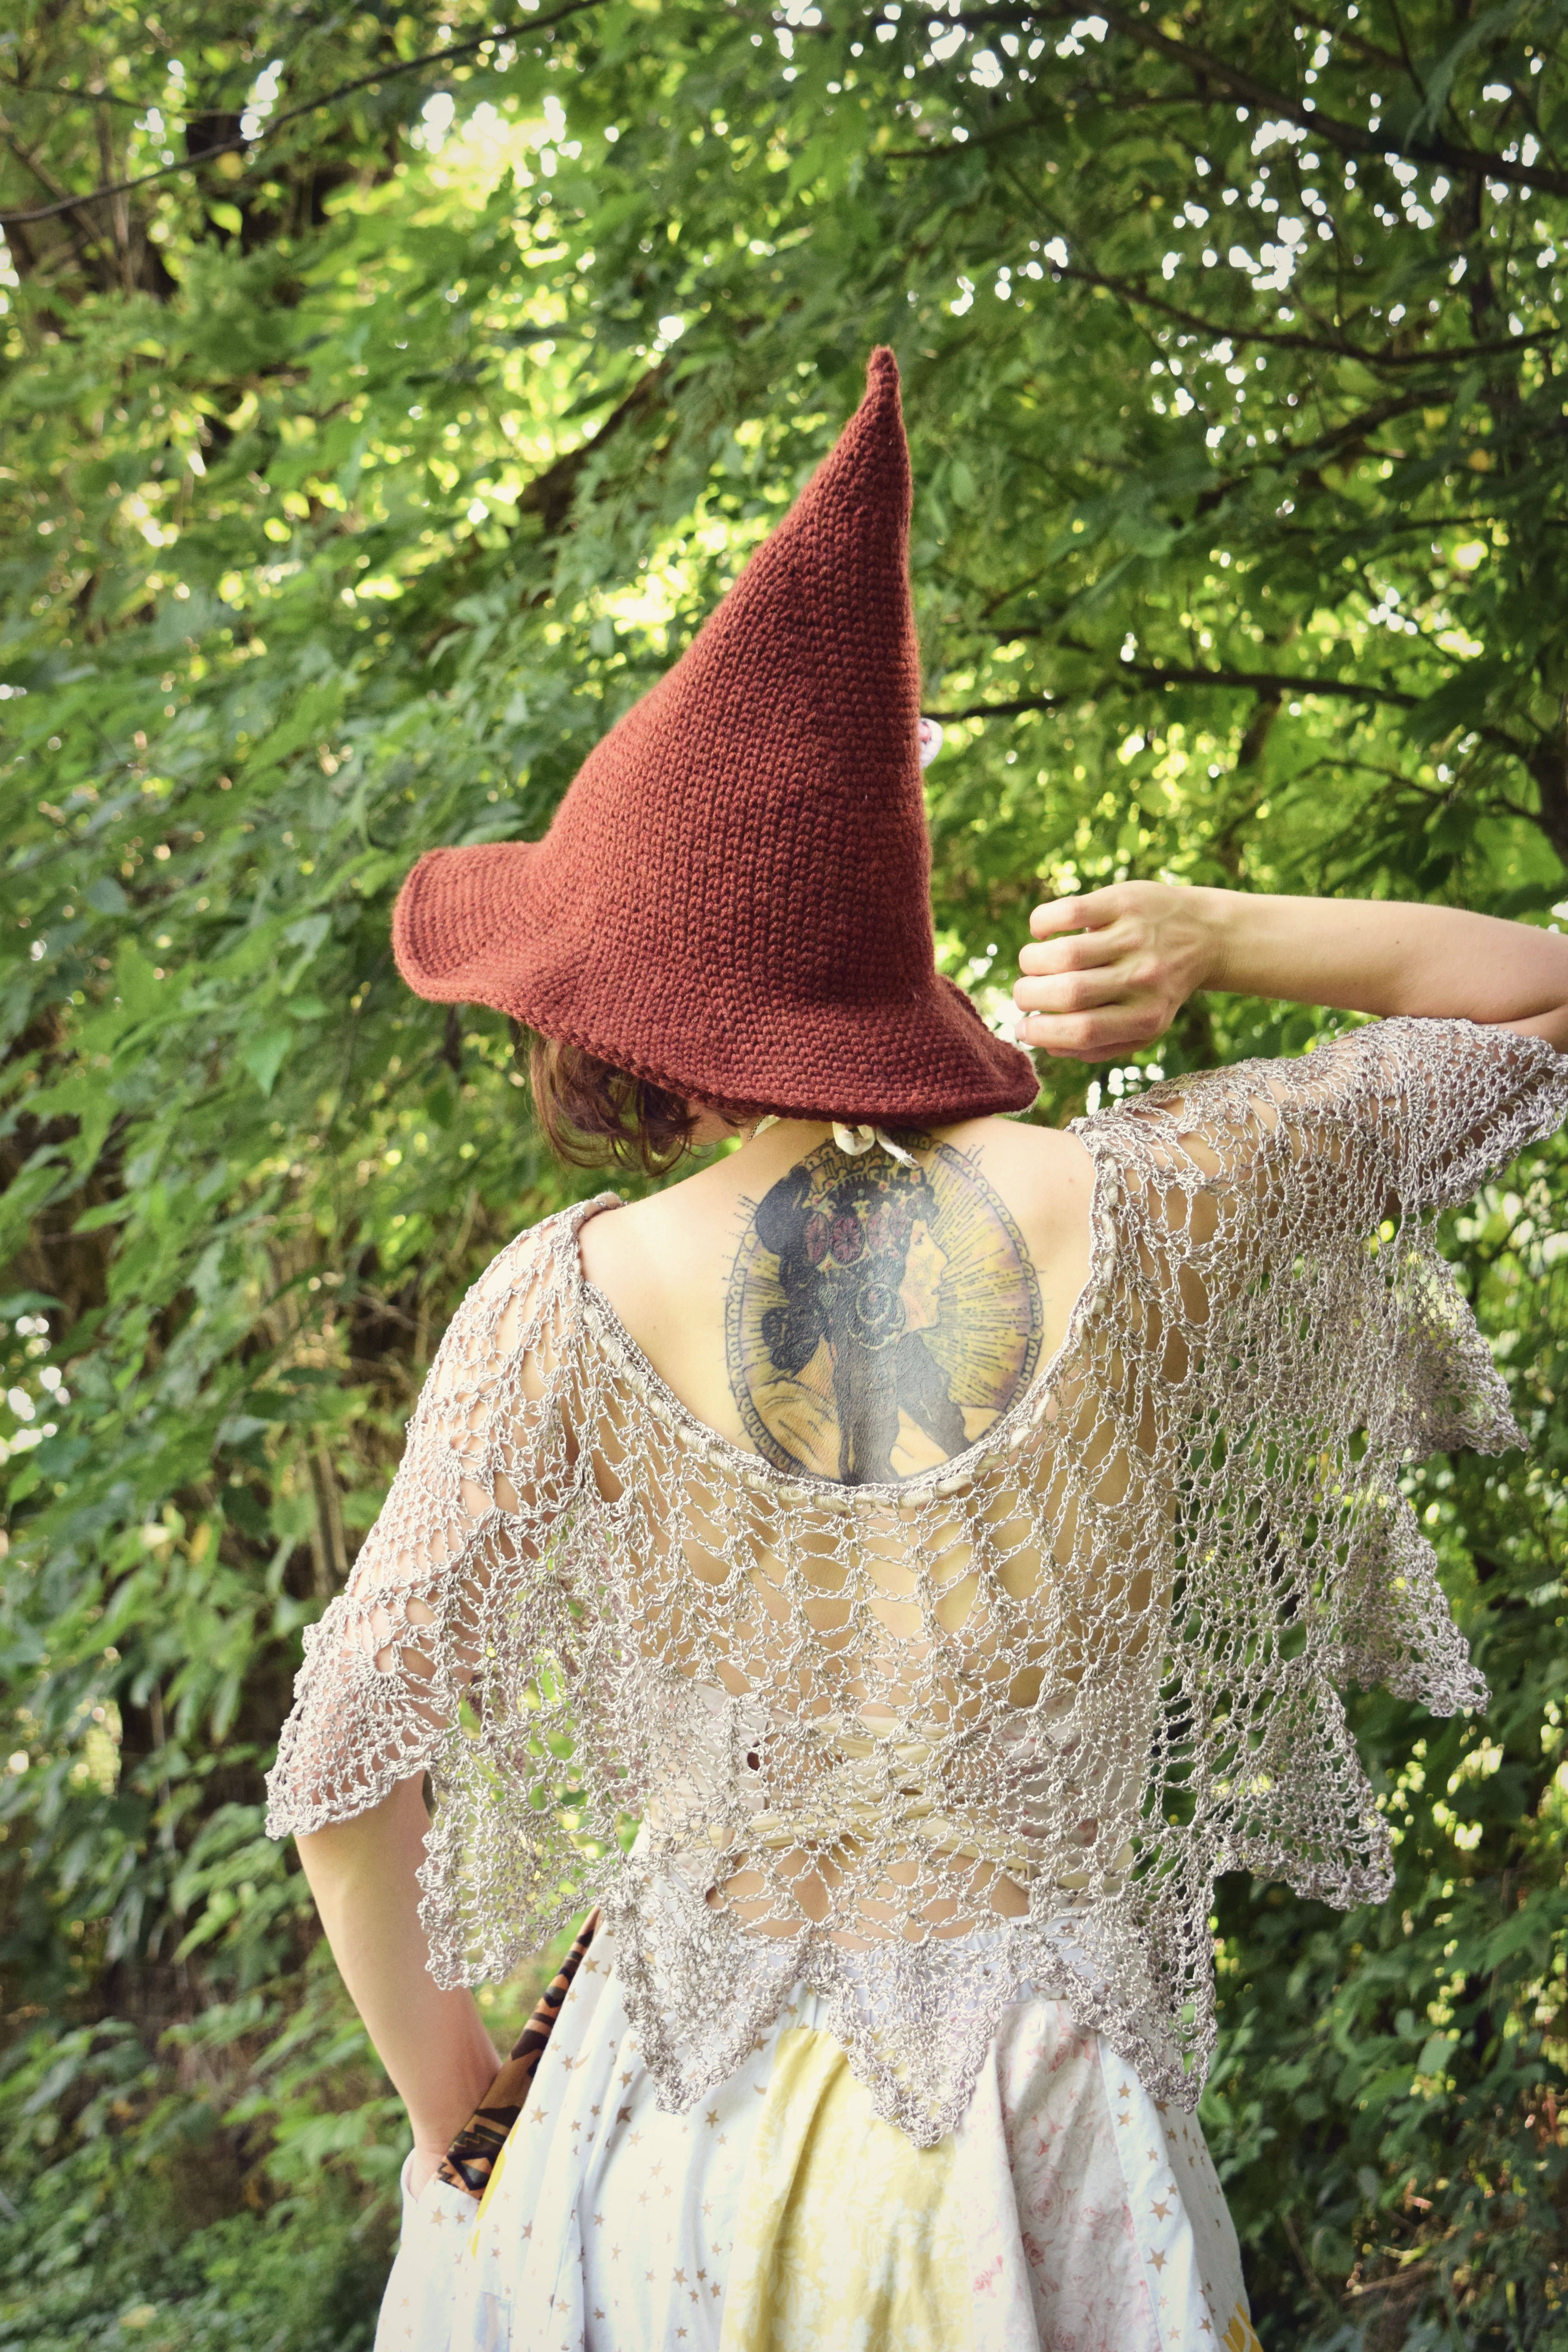
But of course, I was wrong – I saw a beautiful image of an even larger, taller pointed magical hat in irresistible autumn colors, made of solid wool and sporting pretty felted forest mushrooms, and I had the urge to create a hat with a similar silhouette on which to meld extravagant woodland features – and the Wizard Hat was conceived.
You can get the portable, ad-free PDF crochet pattern for the Wizard Hat in my Ravelry Store , Etsy Shop , or Ko-Fi Shop now! Click the links in the text to head there directly or keep reading for more info on this newest design 🙂
I knew I needed a tight stitch to keep the tall crown of this hat upright, as well as provide a smooth surface texture, so I went with the extremely neat and handy Waistcoat Stitch for this design (click the link for the free tutorial). Worked in bulky wool blend yarn and a relatively small hook, the Wizard Hat took shape in no time and I’m very happy to be releasing this pattern today! More details on this pattern – plus info on the special sale – can be found below.
Wizard Hat
Don’t be caught at the wizard’s duel without an impressive hat! This extra-tall wizard or witch hat is the perfect headwear for serious magicians, wandering wise men, or your friendly village potion-maker. A plainly stitched hat makes a warm and fantastical accessory but is also a great canvas for extras such as hat bands, patches, and other fiber art embellishments.
The tall crown of the Wizard Hat is achieved with bulky weight yarn worked in the beautifully smooth and firm Waistcoat Stitch, an easy-to-learn technique that tweaks the placement of simple single crochet stitches to form a tight and unique fabric with a surface texture that looks like knit stitches. A full tutorial for Waistcoat stitch is available in the resources for this pattern, which also includes step by step written instructions and detailed photos.
Materials
5.50 mm hook (or size needed to obtain gauge) Lion Brand Lion’s Pride Woolspun (#5 Bulky weight, 3.5 oz / 100 g, 127 yds, 80% Acrylic 20% wool) – color shown is Clay – 3 skeins Stitch Marker Tapestry Needle Scissors
Finished Measurements: 13” tall from tip to crown, 23″ crown circumference, 46” brim circumference, brim width 3-3.5”
Language: English. Written in US crochet terminology
I’m offering a special BOGO deal for this hat pattern for one week only to celebrate the debut – you can get this brand new exclusive PDF for FREE when you buy any other crochet pattern from my Ravelry pattern store! This deal is only available through Ravelry through 7-29-21 – and you must use the code “WIZZARD” to get the discount <3 If you miss this deal, be sure to check out my multi-pattern discount codes which are ALWAYS available and offer a substantial bulk-buying markdown!
Morale Fiber Pattern Store Discount Codes Valid for both Etsy and Ravelry! 15% off of 2: MF15OFF 20% off of 3-4: MF20OFF 25% off of 5-6: MF25OFF 30% off of 7+: MF30OFF
These femme wizard photos also include a few other things made by me! The shawl is a version of my Cobweb Wrap crochet pattern, which I altered in length (following the mathematical formula for altering provided in the pattern instructions) and did in rows instead of rounds (don’t have notes for that part, sorry!)
I’m loving the patchwork dress I made from scrap quilting cotton and some vintage linens and laces gifted to me by a friend 🙂 I periodically do sewing projects and am getting marginally better at them, and sometimes even meld them with crochet – I hope to be doing more of that in the future.
I haven’t had time to add my desired crocheted mushroom and forest-y felted embellishments to this hat design yet, so in the meantime I adorned my official wizard garb with one of my ethereal handmade moth clips from The Forest Fae.
As always, thank you for visiting and checking out my newest offerings! If you’d like to see ALL the Morale Fiber content, check out my handy Linktree!
I have some good news and some bad news! Let’s start with the good news:
The Mermaid Mitts & Sandals crochet pattern has been given a major update, which includes fixing some errors in the written pattern but also adding a bunch of bright, fresh new tutorial photography 🙂 As a pattern designer, I’m constantly backtracking to check that my paid patterns are up to my current standard – I started publishing my designs in 2015 and I’m always learning as I go, so sometimes the older patterns just look flimsy compared to what I can do now. The Mermaid Mitts & Sandals pattern is the latest PDF crochet pattern to get a nice makeover.
Keep reading for all the details on this design or go directly to my Etsy Shop, Ko-Fi Shop, or Ravelry Store to purchase this premium crochet pattern (But you might want to keep reading because I’m offering a SALE on Ravelry, discussed below)!
So that’s the good news, here’s the bad news: This design was supposed to debut today as both a paid PDF pattern file update AND a FREE pattern re-release including a new video tutorial. Another thing I like to do with my older paid patterns as I update them is consider whether they would be good choices for offering a free version here on my blog – just like I did with the Rhiannon Cowl, the Mandala Tam, the Winter Poncho, and the Mandala Top. Free versions of patterns help both me and you, since I get more site traffic which leads to more sales, and people who can’t afford a ton of paid patterns get access to quality content they can enjoy and recommend to others 🙂
But this is the bad news part, because I can’t offer the pattern on the blog or as a video today. For about two weeks now, my laptop computer has been inexplicably slow. It took me days to format the pattern update, and my computer has been so laggy and malfunctioning that it’s been very difficult to get any work done at all. I had scheduled the re-release of the Mermaid Mitts in updated PDF form, free blog pattern form, and free YouTube tutorial video form… but I’m nowhere near completing those last two items because my computer is SO FREAKING SLOW right now. 🙁
SOOOOO here’s my temporary solution – A SALE! Buy any other crochet pattern from my Ravelry Store, get the Mermaid Mitts & Sandals PDF pattern file for free! You don’t need a coupon code, just drop the Mermaid pattern in your cart with any other pattern and go to checkout where the discount will be taken 🙂 I’ll still be uploading this pattern for free and with a video tutorial in the future, once I fix whatever ailment is afflicting my technology. In the meantime, PDF pattern purchases are my main source of income and it would really help me out with the new technology costs if you took advantage of this deal – or, if you don’t need any more PDF patterns but still want to support my business, consider leaving a Tip in the Tip Jar! You can enter any amount of $1 increments to leave a tip in my secure, WordPress-backed payment system there. Any amount will be extra appreciated right now as technology is expensive but I can’t provide patterns without it <3
Anyway, here’s all the details about the Mermaid Mitts & Sandals pattern, which is one I’m very proud of and I think you’ll love! <3
Mermaid Mitts & Sandals
This fanciful beaded crochet accessory set is suitable for any mermaids, undines, or sirens that might journey onto land in search of a mortal to ensnare. This is a two-in-one pattern that makes one pair of scaly armwarmers (wrist OR elbow length) and one pair of beaded barefoot sandals!
I love the unique design of the mitts, which feature the crocodile stitches only on the back of the hand, not surrounding the palm, for more practical wear. The barefoot sandals are a mystical twist on traditional crochet foot accessories! Includes tutorial photography to accompany the written instructions and separate tutorials for crocodile stitches and the beading technique used in this pattern.
Suitable not only for mermaids, undines, and naiads, but also dryads, nymphs, sylphs, and all other manner of fae and little folk!
Materials: 3.50 hook (or size needed to obtain gauge) Lion Brand Coboo (#3 weight, 100 g / 232 yd, 50% cotton 50% Bamboo rayon) – about ½ skein (this is the recommended yarn but this pattern looks GREAT with lots of different yarns, including many #4 weight and #3 weight substitutes such as Lion Brand Mandala or Red Heart Unforgettable) 32 6/0 seed beads (optional) beading needle (optional) tapestry needle Gauge: 1 croc stitch scale = 1.5” measured across top
Pattern written in US crochet terminology. Language: ENGLISH
I drew inspiration from a lot of places for this design but one that always stuck with me was a faerie-like croc stitch barefoot sandal that had bells at the tip of each croc scale – I adored them and I still plan on doing a bell version of the sandals soon <3
As always, and despite the sometimes struggle-y nature of being a one-woman art business, I’m so full of gratitude. The online crochet community has been my home for over a decade now and it just gets better and better. It takes all of us to make it that way, sharing our creativity, ideas, inspiration, and encouragement to keep the passion of our tradition alive <3 Thank you!
My little Kismet Square motif has had an eventful life so far! I designed this circle-to-square motif a couple years ago, planning on using it for an ambitious new design which STILL hasn’t seen the light of day. Okay so, I’m still working on that one and it will eventually become something really great, but it is like… taking forever. Which I’ve learned simply happens sometimes, so you just have to roll with it.
In the meantime, I’ve found the main Kismet motif really useful for inspiring other patterns – including my newest FREE halter top design which premiers right here, right now!
The Kismet Halter Top is here on this blog post for anyone who wants to enjoy it, but is also available in my Ravelry Store , Ko-fi Shop, and Etsy Shop as a downloadable, printable, ad-free PDF 🙂 Read all the details of this latest design below or keep scrolling for the FREE crochet pattern instructions!
Oh, and the other project that features the Kismet motif is the Kismet Poncho, shown below, also free or purchasable as a premium pattern – OH and a FULL video tutorial version exists, too! <3 Yay!
Kismet Halter Top
The Kismet Halter top draws aspects from many of my other favorite halter top designs – a sturdy, wide construction around the ribcage for good coverage and good support, criss-cross lacing ties that don’t pressure the neck, and an eye-catching central mandala that looks perfect layered under tanks and low-cut tees. The optional Mehndi Border across the bottom can add extra coverage and turn up the festival fanciness factor!
The instructions for this top are in good written detail for the stitches and construction, while also being flexible enough to customize size to get the perfect fit. Cup sizes are written for A cup through DD cup and size suggestions for customizing the band portion go from X-Small – to 2X-Large 🙂 75+ tutorial photos are included with detailed references and clear steps connected to the written instructions.
The top is made with #4 weight 100% cotton for a quick project that will keep you cool and comfortable all summer – taken to the beach, to festivals, out dancing, or anywhere you are following your kismet <3
The following free pattern appears here exactly as in the PDF version, if you like it consider supporting my art by buying the PDF version or sampling my other patterns in the Ravelry Store and Etsy Shop! If you don’t need or want the PDF file, consider leaving a tip in my Tip Jar? Thank you for your support and please let me know what you think 🙂
Materials:
#4 weight cotton yarn (I used I Love This Cotton! – 3.5 oz/ 100 g, 180 yds, 100% cotton) 1 skein main color for Small-Med/A-C, 2 skeins main color for Lg-XL/D-DD , ~100 yds each for 2 accent colors 3.50 mm hook (or size needed to obtain gauge) Stitch markers, scissors, tapestry needle.
Gauge: 4 sts & 3 rows = 1” in hdc 4 sts & 5 rows = 1” in sc 4 sts & 2.5 rows = 1” in dc
Sizes: A – DD Cup sizes. Sizing for band (circumference around the ribcage) is written flexibly for customizable sizes. Finished Measurements For Individual Cups (approximate, taken with cup flattened): Cup Size A: 5.5” length from top to bottom (shown below), 4” width across bottom Size B: 6.5” length, 5” width Size C: 7” length, 6.5” width Size D: 7” length, 7.5” width Size DD: 7.5” length, 8.5” width
Notes: Beginning chain stitches do not count as the first st of the row. Beginning chain sts are given as 1 chain stitch for sc, 1 chain st for hdc, 2 ch sts for dc – these are one less than the typical amount because they work better for my gauge for this project, however, if those are too tight please feel free to add an extra chain to the beginning chain as needed.
Instructions
Center Motif:
With first accent color, make magic ring.
Rnd 1: Ch 3 (does not count as first dc – fig 1), 12 dc into the ring – fig 2. Pull loose yarn end to tighten the ring, slip stitch in the first dc to join – fig 3. – 12 dc
Fig. 1
Fig. 2
Fig. 3
Rnd 2: Ch 5 (counts as first dc + ch 2). (1 dc in the next st, ch 2) 11 times. Join with a sl st in the 3rd ch of beginning ch-5 – fig 4. – 12 dc, 12 ch-2 spaces
Fig. 4
Rnd 3: In the next ch space work 1 hdc, 1 dc, ch 2, 1 dc, 1 hdc – fig 5. Sl st in the next dc – fig 6. (In the next ch sp work 1 hdc, 1 dc, ch 2, 1 dc, 1 hdc. Sl st in the next dc) 11 times. Cut yarn and tie off if changing colors. – fig 7. – 12 shells
Fig. 5
Fig. 6
Fig. 7 – your motif may ruffle some at the end of this round. To help it lie flat, pull out the ends of the shells and press the motif. Don’t worry if it’s still a little curly, it will straighten out in the following rounds.
Rnd 4: Join 2nd accent color at the top of any ch space of the previous round (if not changing colors, simply slip stitch to the next ch sp). 1 sc in the same sp – fig 8. Ch 3, sc in the same space, ch 3. (1 sc in the next ch-1 space, ch 3, 1 sc in the same space, ch 3) 10 times – fig 9. 1 sc in the next ch-1 space, ch 3, 1 sc in the same space. Ch 1, work 1 hdc in the first sc of the round. This closes the last chain space by using a half-double crochet stitch instead of chain stitches so that your hook is positioned in the middle of a ch-3 sized space to begin the next round – figs 10-11. – 24 ch-3 spaces, 24 sc.
Fig. 8
Fig. 9
Fig. 10
Fig. 11 – the final chain space is closed by working a hdc which leaves your hook positioned in a ch-3 sized space to begin the next round.
Rnd 5: Ch 3 (does not count as first dc) – fig 12. 2 dc in the side of the last hdc worked at the close of Rnd 4, working underneath the side of the stitch as if it were a chain space – fig 13. Ch 1, sc in the next ch-3 space, ch 1 – fig 14. (2 dc in the next ch-3 space, ch 2. 2 dc in the same space, ch 1. 1 sc in the next ch-3 space, ch 1) 11 times – fig 15. 2 dc in the last ch-3 space, working next to the initial 2 dc. Ch 2, join with a sl st in the first dc of the round – fig 16. – 12 shells
Cut yarn and tie off – center motif should measure about 5.5” in diameter – fig 17. If motif is still curly, stretch out the points of the shells again and press flat. Some curl or ruffle will likely remain, this will also get stretched out later in the pattern. In some cases, 100% cotton yarn will be very thick and you may have extreme ruffling problems – in this case, you can skip the ch-1 in between the dc shells and the single crochets in Rnd 5 to reduce bulk.
Proceed to Cups instructions.
Fig. 12
Fig. 13
Fig. 14
Fig. 15
Fig. 16
Fig. 17 – Motif should measure about 5.5” in diameter.
Once finished, make 2 bikini cups according to your cup size:
Cups: Size A
Finished measurements: 5.5” from top to bottom (show above), 4.5” width across flat side.
Ch 16 (counts as first 15 chain stitches + 1 to turn, final ch st does not count as first st)
Foundation Row: Turn, work 1 sc in each of the next 15 ch sts. – 15 sc
Row 1: Ch 1 (does not count as first sc, see Notes), turn. 1 sc in the same st. 1 sc in ea of the next 14 sts. In the side of the sc on the end, work (1 sc, ch 1, 1 sc). Rotate to work down the other side of the foundation row, inserting hook into the bottom loop of the chain stitches. 1 sc in ea of the next 15 sts. – 32 sc, 16 on ea side of the ch-1 space (ch-1 space not included in the end-of-row stitch counts)
Row 2: Ch 1, turn. 1 sc in the same st. 1 sc in ea of the next 15 sts. (1 sc, ch 1, 1 sc) in the next ch-1 space. 1 sc in ea of the next 16 sc. – 34 sc, 17 on ea side of ch-1 space.
Row 3: Ch 1, turn. 1 sc in the same st. 1 sc in ea of the next 16 sts. (1 sc, ch 1, 1 sc) in the next ch-1 sp. 1 sc in ea of the next 17 sc. – 36 sc, 18 on ea side of the ch-1 sp.
Row 4: Ch 1, turn. 1 sc in the same st. 1 sc in ea of the next 17 sts. (1 sc, ch 1, 1 sc) in the next ch-1 sp. 1 sc in ea of the next 18 sc. – 38 sc, 19 on ea side of the ch-1 sp.
Row 5: Ch 1, turn. 1 sc in the same st. 1 sc in ea of the next 18 sts. (1 sc, ch 1, 1 sc) in the next ch-1 sp. 1 sc in ea of the next 19 sc. – 40 sc, 20 on ea side of the ch-1 sp.
Row 6: Ch 1, turn. 1 sc in the same st. 1 sc in ea of the next 19 sts. (1 sc, ch 1, 1 sc) in the next ch-1 sp. 1 sc in ea of the next 20 sc. – 42 sc, 21 on ea side of the ch-1 sp.
Row 7: Ch 1, turn. 1 sc in the same st. 1 sc in ea of the next 20 sts. (1 sc, ch 1, 1 sc) in the next ch-1 sp. 1 sc in ea of the next 21 sc. – 44 sc, 22 on ea side of the ch-1 sp.
Row 8: Ch 1, turn. 1 sc in the same st. 1 sc in ea of the next 21 sts. (1 sc, ch 1, 1 sc) in the next ch-1 sp. 1 sc in ea of the next 22 sc. – 46 sc, 23 on ea side of the ch-1 sp.
Cut yarn and tie off. Repeat for 2nd cup, leaving main color yarn attached after 2nd cup is complete. Proceed to “Construction”
Cups: Size B
Finished measurements: 6.5” from top to bottom (shown above), 5” width across flat side (shown below)
Ch 16 (counts as first 15 ch stitches + 1 to turn, final ch does not count as first st).
Foundation Row: Turn, 1 sc in ea of the next 15 ch sts. – 15 sc
Row 1: Ch 1, turn. 1 hdc in the same st. 1 hdc in ea of the next 14 sts. (2 hdc, ch 1, 2 hdc) in the side of the ch 1 on the end. Rotate to work down the other side of the row, inserting hook into the bottom loop of the foundation chain stitches. 1 hdc in ea of the next 15 sts. – 34 hdc, 17 hdc on ea side of the ch-1 space (Ch-1 space not included in the end-of-row stitch counts)
Row 2: Ch 1, turn. 1 hdc in the same st. 1 hdc in ea of the next 16 sts. (2 hdc, ch 1, 2 hdc) in the next ch-1 sp. 1 hdc in ea of the next 17 sts. – 38 hdc, 19 hdc on ea side of the ch-1 sp.
Row 3: Ch 1, turn. 1 hdc in the same st, 1 hdc in ea of the next 18 sts. (2 hdc, ch 1, 2 hdc) in the next ch-1 sp. 1 hdc in ea of the next 19 sts. – 42 hdc, 21 on ea side of the ch-1 sp.
Row 4: Ch 1, turn. 1 hdc in the same st. 1 hdc in ea of the next 20 sts. (2 hdc, ch 1, 2 hdc) in the next ch-1 sp. 1 hdc in ea of the next 21 sts. – 46 hdc, 23 on ea side of the ch-1 sp.
Row 5: Ch 1, turn. 1 hdc in the same st. 1 hdc in ea of the next 22 sts. (2 hdc, ch 1, 2 hdc) in the next ch-1 sp. 1 hdc in ea of the next 23 sts. – 50 hdc, 25 on ea side of the next ch-1 sp.
Row 6: Ch 1, turn. 1 hdc in the same st. 1 hdc in ea of the next 24 sts. (2 hdc, ch 1, 2 hdc) in the next ch-1 sp. 1 hdc in ea of the next 25 sts. – 54 hdc, 27 on ea side of the next ch-1 sp.
Cut yarn and tie off. Repeat for 2nd cup, leaving main color yarn attached after 2nd cup is complete. Proceed to “Construction”
Cups: Size C
Finished measurements: 7” from top to bottom (above), 6.5” width across flat side (below)
Ch 16 (counts as first 15 chain stitches + 1 to turn, final 2 ch sts do not count as first st)
Foundation Row: Turn, work 1 hdc in each of the next 15 ch sts. – 15 hdc
Row 1: Ch 2 (does not count as first dc, see Notes), turn. 1 dc in the same st. 1 dc in ea of the next 14 sts. In the side of the hdc on the end, work (2 dc, ch 1, 2 dc). Rotate to work down the other side of the foundation row, inserting hook into the bottom loop of the chain stitches. 1 dc in ea of the next 15 sts. – 34 dc, 17 on ea side of the ch-1 space (ch-1 space not included in the end-of-row stitch counts)
Row 2: Ch 2, turn. 1 dc in the same st. 1 dc in ea of the next 16 sts. (2 dc, ch 1, 2 dc) in the next ch-1 sp. 1 dc in ea of the next 17 sts. – 38 dc, 19 on ea side of the ch-1 space.
Row 3: Ch 2, turn. 1 dc in the same st. 1 dc in ea of the next 18 sts. (2 dc, ch 1, 2 dc) in the next ch-1 sp. 1 dc in ea of the next 19 sts. – 42 dc, 21 on ea side of the ch-1 sp
Row 4: Ch 2, turn. 1 dc in the same st. 1 dc in ea of the next 20 sts. (2 dc, ch 1, 2 dc) in the next ch-1 sp. 1 dc in ea of the next 21 sts. – 46 dc, 23 on ea side of the ch-1 sp
Row 5: Ch 2, turn. 1 dc in the same st. 1 dc in ea of the next 22 sts. (2 dc, ch 1, 2 dc) in the next ch-1 sp. 1 dc in ea of the next 23 sts. – 50 dc, 25 on ea side of the ch-1 sp.
Row 6: Ch 2, turn. 1 dc in the same st. 1 dc in ea of the next 24 sts. (2 dc, ch 1, 2 dc) in the next ch-1 sp. 1 dc in ea of the next 25 sts. – 54 dc, 27 on ea side of the ch-1 sp.
Cut yarn and tie off. Repeat for 2nd cup, leaving main color yarn attached after 2nd cup is complete. Proceed to “Construction”
Cups: Sizes D-DD
D-DD cups follow the same instructions given below, with DD sizes adding extra rows at the end.
Finished measurements, D Cup: 7” from top to bottom (above), 7.5” width across flat side
Finished Measurements, DD cup: 7.5” from top to bottom, 8.5” width across flat side
Ch 19 (counts as first 18 chain stitches + 1 to turn, final ch sts do not count as first st)
Foundation Row: Turn, work 1 sc in each of the next 18 ch sts. – 18 sc
Row 1: Ch 2 (does not count as first dc, see Notes), turn. 1 dc in the same st. 1 dc in ea of the next 17 sts. In the side of the ch st on the end, work (1 dc, ch 1, 1 dc). Rotate to work down the other side of the foundation row, inserting hook into the bottom loop of the chain stitches. 1 dc in ea of the next 18 sts. – 38 dc, 19 on ea side of the ch-1 space (ch-1 space not included in the end-of-row stitch counts)
Row 2: Ch 2, turn. 1 dc in the same st. 1 dc in ea of the next 18 sts. (1 dc, ch 1, 1 dc) in the next ch-1 space. 1 dc in ea of the next 19 sts. – 40 dc, 20 on ea side of the ch-1 sp.
Row 3: Ch 2, turn. 1 dc in the same st. 1 dc in ea of the next 19 sts. (1 dc, ch 1, 1 dc) in the next ch-1 sp. 1 dc in ea of the next 20 sts. – 42 dc, 21 on ea side of the ch-1 sp.
Row 4: Ch 2, turn. 1 dc in the same st. 1 dc in ea of the next 20 sts. (1 dc, ch 1, 1 dc) in the next ch-1 sp. 1 dc in ea of the next 21 sts. – 44 dc, 22 on ea side of the ch-1 sp.
Row 5: Ch 2, turn. 1 dc in the same st. 1 dc in ea of the next 21 sts. (1 dc, ch 1, 1 dc) in the next ch-1 sp. 1 dc in ea of the next 22 sts. – 46 dc, 23 on ea side of the ch-1 sp.
Row 6: Ch 2, turn. 1 dc in the same st. 1 dc in ea of the next 22 sts. (1 dc, ch 1, 1 dc) in the next ch-1 sp. 1 dc in ea of the next 23 sts. – 48 dc, 24 on ea side of the ch-1 sp.
Row 7: Ch 2, turn. 1 dc in the same st. 1 dc in ea of the next 23 sts. (1 dc, ch 1 1 dc) in the next ch-1 sp. 1 dc in ea of the next 24 sts. – 50 dc, 25 on ea side of the ch-1 sp.
Row 8: Ch 2, turn. 1 dc in the same st. 1 dc in ea of the next 24 sts. (1 dc, ch 1, 1 dc) in the next ch-1 sp. 1 dc in ea of the next 25 sts. – 52 dc, 26 on ea side of the ch-1 sp.
Cut yarn and tie off for D cup sizes. Repeat for 2nd cup, leaving main color yarn attached after 2nd cup is complete.
For DD sizes, continue for following rows:
Row 9: Ch 2, turn. 1 dc in the same st. 1 dc in ea of the next 25 sts. (1 dc, ch 1, 1 dc) in the next ch-1 sp. 1 dc in ea of the next 26 sts. – 54 dc, 27 on ea side of the ch-1 sp.
Row 10: Ch 2, turn. 1 dc in the same st. 1 dc in ea of the next 26 sts. (1 dc, ch 1, 1 dc) in the next ch-1 sp. 1 dc in ea of the next 27 sts. – 56 dc, 28 on ea side of the ch-1 sp.
Cut yarn and tie off. Repeat for 2nd cup, leaving main color yarn attached after 2nd cup is complete. Proceed to “Construction”
Construction:
Completed pieces so far.
Connecting the Motif & Cups:
With the two cups complete, position the 2nd cup (with the yarn still attached), so that the attached yarn is between the motif and the cup on the side of your crocheting hand – as shown in fig. 18, below-
Fig. 18 -This configuration allows you to work back and forth between the cups and the motif to connect them.
Chain 3. Sc in any ch-2 space of the shells of the motif – fig 19. Ch 2. Skip 5 stitches on the last row of the cup, sc in the next st – fig 20.
Fig. 19
Fig. 20
*Ch 2. 1 sc in the next ch-2 space on the motif. Ch 2, skip 5 sts on the edge of the cup, 1 sc in the next st on the cup – fig 21. Repeat from * once more.
There should now be 3 shell spaces attached along the cup side, with 5 stitches between each sc attachment on the cup, and gap of remaining stitches left at the end of the cup side before the central ch-1 space of the cup peak.
How many sts you have left on the cup before the ch-1 space depends on size – 4 for A, 8 for B, 8 for C, 7 for D, 9 for DD.
Fig. 21
The connection now continues onto the second cup:
Ch 2, 1 sc in the next ch-2 space on the motif – fig 22. Count an equal amount of stitches away from the ch-1 central space on the opposite cup as you had left on the first cup (4 for A, 8 for B, 8 for C, 7 for D, 9 for DD) , mark the next stitch. Ch 2 and work 1 sc into the marked stitch. Ch 2, 1 sc in the next shell.
Fig. 22
*Ch 2, skip 5 stitches on the cup, 1 sc in the next st. Ch 2, 1 sc in the next shell of the motif.
Repeat from * once more.
Ch 2, skip 5 stitches on the cup, sc in the next st (the final stitch on the row of the cup side) – fig 23.
Fig. 23
Now the entire piece will be rotated to add chains across the rest of the central motif – fig 24.
(Ch 6 – fig 24, 1 sc in the next shell) 5 times. Ch 6, 1 sc in the side of the outermost stitch of the side of the cup – figs 25-26.
Fig. 24
Fig. 25
Fig. 26
Edges
To continue, a sc edging will be worked into the side of the cup.
In single crochet down the side of the rows on this edge of the cup, work 1 sc per row side for Cup Size A (total 17), 2 sc per row side for cup sizes B-C (total 26 for B, 26 for C), and 2-3 sc per row side for sizes D-DD (total 34 sc for D at 2 per side, 42 for DD at 2 per side) – fig 27.
Depending on gauge, you may want to work 3 sc per row side for cups worked in dc – you can experiment and decide which looks best as the rest of the instructions will be flexible for this area of the design.
Fig. 27
At the edge of the cup, ch 1 and rotate the piece to work along what is now the “bottom” portion of the halter top – fig 28. 1 sc in each stitch until reaching the ch-1 space at the peak of the cup. 1 sc in the ch-1 space. 1 sc in the next st – fig 29.
Fig. 28
Fig. 29
Ch 1 for A-C sizes. Ch 2 for D-DD sizes. Skip to next cup, 1 sc in the st right before the ch-1 space. 1 sc in the next ch-1 space. Continue along the bottom edge of the next cup by working 1 sc in each st until the edge – fig 30.
Fig. 30
Ch 1, rotate to begin working along the edge of the cup – fig 31. 1-3 sc in the side of each row according to your size the same way as you worked with the other cup edge, until reaching the top corner – fig 32. Slip stitch in the top corner stitch to join, cut yarn and tie off.
Fig. 31
Fig. 32
Fig. 33
Reattach main yarn at the bottom corner of the halter top so that you are ready to work across the length of the bottom again.
Bottom:
Row 1: Ch 1 (does not count as first sc), 1 sc in each st until 3 stitches from the chain that runs across the middle of the two cups – fig 34.
Fig. 34
Ch 4 – 5 (4 for smaller sizes, 5 for larger), skip the next 3 stitches, the chains, and the 3 sts on the opposite side – fig 35. 1 sc in the next st and in ea remaining stitch across the bottom length.
Fig. 35
Row 2: Ch 1, turn. 1 sc in the same st and in each stitch across the bottom of the first half, working 4-5 sc in the chain space, then working 1 sc in each st across the bottom of the second half – fig 36.
Fig. 36
Row 3: Ch 1, turn. 1 sc in ea st across.
Row 4: Ch 1, turn. 1 sc in ea st across – fig 37.
Fig. 37
Now there should be 3 rows total of single crochet after the 2nd chain space between the cups (not counting the row containing the chain space). To finish the bottom edge, you can add as much hdc as you like by working the following:
Row 5: Ch 1 (does not count as first hdc), 1 hdc in the same st. 1 hdc in ea stitch across – fig 38.
Work an amount of rows repeating Row 5 so that the top is the length you like. I suggest the following amounts just to get started, then add more or less if you like: XS: 3 rows, Small: 4 rows, Med-Large: 5 rows, XL-2XL: 6 rows. Do not tie off. Proceed to Side Panel instructions.
Fig. 38
Side Panels
Rotate the piece so that you are preparing to work up the side of the halter toward the motif – fig 39.
Row 1: Ch 1, 1 hdc in the side of ea row just worked along the bottom of the halter for all rows worked. For example, a total of bottom rows equaling 7 (4 sc rows, 3 hdc rows) would be 7 sc.
Fig. 39
Row 1 Ct’d: Working in the sc stitches up the side of the cup, 1 hdc in ea st until this portion covers 5 total rows of the cup – fig. 40. This will be approximately 5 more stitches for A cups, 10 more stitches for B and C cups, and 10-15 more stitches for D and DD cups (depending on how many sc’s per row end you worked).
This will extend the side panel to cover about 1/3rd of the cup length. Smaller sizes may go up to almost ½ the cup length if more coverage is needed.
The total width of these side panels can also be modified here to suit taste or desired fit – just add or remove stitches to alter the width of the side panel.
Fig. 40
Row 2: Ch 1, turn. 1 hdc in the same st, 1 hdc in ea st across.
Repeat for as many rows as you like to get enough length to reach around your ribcage.
Use the following as a guide & customize number of rows to suit your personal fit: X-Small: 10 rows, Small: 12 rows, Med: 15, Lg: 18, XL: 21, 2XL: 23
These amounts are just a starting point, as you can do as many or as few rows as you need here.
Cut yarn and tie off.
Attach yarn to the opposite corner and work the same amount of stitches up the side to start the second side panel. Repeat the same amount of rows as you did before to complete second side panel. Proceed to Trim & Straps Instructions.
Trim & Straps
Reattach yarn at the top corner of the panel on the side of your hook hand, Right Side of the piece facing (as shown below). Depending on how many rows on your side panel, you may finish in this spot, in which case you wouldn’t have to cut & rejoin the yarn.
Rejoined yarn at the top corner of the side panel on my hook hand side (the right side). Right Side facing.
Step 1: Ch 1, 1 sc in each st of the sides of the side panel rows. As before, you can add more or less to loosen or tighten the stitching depending on tension and preference – fig 41
Step 2: Now working in the side of the cup, 1 Sc in ea stitch up the side of the cup – fig 42 – until reaching the ch-6 space that connects the motif to the top.
Fig. 41
Fig. 42
Step 3: (6 sc in the next ch-6 space, 1 sc in the next sc) 2 times – fig 43.
Fig. 43
Step 4 (First strap) Here we add the straps that cross in the back and then weave back and forth through the eyelets. We’ll need plenty of length to weave back and forth – I use 200 for a smalls-mediums. 200-250 is usually enough, but it also depends on how long your side panels are. If you’re not sure, err on the side of extra length as you can always wrap the ties more to get the out of the way. If they are too short, you either have to frog and try again or attach yarn at the end and lengthen by chaining and slip stitching back down the extra length. 😉
Ch 200-250 – fig 44.
Slip stitch in each ch stitch all the way back down the chain. Sc in the same stitch as last sc fig 45.
Fig. 44
Fig. 45
Step 5: (6 sc in the next ch-6 space, 1 sc in the next sc) 2 times.
Step 6 (Second strap) Ch 200-250 – fig 46. Slip stitch back down, 1 sc in the same stitch as last sc.
Fig. 46
Step 7: (6 sc in the next ch-6 space, 1 sc in the next sc) 2 times – fig 47.
Fig. 47
Step 8: 1 sc in ea st down the side of the next cup.
Step 9: 1 sc in ea st on the side of the panel rows – matching the number you got for the other side – fig 48.
Fig. 48
Step 10: Ch 3, rotate to work down the edge of the panel. Sk next st, 1 hdc in the next st. 1 hdc in each of the next 4-5 sts*.
(Ch 1, sk next st, 1 hdc in ea of the next 4-5 sts) rpt across the end of the side panel – fig 49. This creates the eyelets necessary to weave the straps back and forth.
*Depending on the exact number of stitches in your side panel, your eyelet number might be different. Just create as many repeats so that the skipped stitches are even across the panel. You can vary the number of stitches between eyelets to help balance the spacing.
Fig. 49
Step 11: At the end of the row, rotate to work across the bottom of the halter top. Ch 3, 1 sc in each row end stitch across the bottom of the side panel, in each stitch across the bottom of the halter, and in each row end across the other side panel. – fig 50.
Fig. 50
Step 12: Ch 3, 1 hdc in the same st. Working across the top row of the side panel, create the (4-5 hdc, ch 1, sk next st) repeats from the other side to create a matching eyelet row. At the final stitch, ch 3 and slip stitch in the first stitch of the strap edging round – fig 51.
Cute yarn and tie off.
Fig. 51
Mehndi Border (Optional)
The Mehndi Border creates a cute textural decoration of petals and pompoms across the bottom of the halter. This is a great option if you are wearing your halter alone as a crop top and want a little more coverage – it does make it a bit bulky for layering though.
This feature originally appeared in another halter design of mine, the Mehndi Halter Top!
Finished Mehndi Border (shown above)
Row 1: With RS facing, join coordinating color yarn into the bottom edge – fig 52 – and ch 3. The first ch 3 counts as the first dc. (Ch 1, sk the next st, dc in the next st) across to the other edge of the bottom – figs 53-54.
Fig. 52
Fig. 53
Fig. 54
Row 2: Ch 6, turn – fig 55, sk next 4 sts, sl st in the next st – fig 56. (Ch 6, sk next 4 sts, sl st in the next st) across – figs 57-58.
Fig. 55
Fig. 56
Fig. 57
Fig. 58
Row 3: Turn without chaining. 2 hdc in the last ch-6 loop of the previous row – figs 59-60. Work 2 dc, 3 tr, 2 dc in the same loop. 1 hdc in the same space – fig 61. YO, draw up a loop in the same ch-6 space. YO, draw up a loop in the next ch-6 space – fig 62. YO and draw through all 5 lps on the hook – 1 hdc2tog over 2 ch-6 spaces – fig 63. (1 hdc, 2 dc, 3 tr, 2 dc, 1 hdc, 1 hdc2tog over the next 2 spaces) in ea ch-6 space across, forming the “petals” of the border design. 1 hdc, 2 dc, 3 tr, 2 dc, 2 hdc in the last ch-6 space – fig 64. Sl st in the side of the last dc of the first row.
Fig. 59
Fig. 60
Fig. 61
Fig. 62
Fig. 63
Fig. 64
Cut yarn and tie off if changing to 2nd accent color. If not, then turn without chaining to begin Row 4.
The petals will likely be slanted or curly from working – take the middle tr stitch and stretch them until evenly placed on the spaces and straightened – fig 65.
Fig. 65
Row 4: Turn, join new color at the middle tr st of the first petal. If using same color, sl st to that stitch. Ch 7 ( counts as ch-5 + first 2 ch of pompom st) – fig 66. *Dc3tog in the 2nd ch from the hook. Ch 2, Dc3tog in the top of the previous cluster. Slip stitch in the base of the FIRST cluster, bringing the two dc clusters together to form two halves of a ball* – from * to * is your pompom stitch (see tutorial, Pg. 22). Ch 5, sl st in the 2nd treble of the next petal – fig 67. (Ch 7, pom pom stitch, ch 5, sl st in the 2nd tr of the next petal) repeat across – fig 68.
Fig. 66
Fig. 67
Fig. 68
Cut yarn and tie off. Weave in all ends.
To Wear
Weave in all remaining ends. The two long ties at the top of the motif cross and/or tie at the neck, then cross over again to lace down the eyelets of the side panels.
I hope you have as much fun making & wearing this top as I did designing it! I love the flattering way the border flares out from the natural waist, which makes it so versatile as a crop top for higher waisted skirts and pants – while you can also leave off the border entirely for a perfect layering bralette 🙂
First things first! To see all available sizes of the FREE Elf Coat pattern, as well as all the available add-ons to this design, please visit the Elf Coat FAQ page for links <3
During the process of updating the original Elf Coat Pattern, I decided it was finally time to make an Elf Coat of my very own! I’ve had this color of King Cole DK Riot “Funky” saved back specifically for this purpose for years – the colors feature warm purples, lavender, sage greens, olive and hints of fuschia – all my favorite colors 🙂
I worked up a size Small in this colorway, partly to test out the new shoulder and hood shaping that was part of the big update – and also to keep my head in the game while my awesome pattern testers worked on the Elf Coat Plus Sizes pattern expansion which was just released. This whole design has had a lively life so far, and I can’t wait to see where you all take it in the future 😉
While working, I also made some modifications on the skirt wedges that resulted in a larger skirt seamed to a smaller bodice – for more info on how to pull that off, I made a YouTube tutorial how-to! 🙂
While making my personal version of the Elf Coat, I couldn’t help but try out my vision for a pointed pocket, inspired by the type of pixie pocket shape featured on Katwise’s (www.katwise.com) coats, which are responsible for helping inspire this design. I didn’t want to mess around with doing the inset pockets, so I decided that I could do the pointed shape and apply it directly to the outside of the coat after it was finished for an “afterthought” pocket. Keep scrolling for the FREE pattern for these cute pointed pockets for the Elf Coat 🙂
I also added a sweet little faux fur trim to the hood – 6 rows of fuzzy yarn in LDC with a 3.50 mm hook and I will NEVER do something so crazy again, haha! 😛 It was slow going, but I did eventually accomplish that faux fur and I’ll say now that it was worth it.
I also really love how the buttons came out – I had an assortment of detailed metal vintage buttons and I love the way they add interest and character <3
I give each of these coats a name and a personality and I dubbed my own personal Elf Coat “Twig Nest” – for reasons 😀 I’m a hodge-podge, helter-skelter chaos artist and if I were a bird, my nest would be a dopey looking pile of twigs on the ground – but there’d be love in there 🙂
Pointed Pockets Pattern
Following all yarn, hook, and gauge instructions from the original pattern.
With 6.50 Tunisian hook and main yarn:
Row 1: Ch 3. TSS in the 2nd chain from the hook and in the next ch st. RP – 3 sts
Rows 2-3: TKS in ea st across. RP. – 3 sts
Row 4: TKS inc in the next space. TKS in the next st. TKS inc in the next space. TKS in the final st. RP. – 5 sts
Rows 5-6: TKS in ea st across. RP. – 5 sts
Row 7: TKS inc in the next space. TKS in ea of the next 3 sts. TKS inc in the next space. TKS in the last st. RP. – 7 sts
Rows 8-9: TKS in ea st across. RP. – 7 sts
Row 10: TKS inc in the next space. TKS in the next 5 sts. TKS inc in the next space. TKS in the final st. RP. – 9 sts.
Rows 11-12: TKS in ea st across. RP. – 9 sts.
Row 13: TKS inc in the next space. TKS in the next 7 sts. TKS inc in the next space. TKS in the final st. RP. – 11 sts
Rows 14-15: TKS in ea st across. RP. – 11 sts
Row 16: TKS inc in the next space. TKS in the next 9 sts. TKS inc in the next space. TKS in the final st. RP. – 13 sts
Row 17: TKS in ea st across. RP. – 13 sts
Row 18: TKS inc in the next space. TKS in the next 11 sts. TKS inc in the next space. TKS in the final st. RP. – 15 sts
Row 19: TKS in ea st across. RP. – 15 sts
Row 20: TKS inc in the next space. TKS in the next 13 sts. TKS inc in the next space. TKS in the final st. RP. – 17 sts
Row 21: TKS in ea st across. RP. – 17 sts
Row 22: TKS inc in the next space. TKS in the next 7 sts. TKS inc in the next space, TKS in the next st, TKS inc in the next space. TKS in the next 7 sts. TKS inc in the last space, TKS in the last st. RP. – 21 sts
Row 23: TKS in ea st across. RP. – 21 sts
Row 24: TKS inc in the next space. TKS in the next 9 sts. TKS inc in the next space, TKS in the next st, TKS inc in the next space. TKS in the next 9 sts. TKS inc in the last space, TKS in the last st. RP. – 25 sts
Row 25: TKS inc in the next space. TKS in the next 11 sts. TKS inc in the next space, TKS in the next st, TKS inc in the next space. TKS in the next 11 sts. TKS inc in the last space, TKS in the last st. RP. – 29 sts
Row 26: TKS inc in the next space. TKS in the next 13 sts. TKS inc in the next space, TKS in the next st, TKS inc in the next space. TKS in the next 13 sts. TKS inc in the last space, TKS in the last st. RP. – 33 sts
Row 27: TKS dec over the next 2 sts. TKS in the next 11 sts. TKS dec over the next 2 sts, TKS in the next st, TKS dec over the next 2 sts. TKS in the next 11 sts, TKS dec over the next 2 sts, TKS in the last st. RP – 29 sts.
Row 28: TKS in ea st across. RP. – 29 sts
Row 29: TKS dec over the next 2 sts. TKS in the next 9 sts. TKS dec over the next 2 sts, TKS in the next st, TKS dec over the next 2 sts. TKS in the next 9 sts, TKS dec over the next 2 sts. TKS in the last st. RP. – 25 sts
Rows 30-34: TKS in ea st across. RP. – 25 sts
Switch to 3.50 mm regular crochet hook.
LDC Row 1: Ch 3, 1 dc in the same st, inserting hook into the tunisian stitches as if to TKS (but working regular crochet instead). 1 LDC (Linked Double Crochet, see Stitches & Techniques section in the main pattern) in ea of the next 24 sts.
LDC Rows 2-3 : Ch 3, turn. 1 LDC in each stitch across.
Cut yarn and tie off, leaving a long tail for sewing the pocket onto the coat.
Using the long yarn tail and tapestry needle, sew the pocket onto the outside of the finished coat using a whip stitch or your preferred seaming stitch.
I’ll be taking another long break from Elf Coats now, especially considering that I gloriously injured my shoulder while cranking out this particular coat! But no worries, there’s plenty more coming from your friendly neighborhood Mad Fiber Scientist… -MF
To see all available sizes of the FREE Elf Coat pattern, as well as all the available add-ons to this design, please visit the Elf Coat FAQ page for links!
It’s finally here you guys! This page contains the FREE PLUS SIZES pattern for the Elf Coat, my most popular pattern <3 And it’s all thanks to you! Your encouragement, feedback, and testing (and of course LOVE) powered me through all the work necessary to get this design expanded for plus sizes. I simply can’t wait to see what you all make!
Although this pattern is written for XL and 2XL, the sizes are oversized, meaning that 2XL measurements cover the standard measurements for 3XL as well! Please see the Sizes section in the notes for more details on that 😉 If you need a reference for the sizing standards I use, those can be found here!
The portable, printable, ad-free PDF for this crochet pattern is also available in my Etsy Shop , Ko-fi Shop, and Ravelry Store – purchasing the paid version of this pattern is a great way to directly support my art! Or if you don’t need the PDF, consider leaving a tip in the Tip Jar if you feel it’s worth it! 🙂
If you want to show off your awesome Elf Coat, have you joined our super nice and supportive Facebook Group, the Magic Fantastic Crochet Atelier? They (and I) would love to see your work!
Elf Coat Plus Sizes XL – 2XL / 3XL
Materials & Notes
6.5 (K) Tunisian hook 3.50 mm regular hook King Cole Riot DK (#3 weight, 100 g / 324 yds, 30% wool, 70% acrylic) – 17, 19 skeins Pockets: 1 extra skein makes inset pockets, ~ ½ a skein makes outside pockets. Gauge for Riot DK: 9 sts & 10 rows = 2” Red Heart Boutique Unforgettable (#4 weight, 100 g / 270 yds, 100% acrylic – color shown is Meadow) – 21, 23 skeins Gauge for Unforgettable: = 8 sts & 9 rows = 2”
Sizes: X-Large, 2XL/3XL. Pattern instructional variations are given for each size, in this order. Where no variation occurs, instructions apply to all sizes. Please see notes below the finished measurement section for more details.
Finished Measurements: Measurements are approximate and given for the original gauge using Riot DK. Substituting a different yarn or gauge may result in different measurements.Waist: ~50″, 57” Bust: ~50″, 57” Hip: ~56″, 64” Sleeve: 22″ (measured armpit to hem), 22” Length: ~40″
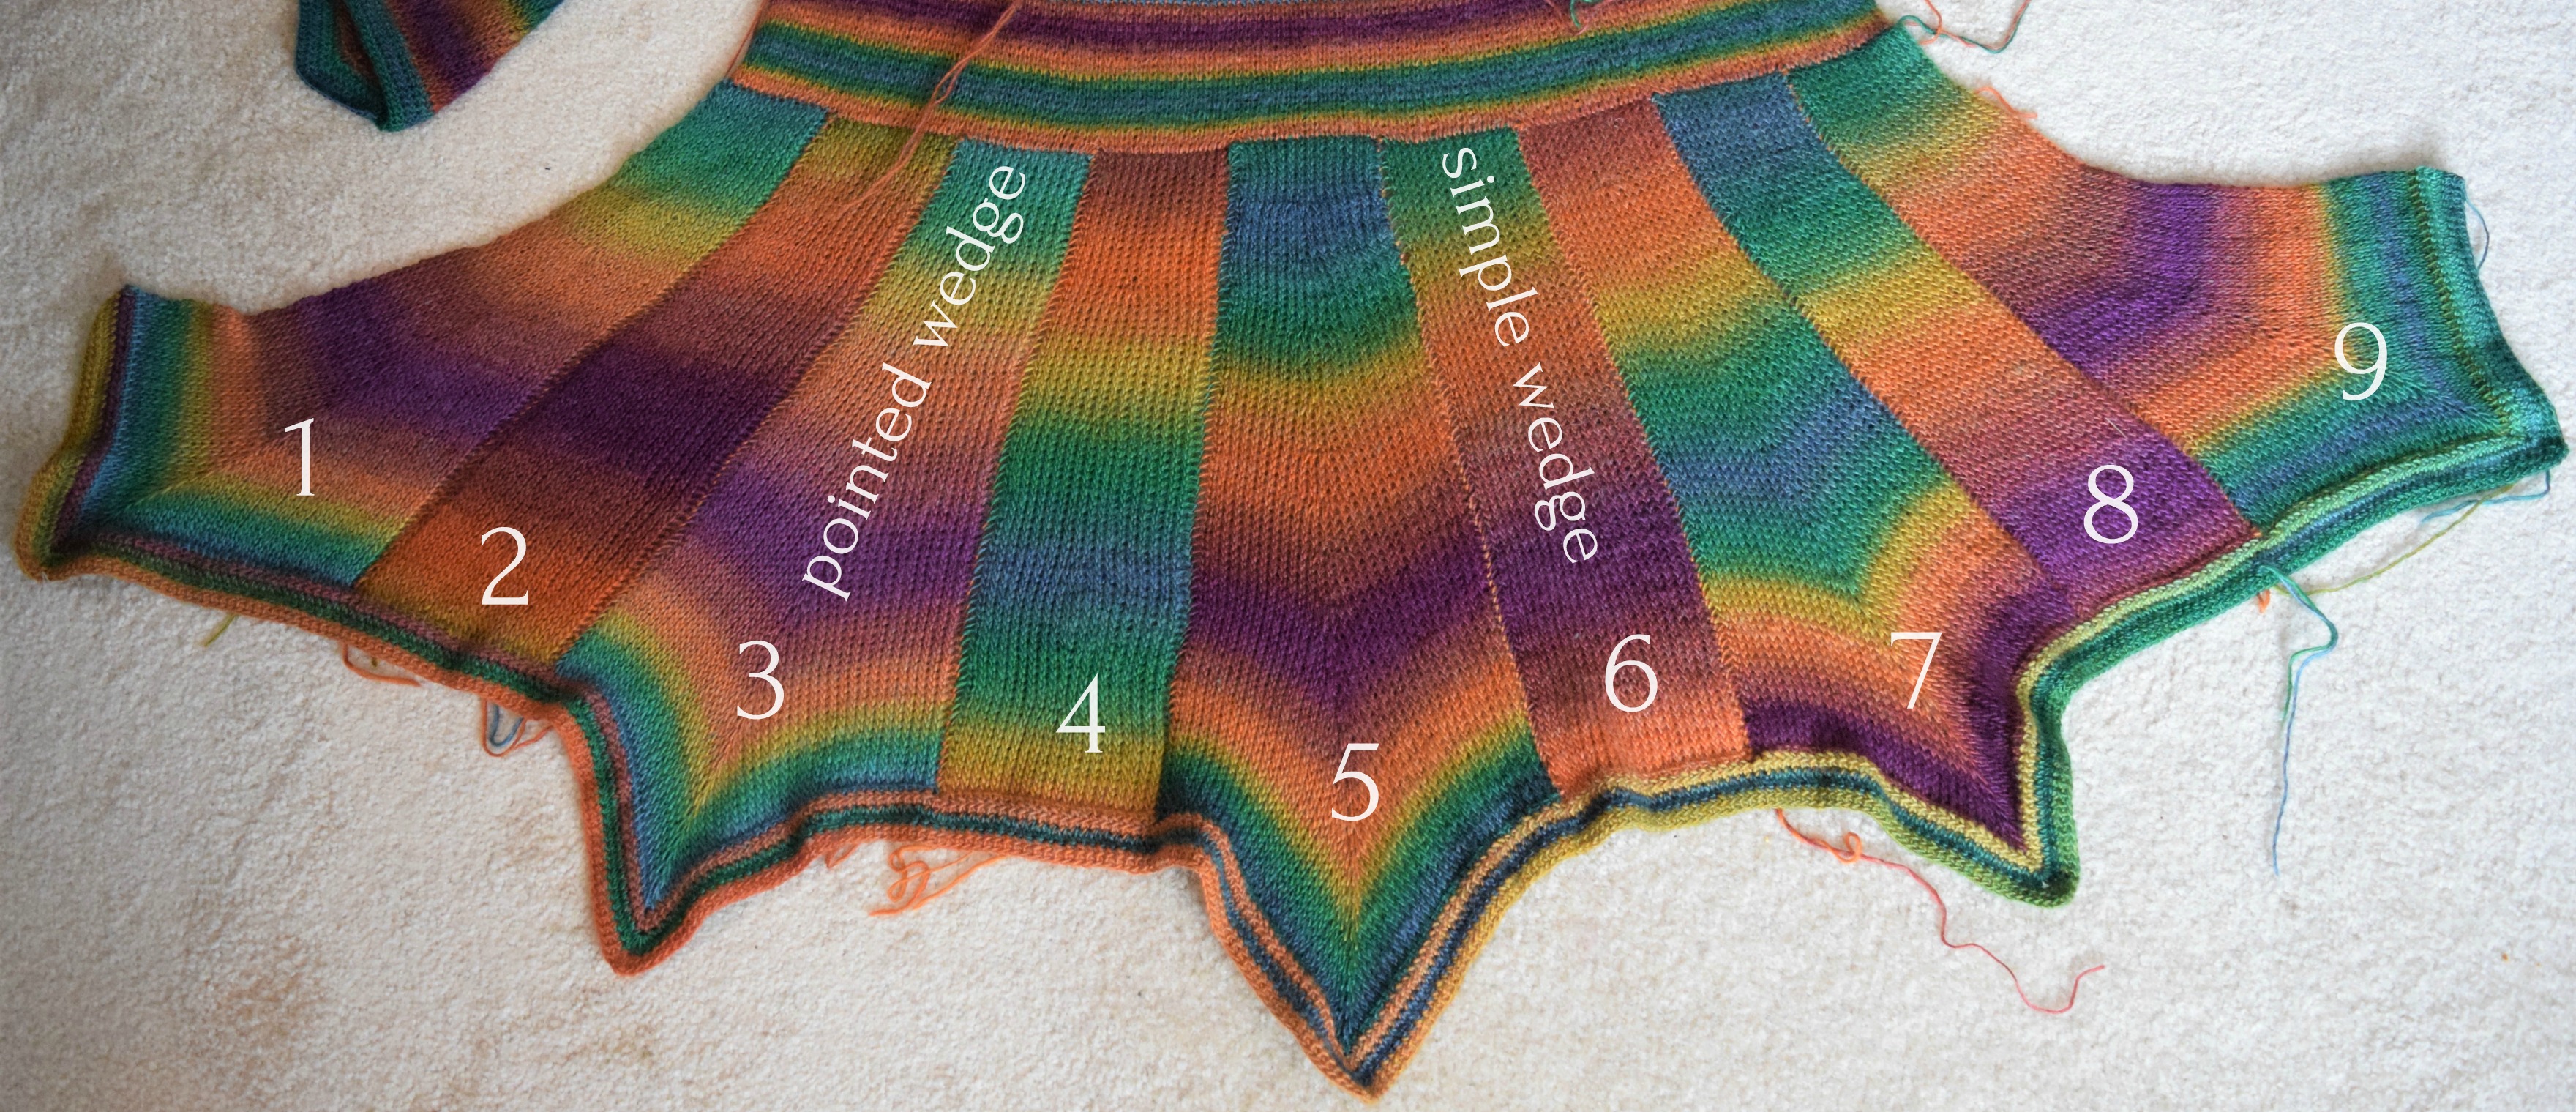
Sizing Notes: This pattern is based on the number of wedges in the skirt, making 15 wedges (7 pointed, 8 simple) for the XL size, and 17 wedges (8 simple, 9 pointed) for the 2XL size. Please note that due to this incremental difference between all sizes (2 extra skirt panels per each size up) means that the Plus Sizes are actually oversized. This is why 3XL is included under 2XL – the 2XL is already bigger than the 3XL’s standard measurements based on this sizing system. Please be sure to measure your actual body size and compare to the measurements given for each size to determine which size to make. Bigger coats can also be adjusted to fit using the optional corset back lacing and belt tie additions included in this pattern. Some parts of the pattern include areas where lengthening or shortening is an option (the bottom of the front & back panels, the height of the waistband, and the crochet trim). Please be aware that if you need the coat length adjusted these options are available!
Configuration of wedges on size Small
Size medium
Size Large
Notes on yarn, gauge, and sizing:
Yarn: I chose King Cole Riot DK yarn for this pattern because of its long color changes and pretty one-ply structure that makes the colors and the stitches well defined. The DK weight and 30% wool content creates a sleek and lightweight fabric that is also very warm. However, the big box hobby stores in the U.S do not carry this yarn – I get it from a UK website called LoveKnitting.com (which I highly recommend!).
So, I wanted to find a substitute yarn that is more commercially available and the closest I could find was Red Heart Unforgettable, which also looks gorgeous for this design. RH Unforgettable is 100% acrylic, which has the benefit of zero felting, and being allergy/vegan friendly. It is also a #4 weight yarn which means it will gauge differently.
Above: Panels made in Red Hear Unforgettable
Gauge: Since the two yarns gauge differently, I have listed the gauges for each yarn individually under the materials section. These are using the 6.50 mm hook listed. If you use Unforgettable following it’s gauge, you can get a slightly bigger coat using the same stitch counts listed in the pattern.
9 stitches = 2″ in Riot DK
10 rows = 2″ in Riot DK
8 sts = 2″ in RH Unforgettable. It’s really more like 8.5 stitches, but we’re calling it 8 because of stretch!
9 rows = 2″
It’s also an option to change the hook size for Unforgettable to obtain the gauge given for Riot DK, if you want to use the alternate yarn but still get the size pictured.
NOTE FOR LEFTIES: If you are left-handed, your pattern pieces will be mirrored – for instance, your left panel for the torso of the jacket will be worked from the Right Panel pattern, and vice versa.
Technique Notes: Tunisian stitch is a wonderful crochet technique and I love it and highly recommend learning if you haven’t. But since this piece uses a simple stitch pattern (it’s just rows of regular stitches with some increases and decreases – that’s really it) a different technique can easily be substituted in. As long as your stitches match the gauge given, you could work this pattern in regular single crochet or regular knit stitch.
One Tunisian stitch = one regular single crochet or one regular knit/purl stitch.
I tested out some Riot DK in rows of single crochet, and obtained a closely matching gauge using a 4.0 mm hook.
If you are working this pattern in a regular crochet stitch, keep in mind that Tunisian crochet does not ever turn, so your rows will be alternately “opposite” what the Tunisian instructions are. For instance, a piece that decreases at the beginning of every row in Tunisian, will alternately decrease at the beginning and decrease at the end for a regular, turning stitch.
Blocking: Not absolutely necessary but it does wonders for your finished piece, especially with Tunisian crochet which tends to curl naturally. Blocking for this piece can be done simply by laying your piece out on a foam mat, using blocking pins to stretch it and make it lay flat and pretty and in the right shape. Using a spray bottle and plain water, wet the piece, then let dry. This works great with wool based yarns (King Cole Riot DK) and moderately well with acrylics (RH Unforgettable).
Both the simple wedges and the pointed wedges can be shortened by subtracting 8 rows right after the initial Row 1.
Ch 15.
Row 1: Pick up a st in the 2nd ch from the hook and in the next 13 sts. Return pass (RP). – 15 stitches
Row 2: TKS in ea ch st across the row. RP. – 15 sts
Rows 3-18: TKS across, RP. – 15 sts
Row 19: TKS in the next 6 sts, pick up a lp in the next space to increase. TKS in the next st, pick up a lp in the next sp to increase. TKS in the next 7 sts. RP. – 17 sts
Rows 20-35: TKS across, RP. – 17 sts
Row 36: TKS in the next 7 sts, increase in the next sp. TKS in the next st, increase in the next sp. TKS in the next 8 sts. RP. – 19 sts.
Rows 37-52: TKS across, RP. – 19 sts
Row 53: TKS in the next 8 sts, increase in the next sp. TKS in the next st, increase in the next sp. TKS in the next 9 sts. RP. – 21 sts.
Row 54-69: TKS across, RP. – 21 sts
Row 70: TKS in the next 9 sts, increase in the next sp. TKS in the next st, increase in the next sp. TKS in the next 10 sts. RP. – 23 sts.
Row 71-80: TKS across, RP. – 23 sts Cut yarn and tie off.
Pointed Wedge (Make 7, 9):
The point is formed by concentrating the increases in the center part of the wedge, with increasing frequency as the wedge gets larger. There are no decreases used to form the point. When the pointed wedge is finished and tied off, stretch the central point outward gently to fully accent the shape.
Ch 15.
Row 1: Pick up a st in the 2nd ch from the hook and in the next 13 sts. Return pass (RP). – 15 stitches
Row 2: In TKS, pick up a lp from ea st across the row. RP. – 15 sts
Rows 3-9: TKS across, RP. – 15 sts
Row 10: TKS in the next 6 sts, pick up a lp in the next space to increase. TKS in the next st, pick up a lp in the next sp to increase. TKS in the next 7 sts. RP. – 17 sts
Rows 11-18: TKS across, RP. – 17 sts
Row 19: TKS in the next 7 sts, inc in the next sp. TKS in the next st, inc in the next sp. TKS in the next 8 sts. RP. – 19 sts
Rows 20-27: TKS across, RP. – 19 sts
Row 28: TKS in the next 8 sts, inc in the next sp. TKS in the next st, inc in the next sp. TKS in the next 9 sts. RP. – 21 sts
Rows 29-32: TKS across, RP. – 21 sts
Row 33: TKS in the next 9 sts, inc in the next sp. TKS in the next st, inc in the next sp. TKS in the next 10 sts. RP. – 23 sts
Rows 34-37: TKS across, RP. – 23 sts
Row 38: TKS in the next 10 sts, inc in the next sp. TKS in the next st, inc in the next sp. TKS in the next 11 sts. RP. – 25 sts
Rows 39-42: TKS across, RP. – 25 sts
Row 43: TKS in the next 11 sts, inc in the next sp. TKS in the next st, inc in the next sp. TKS in the next 12 sts. RP. – 27 sts
Rows 44-47: TKS across, RP. – 27 sts
Row 48: TKS in the next 12 sts, inc in the next sp. TKS in the next st, inc in the next sp. TKS in the next 13 sts. RP. – 29 sts
Rows 49-50: TKS across, RP. – 29 sts
Row 51: TKS in the next 13 sts, inc in the next sp. TKS in the next st, inc in the next sp. TKS in the next 14 sts. RP. – 31 sts
Rows 52-53: TKS across, RP. – 31 sts
Row 54: TKS in the next 14 sts, inc in the next sp. TKS in the next st, inc in the next sp. TKS in the next 15 sts. RP. – 33 sts
Row 55: TKS across, RP. – 33 sts
Row 56: TKS in the next 15 sts, inc in the next sp. TKS in the next st, inc in the next sp. TKS in the next 16 sts. RP. – 35 sts
Row 57: TKS across, RP. – 35 sts
Row 58: TKS in the next 16 sts, inc in the next sp. TKS in the next st, inc in the next sp. TKS in the next 17 sts. RP. – 37 sts
Row 59: TKS across, RP. – 37 sts
Row 60: TKS in the next 17 sts, inc in the next sp. TKS in the next st, inc in the next sp. TKS in the next 18 sts. RP. – 39 sts
Row 61: TKS across, RP. – 39 sts
Row 62: TKS in the next 18 sts, inc in the next sp. TKS in the next st, inc in the next sp. TKS in the next 19 sts. RP. – 41 sts
Row 63: TKS across, RP. – 41 sts
Row 64: TKS in the next 19 sts, inc in the next sp. TKS in the next st, inc in the next sp. TKS in the next 20 sts. RP. – 43 sts
Row 65: TKS across, RP. – 43 sts
Row 66: TKS in the next 20 sts, inc in the next sp. TKS in the next st, inc in the next sp. TKS in the next 21 sts. RP. – 45 sts
Row 67: TKS in the next 21 sts, inc in the next sp. TKS in the next st, inc in the next sp. TKS in the next 22 sts. RP. – 47 sts
Row 68: TKS in the next 22 sts, inc in the next sp. TKS in the next st, inc in the next sp. TKS in the next 23 sts. RP. – 49 sts
Row 69: TKS in the next 23 sts, inc in the next sp. TKS in the next st, inc in the next sp. TKS in the next 24 sts. RP. – 51 sts
Row 70: TKS in the next 24 sts, inc in the next sp. TKS in the next st, inc in the next sp. TKS in the next 25 sts. RP. – 53 sts
Row 71: TKS in the next 25 sts, inc in the next sp. TKS in the next st, inc in the next sp. TKS in the next 26 sts. RP. – 55 sts
Row 72: TKS in the next 26 sts, inc in the next sp. TKS in the next st, inc in the next sp. TKS in the next 27 sts. RP. – 57 sts
Row 73: TKS in the next 27 sts, inc in the next sp. TKS in the next st, inc in the next sp. TKS in the next 28 sts. RP. – 59 sts
Row 74: TKS in the next 28 sts, inc in the next sp. TKS in the next st, inc in the next sp. TKS in the next 29 sts. RP. – 61 sts
Row 75: TKS in the next 29 sts, inc in the next sp. TKS in the next st, inc in the next sp. TKS in the next 30 sts. RP. – 63 sts
Row 76: TKS in the next 30 sts, inc in the next sp. TKS in the next st, inc in the next sp. TKS in the next 31 sts. RP. – 65 sts
Row 77: TKS in the next 31 sts, inc in the next sp. TKS in the next st, inc in the next sp. TKS in the next 32 sts. RP. – 67 sts
Row 78: TKS in the next 32 sts, inc in the next sp. TKS in the next st, inc in the next sp. TKS in the next 33 sts. RP. – 69 sts
Row 79: TKS in the next 33 sts, inc in the next sp. TKS in the next st, inc in the next sp. TKS in the next 34 sts. RP. – 71 sts
Row 80: TKS in the next 34 sts, inc in the next sp. TKS in the next st, inc in the next sp. TKS in the next 35 sts. RP. – 73 sts
Cut yarn and tie off.
Skirt Construction
Alternating simple wedges with pointed wedges as shown, seam all blocks together with a whip stitch using a tapestry needle and a length of yarn.
Waist length for the size Small.
After stitching the wedges, the stretch at the seams will add width to the length of the coat bottom. This will be corrected by the waist stitching later.
Skirt Border:
The skirt border consists of 3 rows of Linked Double Crochet, worked back and forth, with increases at the point of each pointed wedge.
With 3.50 mm hook, attach yarn at one end of the skirt hem.
Row 1: Ch 3, LDC in each stitch across, inserting hook as if to TKS. 3 LDC at the point of each pointed wedge, mark the middle stitch of this increase.
Row 2: Ch 3, turn. LDC in ea st across working (2 LDC, ch 1, 2 LDC) at each point where the increase was marked.
Row 3: Ch 3, turn. LDC in ea st across working (2 LDC, ch 1, 2 LDC) in each ch-1 from the increase points of the previous row.
Once third row is completed, cut yarn and tie off. You can work extra border here if you want the skirt longer!
Close-up of the increases placed at the point of each pointed wedge
WAIST:
The waist is worked directly onto the top of the wedges that make up the skirt. One stitch is skipped on every block, to create a slight decrease in width to accentuate the waist.
Waist size for Small
Row 1: RS facing, attach yarn at end of the line of the seamed wedges by pulling up a loop from the foundation chain or first row of stitches using TKS. With 6.50 mm Tunisian hook, pick up a loop using TKS from ea of the next 13 sts. Sk next st and seam. (Pick up a loop from ea of the next 14 sts, sk next st and seam) 14, 16 times. RP. – 210, 238 sts
To modify the size here, add or subtract any rows after the first one to make it longer or shorter. To create inset pockets, see “Pockets” Instructions, before completing the waistband. Outside pockets may be completed after the waistband is finished.
Rows 2 – 17: TKS in ea st across. RP.
Bodice – Front & Back Panels
Note on Size for the Front & Back Panels:
All sizes work 26 rows of TKS before beginning to decrease and shape the collar and shoulder area. You can add or subtract rows from the total of 26 in order to modify the length of the coat.
The bodice panels should reach from the shoulders down to cover the bust and end just under the bust line. However many rows you work, be sure to work the same amount of TKS rows in the beginning for each panel!
Back Panel:
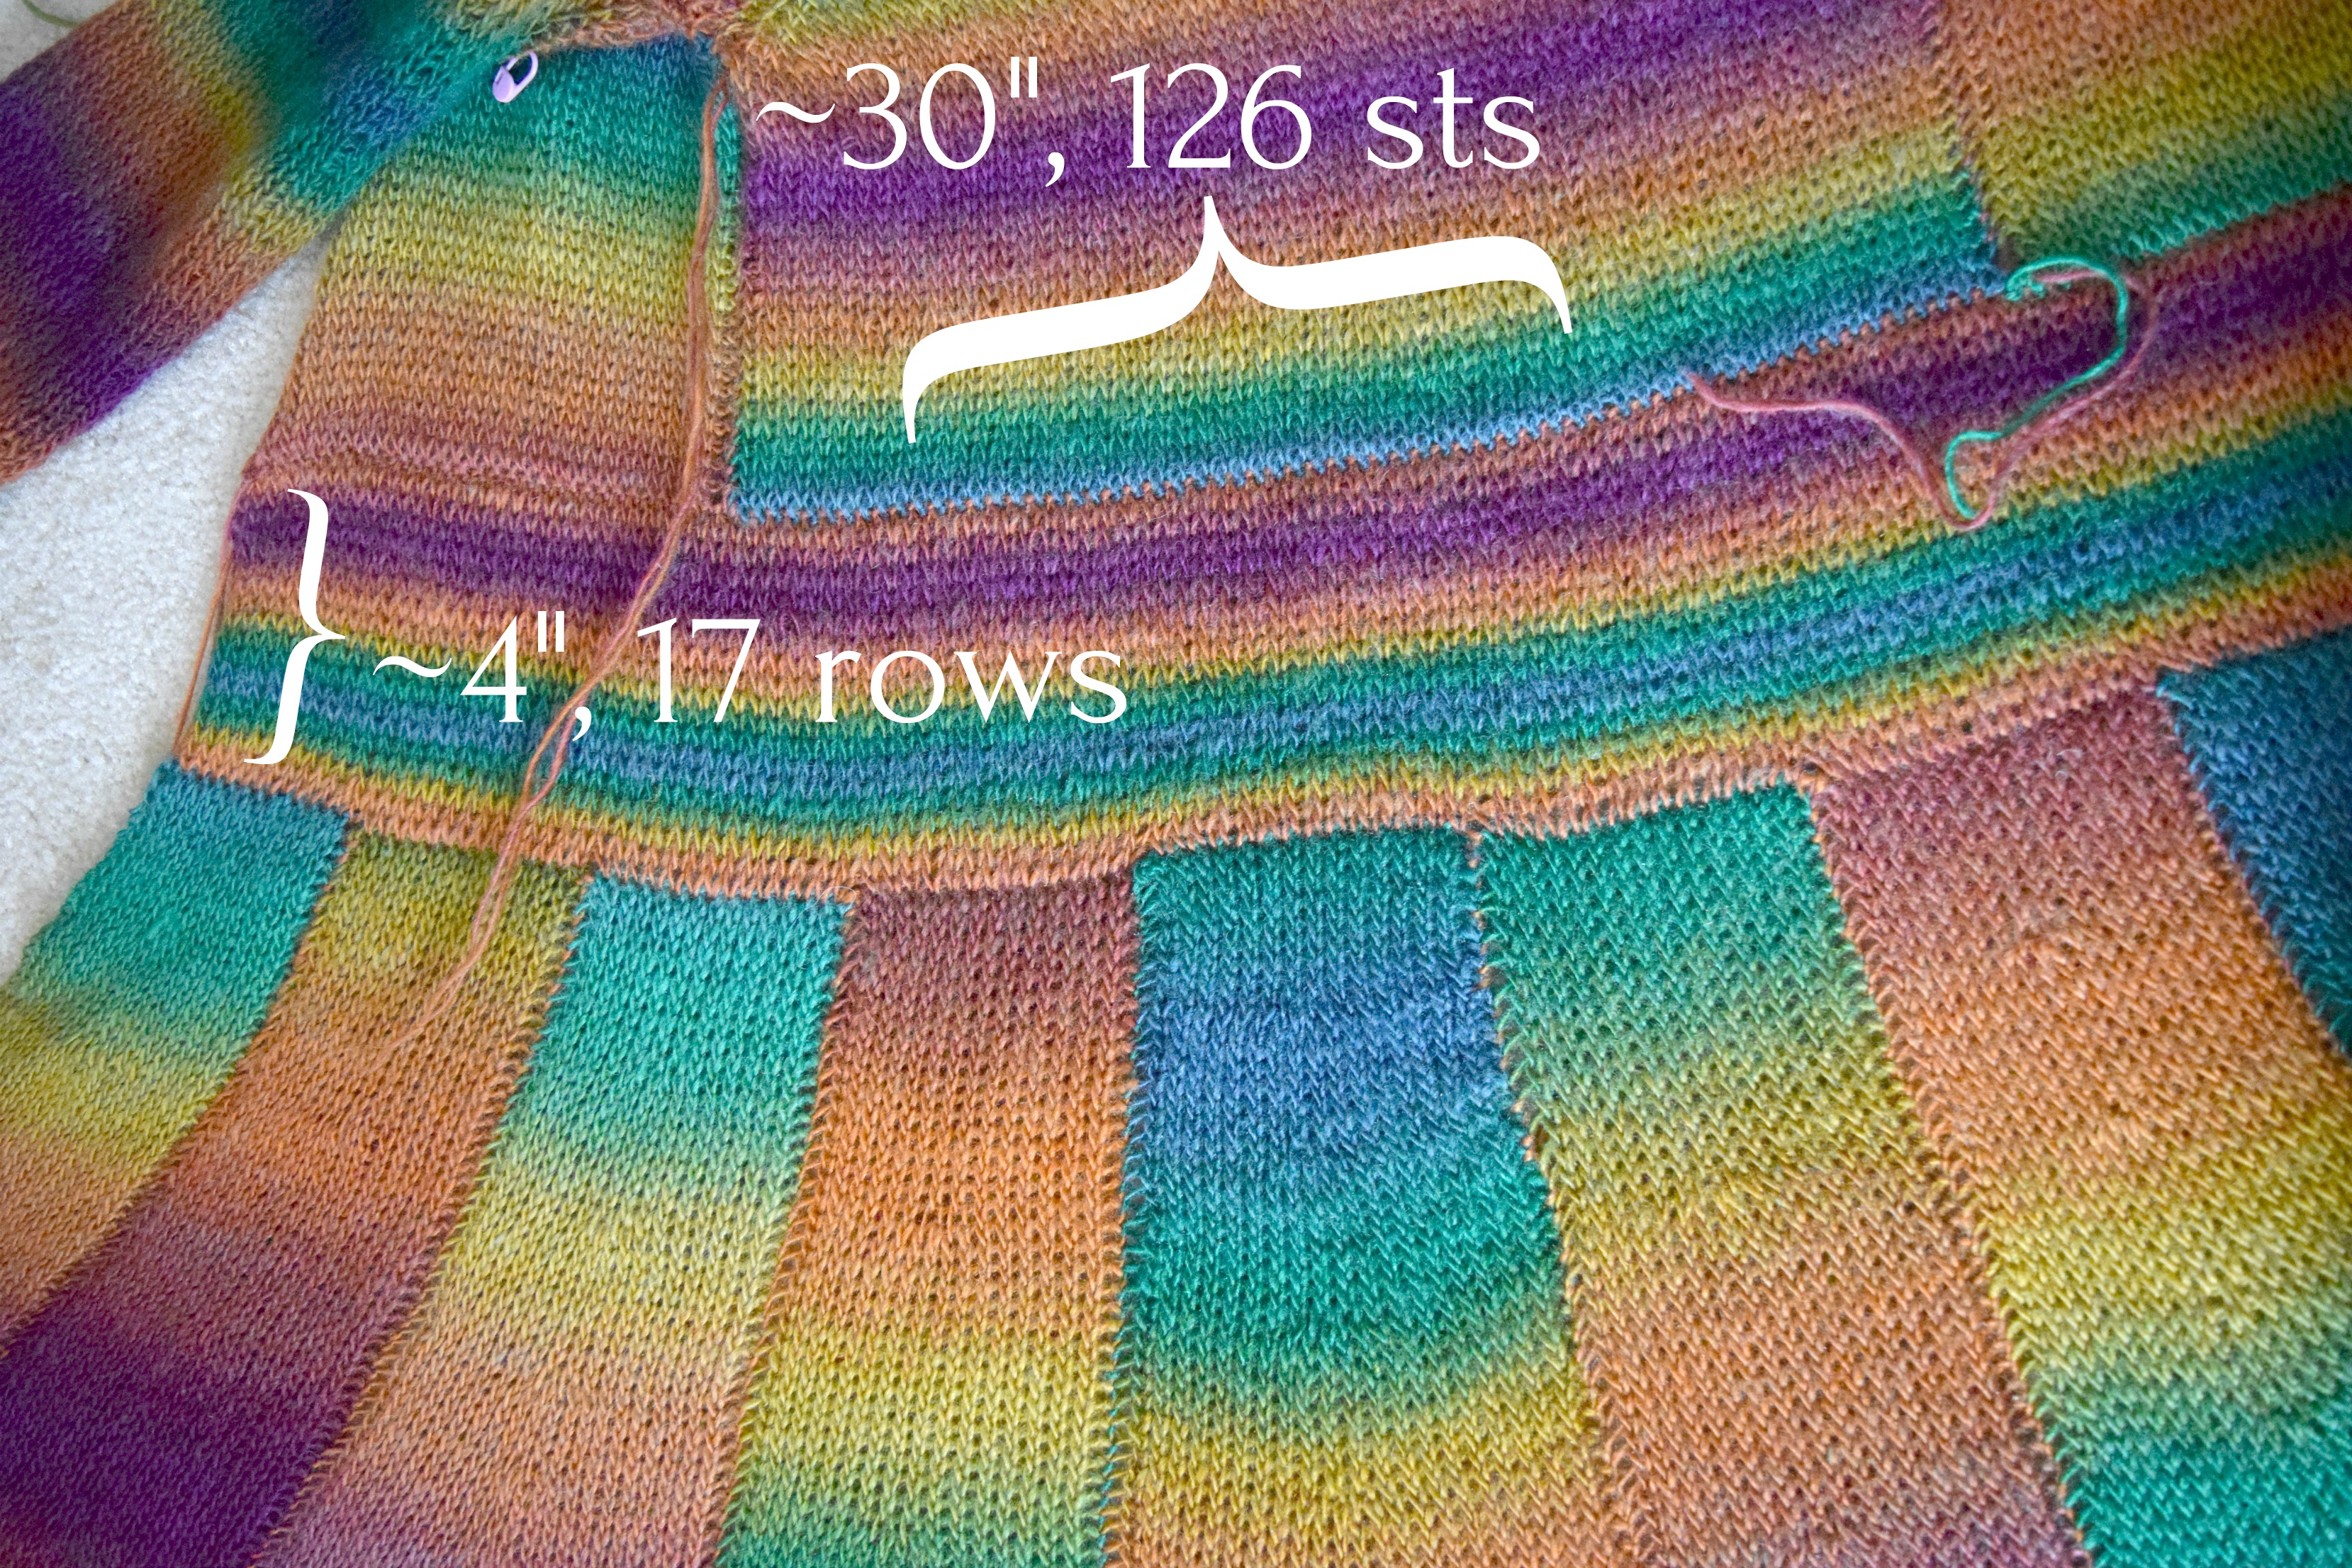
The back panel is worked the length of stitches that equals half of the number of stitches in the waist. In size XL, the waist is 210 sts. Divided in half, that’s 105. In 2XL, the waist is 238 sts, divided in half that’s 119.
The completed Back Panel should be approximately 13.5 inches tall for XL, and 14.5 for 2XL. If you need a longer measurement here (should reach just below the bust), add more rows where indicated in the pattern.
Back panel, Small
With 6.50 mm Tunisian Hook, Ch 105, 119
Row 1: Pick up a st in the 2nd ch from the hook and in the next 104, 118 sts. Return pass (RP). – 105, 119 stitches
Row 2: In TKS, pick up a lp from ea st across the row. RP. – 105, 119 sts
Rows 3 – 26: Rpt Row 2.
To increase length of the front & back panels, add more rows here.
Row 27: TKS in the next st, TKS dec over the next 2 sts. TKS in the next 97, 111 sts. TKS dec over the next 2 sts. TKS in the next 2 sts. RP. – 103, 117 sts
Row 28: TKS in the next st, TKS dec over the next 2 sts. TKS in the next 95, 109 sts. TKS dec over the next 2 sts. TKS in the next 2 sts. RP. – 101, 115 sts
Row 29: TKS in the next st, TKS dec over the next 2 sts. TKS in the next 93, 107 sts. TKS dec over the next 2 sts. TKS in the next 2 sts. RP. – 99, 113 sts
Row 30: TKS in the next st, TKS dec over the next 2 sts. TKS in the next 91, 105 sts. TKS dec over the next 2 sts. TKS in the next 2 sts. RP. – 97, 111 sts
Row 31: TKS in the next st, TKS dec over the next 2 sts. TKS in the next 89, 103 sts. TKS dec over the next 2 sts. TKS in the next 2 sts. RP. – 95, 109 sts
Row 32: TKS in the next st, TKS dec over the next 2 sts. TKS in the next 87, 101 sts. TKS dec over the next 2 sts. TKS in the next 2 sts. RP. – 93, 107 sts
Row 33: TKS in the next st, TKS dec over the next 2 sts. TKS in the next 85, 99 sts. TKS dec over the next 2 sts. Tks in the next 2 sts. RP. – 91, 105 sts
Row 34: TKS in the next st, TKS dec over the next 2 sts. TKS in the next 83, 97 sts. TKS dec over the next 2 sts. TKS in the next 2 sts. RP. – 89, 103 sts
Row 35: TKS in the next st, TKS dec over the next 2 sts. TKS in the next 81, 95 sts. TKS dec over the next 2 sts. Tks in the next 2 sts. RP. – 87, 101 sts
Row 36: TKS in the next st, TKS dec over the next 2 sts. TKS in the next 79, 93 sts. TKS dec over the next 2 sts. Tks in the next 2 sts. RP. – 85, 99 sts
Row 37: TKS in the next st, TKS dec over the next 2 sts. TKS in the next 77, 91 sts. TKS dec over the next 2 sts. Tks in the next 2 sts. RP. – 83, 97 sts
Row 38: TKS in the next st, TKS dec over the next 2 sts. TKS in the next 75, 89 sts. TKS dec over the next 2 sts. TKS in the next 2 sts. RP. – 81, 95 sts
Row 39: TKS in the next st, TKS dec over the next 2 sts. TKS in the next 73, 87 sts. TKS dec over the next 2 sts. TKS in the next 2 sts. RP. – 79, 93 sts
Row 40: TKS in the next st, TKS dec over the next 2 sts. TKS in the next 71, 85 sts. TKS dec over the next 2 sts. TKS in the next 2 sts. RP. – 77, 91 sts
Row 41: TKS in the next st, TKS dec over the next 2 sts. TKS in the next 69, 83 sts. TKS dec over the next 2 sts. TKS in the next 2 sts. RP – 75, 89 sts
Row 42: TKS in the next st, TKS dec over the next 2 sts. TKS in the next 67, 81 sts. TKS dec over the next 2 sts. TKS in the next 2 sts. RP – 73, 87 sts
Row 43: TKS in the next st, TKS dec over the next 2 sts. TKS in the next 65, 79 sts. TKS dec over the next 2 sts. TKS in the next 2 sts. RP – 71, 85 sts
Row 44: TKS in the next st, TKS dec over the next 2 sts. TKS in the next 63, 77 sts. TKS dec over the next 2 sts. TKS I the next 2 sts. RP – 69, 83 sts
Row 45: TKS in the next st, TKS dec over the next 2 sts. TKS in the next 61, 75 sts. TKS dec over the next 2 sts. TKS in the next 2 sts. RP – 67, 81 sts
Row 46: TKS in the next st, TKS dec over the next 2 sts. TKS in the next 59, 73 sts. TKs dec over the next 2 sts. TKS in the next 2 sts. RP – 65, 79 sts
Row 47: TKS in the next st, TKS dec over the next 2 sts. TKS in the next 57, 71 sts. TKS dec over the next 2 sts. TKS in the next 2 sts. RP – 63, 77 sts
Row 48: TKS in the next st, TKS dec over the next 2 sts. TKS in the next 55, 69 sts. TKS dec over the next 2 sts. TKS in the next 2 sts. RP – 61, 75 sts
Row 49: TKS in the next st, TKS dec over the next 2 sts. TKS in the next 53, 67 sts. TKS dec over the next 2 sts. TKS in the next 2 sts. RP – 59, 73 sts
Row 50: TKS in the next st, TKS dec over the next 2 sts. TKS in the next 51, 65 sts. TKS dec over the next 2 sts. TKS in the next 2 sts. RP – 57, 71 sts
Row 51: TKS in the next st, TKS dec over the next 2 sts. TKS in the next 49, 63 sts. TKS dec over the next 2 sts. TKS in the next 2 sts. RP – 55, 69 sts
Row 52: TKS in the next st, TKS dec over the next 2 sts. TKS in the next 47, 61 sts. TKS dec over the next 2 sts. TKS in the next 2 sts. RP – 53, 67 sts
Row 53: TKS in the next st, TKS dec over the next 2 sts. TKS in the next 45, 59 sts. TKS dec over the next 2 sts. TKS in the next 2 sts. RP – 51, 65 sts
Row 54: TKS in the next st, TKS dec over the next 2 sts. TKS in the next 43, 57 sts. TKS dec over the next 2 sts. TKS in the next 2 sts. RP – 49, 63 sts
Row 55: TKS in the next st, TKS dec over the next 2 sts. TKS in the next 41, 55 sts. TKS dec over the next 2 sts. TKS in the next 2 sts. RP – 47, 61 sts
Row 56: TKS in the next st, TKS dec over the next 2 sts. TKS in the next 39, 53 sts. TKS dec over the next 2 sts. TKS in the next 2 sts. RP – 45, 59 sts
Row 57: TKS in the next st, TKS dec over the next 2 sts. TKS in the next 37, 51 sts. TKS dec over the next 2 sts. TKS in the next 2 sts. RP – 43, 57 sts
Row 58: TKS in the next st, TKS dec over the next 2 sts. TKS in the next 35, 49 sts. TKS dec over the next 2 sts. TKS in the next 2 sts. RP – 41, 55 sts
Row 59: TKS in the next st, TKS dec over the next 2 sts. TKS in the next 33, 47 sts. TKS dec over the next 2 sts. TKS in the next 2 sts. RP – 39, 53 sts
Row 60: TKS in the next st, TKS dec over the next 2 sts. TKS in the next 31, 45 sts. TKS dec over the next 2 sts. TKS in the next 2 sts. RP – 37, 51 sts
Row 61: TKS in the next st, TKS dec over the next 2 sts. TKS in the next 29, 43 sts. TKS dec over the next 2 sts. TKS in the next 2 sts. RP – 35, 49 sts
Row 62: TKS in the next st, TKS dec over the next 2 sts. TKS in the next 27, 41 sts. TKS dec over the next 2 sts. TKS in the next 2 sts. RP – 33, 47 sts
Row 63: TKS in the next st, TKS dec over the next 2 sts. TKS in the next 25, 39 sts. TKS dec over the next 2 sts. TKS in the next 2 sts. RP – 31, 45 sts
Row 64: TKS in the next st, TKS dec over the next 2 sts. TKS in the next 23, 37 sts. TKS dec over the next 2 sts. TKS in the next 2 sts. RP – 29, 43 sts
Row 65: TKS in the next st, TKS dec over the next 2 sts. TKS in the next 21, 35 sts. TKS dec over the next 2 sts. TKS in the next 2 sts. RP – 27, 41 sts
Row 66: TKS in the next st, TKS dec over the next 2 sts. TKS in the next 19, 33 sts. TKS dec over the next 2 sts. TKS in the next 2 sts. RP – 25, 39 sts
Row 68: TKS in the next st, TKS dec over the next 2 sts. TKS in the next 29 sts. TKS dec over the next 2 sts. TKS in the next 2 sts. RP – 35 sts
Row 69: TKS in the next st, TKS dec over the next 2 sts. TKS in the next 27 sts. TKS dec over the next 2 sts. TKS in the next 2 sts. RP – 33 sts
Row 70: TKS in the next st, TKS dec over the next 2 sts. TKS in the next 25 sts. TKS dec over the next 2 sts. TKS in the next 2 sts. RP. – 31 sts
Row 71: TKS in the next st, TKS dec over the next 2 sts. TKS in the next 25 sts. TKS dec over the next 2 sts. TKS in the next 2 sts. RP. – 29 sts
Row 72: TKS in the next st, TKS dec over the next 2 sts. TKS in the next 23 sts. TKS dec over the next 2 sts. TKS in the next 2 sts. RP. – 27 sts
Row 73: TKS in the next st, TKS dec over the next 2 sts. TKS in the next 21 sts. TKS dec over the next 2 sts. TKS in the next 2 sts. RP. – 25 sts.
Cut yarn and tie off.
Front Panel – Right:
The front panels are worked with the length of stitches equaling the half of the waistband that the back panel won’t be taking up. There’s two, so each panel will be a quarter of the total waistband stitches. For X-Larges, that’s 210 / 4 = 52.5. Since that’s not a whole number, I will round down to 52 and fudge the seam by one stitch. For 2X-Large, that’s 238 / 4 = 59. 5, again not a whole number so rounded down to 59.
The completed Front Panels should be approximately 13.5 inches in total length for XL, 14.5 for 2XL. If you need a longer measurement here (should reach to just below the bust), add extra rows where indicated in the pattern.
Front Panel, right, size small
Front Panels size medium
Front Panel, right, size large. Pictured is a panel with an alternate length of 38 rows in the beginning.
With 6.50 mm Tunisian Hook, Ch 52, 59.
Row 1: Pick up a st in the 2nd ch from the hook and in the next 50, 57 sts. Return pass (RP). – 52, 59 stitches
Row 2: TKS in ea st across the row. RP. – 52, 59 sts
Rows 3 – 26: Rpt Row 2.
To increase length of the front & back panels, add more rows here.
Row 27: TKS in ea of the next 48, 55 sts. TKS dec over the next 2 sts. TKS in the final st. RP – 51, 58 sts.
Row 28: TKS in ea of the next 47, 54 sts. TKS dec over the next 2 sts. TKS in the final st. RP – 50, 57 sts.
Row 29: TKS in ea of the next 46, 53 sts. TKS dec over the next 2 sts. TKS in the final st. RP – 49, 56 sts.
Row 30: TKS in ea of the next 45, 52 sts. TKS dec over the next 2 sts. TKS in the final st. RP – 48, 55 sts.
Row 31: TKS in ea of the next 44, 51 sts. TKS dec over the next 2 sts. TKS in the final st. RP – 47, 54 sts.
Row 32: TKS in ea of the next 43, 50 sts. TKS dec over the next 2 sts. TKS in the final st. RP – 46, 53 sts.
Row 33: TKS in ea of the next 42, 49 sts. TKS dec over the next 2 sts. TKS in the final st. RP – 45, 52 sts.
Row 34: TKS in ea of the next 41, 48 sts. TKS dec over the next 2 sts. TKS in the final st. RP – 44, 51 sts.
Row 35: TKS in ea of the next 40, 47 sts. TKS dec over the next 2 sts. TKS in the final st. RP – 43, 50 sts.
Row 36: TKS in ea of the next 39, 46 sts. TKS dec over the next 2 sts. TKS in the final st. RP – 42, 49 sts.
Row 37: TKS in ea of the next 38, 45. TKS dec over the next 2 sts. TKS in the final st. RP – 41, 48 sts.
Row 38: TKS in ea of the next 37, 44 sts. TKS dec over the next 2 sts. TKS in the final st. RP – 40, 47 sts.
Row 39: TKS in ea of the next 36, 43 sts. TKS dec over the next 2 sts. TKS in the final st. RP – 39, 46 sts
Row 40: TKS in ea of the next 35, 42 sts. TKS dec over the next 2 sts. TKS in the final st. RP – 38, 45 sts
Row 41: TKS in ea of the next 34, 41 sts. TKS dec over the next 2 sts. TKS in the final st. RP – 37, 44 sts
Row 42: TKS in ea of the next 33, 40 sts. TKS dec over the next 2 sts. TKS in the final st. RP – 36, 43 sts
Row 43: TKS in ea of the next 32, 39 sts. TKS dec over the next 2 sts. TKS in the final st. RP – 35, 42 sts
Row 44: TKS in ea of the next 31, 38 sts. TKS dec over the next 2 sts. TKS in the final st. RP – 34, 41 sts
Row 45: TKS in ea of the next 30, 37 sts. TKS dec over the next 2 sts. TKS in the final st. RP – 33, 40 sts
Row 46: TKS in ea of the next 29, 36 sts. TKS dec over the next 2 sts. TKS in the final st. RP – 32, 39 sts
Row 47: TKS in ea of the next 28, 35 sts. TKS dec over the next 2 sts. TKS in the final st. RP – 31, 38 sts
Row 48: TKS in ea of the next 27, 34 sts. TKS dec over the next 2 sts. TKS in the final st. RP – 30, 37 sts
Row 49: TKS in ea of the next 26, 33 sts. TKS dec over the next 2 sts. TKS in the final st. RP – 29, 36 sts
Row 50: TKS in ea of the next 25, 32 sts. TKS dec over the next 2 sts. TKS in the final st. RP – 28, 35 sts
Row 51: TKS in ea of the next 24, 31 sts. TKS dec over the next 2 sts. TKS in the final st. RP – 27, 34 sts
Row 52: TKS in ea of the next 23, 30 sts. TKS dec over the next 2 sts. TKS in the final st. RP – 26, 33 sts
Row 53: TKS in ea of the next 22, 29 sts. TKS dec over the next 2 sts. TKS in the final st. RP – 25, 32 sts
Row 54: TKS in ea of the next 21, 28 sts. TKS dec over the next 2 sts. TKS in the final st. RP – 24, 31 sts
Row 55: TKS in ea of the next 20, 27 sts. TKS dec over the next 2 sts. TKS in the final st. RP – 23, 30 sts
Row 56: TKS in ea of the next 19, 26 sts. TKS dec over the next 2 sts. TKS in the final st. RP – 22, 29 sts
Row 57: TKS in ea of the next 18, 25 sts. TKS dec over the next 2 sts. TKS in the final st. RP – 21, 28 sts
Row 58: TKS in ea of the next 17, 24 sts. TKS dec over the next 2 sts. TKS in the final st. RP – 20, 27 sts
Row 59: TKS in ea of the next 16, 23 sts. TKS dec over the next 2 sts. TKS in the final st. RP – 19, 26 sts
XL stop here, resume at “All Sizes”
2XL Only
Row 60: TKS in ea of the next 22 sts. TKS dec over the next 2 sts. TKS in the final st. RP – 25 sts
Row 61: TKs in ea of the next 21 sts. TKS dec over the next 2 sts. TKS in the final st. RP – 24 sts
Row 62: TKs in ea of the next 20 sts. TKS dec over the next 2 sts. TKS in the final st. RP – 23 sts
Row 63: TKS in ea of the next 19 sts. TKS dec over the next 2 sts. TKS in the final st. RP – 22 sts
Row 64: TKS in ea of the next 18 sts. TKS dec over the next 2 sts. TKS in the final st. RP – 21 sts
Row 65: TKS in ea of the next 17 sts. TKS dec over the next 2 sts. TKS in the final st. RP – 20 sts
Row 66: TKS in ea of the next 16 sts. TKS dec over the next 2 sts. TKS in the final st. RP – 19 sts
All Sizes:
Row 60, 67: TKS dec over the next 2 sts. TKS in ea of the next 13 sts. TKS dec over the next 2 sts. TKS in the final st. RP. – 17 sts
Row 61, 68: TKS dec over the next 2 sts. TKS in ea of the next 11 sts. TKS dec over the next 2 sts. TKS in the final st. RP. – 15 sts
Row 62, 69: TKS dec over the next 2 sts. TKS in ea of the next 9 sts. TKS dec over the next 2 sts. TKS in the final st. RP. – 13 sts
Row 63, 70: TKS dec over the next 2 sts. TKS in ea of the next 7 sts. TKS dec over the next 2 sts. TKS in the final st. RP. – 11 sts
Row 64, 71: TKS dec over the next 2 sts. TKS in ea of the next 5 sts. TKS dec over the next 2 sts. TKS in the final st. RP. – 9 sts
Row 65, 72: TKS dec over the next 2 sts. TKS in ea of the next 3 sts. TKS dec over the next 2 sts. TKS in the final st. RP. – 7 sts
Row 66, 73: TKS dec over the next 2 sts. TKS in the next st. TKS dec over the next 2 sts. TKS in the final st. RP. – 5 sts
Cut yarn and tie off.
Front Panel – Left:
With 6.50 mm Tunisian Hook, Ch 52, 59.
Row 1: Pick up a st in the 2nd ch from the hook and in the next 50, 57 sts. Return pass (RP). – 52, 59 stitches
Row 2: TKS in ea st across the row. RP. – 52, 59 sts
Rows 3 – 26: Rpt Row 2.
To increase length of the front & back panels, add more rows here.
Row 27: TKS dec over the next 2 sts. TKS in ea of the next 49, 56 sts. RP – 51, 58 sts.
Row 28: TKS dec over the next 2 sts. TKS in ea of the next 48, 55 sts. RP – 50, 57 sts.
Row 29: TKS dec over the next 2 sts. TKS in ea of the next 47, 54 sts. RP – 49, 56 sts.
Row 30: TKS dec over the next 2 sts. TKS in ea of the next 46, 53 sts. RP – 48, 55 sts.
Row 31: TKS dec over the next 2 sts. TKS in ea of the next 45, 52 sts. RP – 47, 54 sts.
Row 32: TKS dec over the next 2 sts. TKS in ea of the next 44, 51 sts. RP – 46, 53 sts.
Row 33: TKS dec over the next 2 sts. TKS in ea of the next 43, 50 sts. RP – 45, 52 sts.
Row 34: TKS dec over the next 2 sts. TKS in ea of the next 42, 49 sts. RP – 44, 51 sts.
Row 35: TKS dec over the next 2 sts. TKS in ea of the next 41, 48 sts. RP – 43, 50 sts.
Row 36: TKS dec over the next 2 sts. TKS in ea of the next 40, 47 sts. RP – 42, 49 sts.
Row 37: TKS dec over the next 2 sts. TKS in ea of the next 39, 46 sts. RP – 41, 48 sts.
Row 38: TKS dec over the next 2 sts. TKS in ea of the next 38, 45 sts. RP – 40, 47 sts.
Row 39: TKS dec over the next 2 sts. TKS in ea of the next 37, 44 sts. RP. – 39, 46 sts
Row 40: TKS dec over the next 2 sts. TKS in ea of the next 36, 43 sts. RP. – 38, 45 sts
Row 41: TKS dec over the next 2 sts. TKS in ea of the next 35, 42 sts. RP. – 37, 44 sts
Row 42: TKS dec over the next 2 sts. TKS in ea of the next 34, 41 sts. RP. – 36, 43 sts
Row 43: TKS dec over the next 2 sts. TKS in ea of the next 33, 40 sts. RP. – 35, 42 sts
Row 44: TKS dec over the next 2 sts. TKS in ea of the next 32, 39 sts. RP. – 34, 41 sts
Row 45: TKS dec over the next 2 sts. TKS in ea of the next 31, 38 sts. RP. – 33, 40 sts
Row 46: TKS dec over the next 2 sts. TKS in ea of the next 30, 37 sts. RP. – 32, 39 sts
Row 47: TKS dec over the next 2 sts. TKS in ea of the next 29, 36 sts. RP. – 31, 38 sts
Row 48: TKS dec over the next 2 sts. TKS in ea of the next 28, 35 sts. RP. – 30, 37 sts
Row 49: TKS dec over the next 2 sts. TKS in ea of the next 27, 34 sts. RP. – 29, 36 sts
Row 50: TKS dec over the next 2 sts. TKS in ea of the next 26, 33 sts. RP. – 28, 35 sts
Row 51: TKS dec over the next 2 sts. TKS in ea of the next 25, 32 sts. RP. – 27, 34 sts
Row 52: TKS dec over the next 2 sts. TKS in ea of the next 24, 31 sts. RP. – 26, 33 sts
Row 53: TKS dec over the next 2 sts. TKS in ea of the next 23, 30 sts. RP – 25, 32 sts
Row 54: TKS dec over the next 2 sts. TKS in ea of the next 22, 29 sts. RP – 24, 31 sts
Row 55: TKS dec over the next 2 sts. TKS in ea of the next 21, 28 sts. RP – 23, 30 sts
Row 56: TKS dec over the next 2 sts. TKS in ea of the next 20, 27 sts. RP – 22, 29 sts
Row 57: TKS dec over the next 2 sts. TKS in ea of the next 19, 26 sts. RP – 21, 28 sts
Row 58: TKS dec over the next 2 sts. TKS in ea of the next 18, 25 sts. RP – 20, 27 sts
Row 59: TKS dec over the next 2 sts. TKS in ea of the next 17, 24 sts. RP – 19, 26 sts
X-Larges stop here and resume at “All Sizes”
2X-Large Only
Row 60: TKS dec over the next 2 sts. TKS in ea of the next 23 sts. RP – 25 sts
Row 61: TKS dec over the next 2 sts. TKS in ea of the next 22 sts. RP – 24 sts
Row 62: TKS dec over the next 2 sts. TKS in ea of the next 21 sts. RP – 23 sts
Row 63: TKS dec over the next 2 sts. TKS in ea of the next 20 sts. RP – 22 sts
Row 64: TKS dec over the next 2 sts. TKS in ea of the next 19 sts. RP – 21 sts
Row 65: TKS dec over the next 2 sts. TKS in ea of the next 18 sts. RP – 20 sts
Row 66: TKS dec over the next 2 sts. TKS in ea of the next 17 sts. RP – 19 sts
All Sizes:
Row 60, 67: TKS dec over the next 2 sts. TKS in ea of the next 13 sts. Dec over the next 2 sts. TKS in the final st. RP. – 17 sts
Row 61, 68: TKS dec over the next 2 sts. TKs in ea of the next 11 sts. Dec over the next 2 sts. TKS in the final st. RP. – 15 sts
Row 62, 69: TKS dec over the next 2 sts. TKS in ea of the next 9 sts. Dec over the next 2 sts. TKS in the final st. RP. – 13 sts
Row 63, 70: TKS dec over the next 2 sts. TKS in ea of the next 7 sts. Dec over the next 2 sts. TKS in the final st. RP. – 11 sts
Row 64, 71: TKS dec over the next 2 sts. TKS in ea of the next 5 sts. Dec over the next 2 sts. TKS in the final st. RP. – 9 sts
Row 65, 72: TKS dec over the next 2 sts. TKS in ea of the next 3 sts. Dec over the next 2 sts. TKS in the final st. RP. – 7 sts
Row 66, 73: TKS dec over the next 2 sts. TKS in ea of the next st. Dec over the next 2 sts. TKS in the final st. RP. – 5 sts
Cut yarn and tie off.
Seaming the Back & Front Panels and Adding the Skirt
Using a tapestry needle and a length of yarn, whip stitch the sides of the panels together so that the long angles face each other. Stitch together the straight sides, but not the angles. Once the bodice is sewn together, line the flat bottom up with the waist of the skirt and attach using a 5.50 mm crochet hook and a ball of yarn by working a slip stitch through both pieces – you may also use a whip stitch seam here, but I prefer the slip stitch seam at the waist because it’s sturdier.
SLEEVE (Make 2):
The sleeves for all sizes begin with a 16-chain length, then work a portion of increases creating a slant that lines up with the slanted edge of the bodice. The sleeve then works decreases to size down for the main part of the arm (worked evenly), then increases again for the flared sleeve.
The former design placed the decrease portion at the ends of the rows, but the new 2.0 version is written so that the decreases are placed centrally, in the middle of the row. This allows the fabric to slant downward to follow the natural line of the shoulder. If you prefer working the old style, simply place the decreases at the ends of the rows instead 😊
Sleeve size small (old style decreases pictured)
Sleeve size large, new style decreases
Sleeve size small, with the new style of decreasing (above and below)
Ch 16.
Row 1: Pick up a lp in the 2nd ch from the hk and in ea of the next 14 ch sts. RP. – 16 sts
Row 2: TKS in the next st, TKS inc in the next sp. TKS in the next 12 sts, TKS inc in the next sp. TKS in the final 2 sts. RP. – 18 sts
Row 3: TKS in the next st, TKS inc in the next sp. TKS in the next 14 sts, TKS inc in the next sp. TKS in the final 2 sts. RP. – 20 sts
Row 4: TKS in the next st, TKS inc in the next sp. TKS in the next 16 sts, TKS inc in the next sp. TKS in the final 2 sts. RP. – 22 sts
Row 5: TKS in the next st, TKS inc in the next sp. TKS in the next 18 sts, TKS inc in the next sp. TKS in the final 2 sts. RP. – 24 sts
Row 6: TKS in the next st, TKS inc in the next sp. TKS in the next 20 sts, TKS inc in the next sp. TKS in the final 2 sts. RP. – 26 sts
Row 7: TKS in the next st, TKS inc in the next sp. TKS in the next 22 sts, TKS inc in the next sp. TKS in the final 2 sts. RP. – 28 sts
Row 8: TKS in the next st, TKS inc in the next sp. TKS in the next 24 sts, TKS inc in the next sp. TKS in the final 2 sts. RP. – 30 sts
Row 9: TKS in the next st, TKS inc in the next sp. TKS in the next 26 sts, TKS inc in the next sp. TKS in the final 2 sts. RP. – 32 sts
Row 10: TKS in the next st, TKS inc in the next sp. TKS in the next 28 sts, TKS inc in the next sp. TKS in the final 2 sts. RP. – 34 sts
Row 11: TKS in the next st, TKS inc in the next sp. TKS in the next 30 sts, TKS inc in the next sp. TKS in the final 2 sts. RP. – 36 sts
Row 12: TKS in the next st, TKS inc in the next sp. TKS in the next 32 sts, TKS inc in the next sp. TKS in the final 2 sts. RP. – 38 sts
Row 13: TKS in the next st, TKS inc in the next sp. TKS in the next 34 sts, TKS inc in the next sp. TKS in the final 2 sts. RP. – 40 sts
Row 14: TKS in the next st, TKS inc in the next sp. TKS in the next 36 sts, TKS inc in the next sp. TKS in the final 2 sts. RP. – 42 sts
Row 15: TKS in the next st, TKS inc in the next sp. TKS in the next 38 sts, TKS inc in the next sp. TKS in the final 2 sts. RP. – 44 sts
Row 16: TKS in the next st, TKS inc in the next sp. TKS in the next 40 sts, TKS inc in the next sp. TKS in the final 2 sts. RP. – 46 sts
Row 17: TKS in the next st, TKS inc in the next sp. TKS in the next 42 sts, TKS inc in the next sp. TKS in the final 2 sts. RP. – 48 sts
Row 18: TKS in the next st, TKS inc in the next sp. TKS in the next 44 sts, TKS inc in the next sp. TKS in the final 2 sts. RP. – 50 sts
Row 19: TKS in the next st, TKS inc in the next sp. TKS in the next 46 sts, TKS inc in the next sp. TKS in the final 2 sts. RP. – 52 sts
Row 20: TKS in the next st, TKS inc in the next sp. TKS in the next 48 sts, TKS inc in the next sp. TKS in the final 2 sts. RP. – 54 sts
Row 21: TKS in the next st, TKS inc in the next sp. TKS in the next 50 sts, TKS inc in the next sp. TKS in the final 2 sts. RP. – 56 sts
Row 22: TKS in the next st, TKS inc in the next sp. TKS in the next 52 sts, TKS inc in the next sp. TKS in the final 2 sts. RP. – 58 sts
Row 23: TKS in the next st, TKS inc in the next sp. TKS in the next 54 sts, TKS inc in the next sp. TKS in the final 2 sts. RP. – 60 sts
Row 24: TKS in the next st, TKS inc in the next sp. TKS in the next 56 sts, TKS inc in the next sp. TKS in the final 2 sts. RP. – 62 sts
Row 25: TKS in the next st, TKS inc in the next sp. TKS in the next 58 sts, TKS inc in the next sp. TKS in the final 2 sts. RP. – 64 sts
Row 26: TKS in ea st across. RP. – 64 sts
Row 27: TKS in the next st, TKS inc in the next sp. TKS in the next 60 sts, TKS inc in the next sp. TKS in the final 2 sts. RP. – 66 sts
Row 28: TKS in ea st across. RP – 66 sts
Row 29: TKS in the next st, TKS inc in the next sp. TKS in the next 62 sts, TKS inc in the next sp. TKS in the final 2 sts. RP. – 68 sts.
Row 30: TKS in ea st across. RP. – 68 sts
Row 31: TKS in the next st, TKS inc in the next sp. TKS in the next 64 sts, TKS inc in the next sp. TKS in the final 2 sts. RP. – 70 sts
Row 32: TKS in ea st across. RP – 70 sts
Row 33: TKS in the next st, TKS inc in the next sp. TKS in the next 66 sts, TKS inc in the next sp. TKS in the final 2 sts. RP. – 72 sts
Row 34: TKS in ea st across. RP – 72 sts
Row 35: TKS in the next st, TKS inc in the next sp. TKS in the next 68 sts, TKS inc in the next sp. TKS in the final 2 sts. RP. – 74 sts
Row 36: TKS in ea st across. RP – 74 sts
Row 37: TKS in the next st, TKS inc in the next sp. TKS in the next 70 sts, TKS inc in the next sp. TKS in the final 2 sts. RP. – 76 sts
Row 38: TKS in ea st across. RP. – 76 sts
Row 39: TKS in the next st, TKS inc in the next sp. TKS in the next 72 sts, TKS inc in the next sp. TKS in the final 2 sts. RP. – 78 sts
Row 40: TKS in ea st across. RP. – 78 sts
X-Larges Stop here, resume at All Sizes
2X-Larges Only
Row 41: TKS in the next st, TKS inc in the next sp. TKS in the next 74 sts, TKS inc in the next sp. TKS in the final 2 sts. RP. – 80 sts
Row 42: TKS in ea st across. RP. – 80 sts
Row 43: TKS in the next st, TKS inc in the next sp. TKS in the next 76 sts, TKS inc in the next sp. TKS in the final 2 sts. RP. – 82 sts
Row 44: TKS in ea st across. RP. – 82 sts
Row 45: TKS in the next st, TKS inc in the next sp. TKS in the next 78 sts, TKS inc in the next sp. TKS in the final 2 sts. RP. – 84 sts
Row 46: TKS in ea st across. RP. – 84 sts
Row 47: TKS in the next st, TKS inc in the next sp. TKS in the next 80 sts, TKS inc in the next sp. TKS in the final 2 sts. RP. – 86 sts.
All Sizes:
Row 41, 48: TKS in ea of the next 29, 33 sts. TKS dec over the next 2 sts. TKS in the next 14 sts. TKS dec over the next 2 sts. TKS in ea of the next 30, 34 sts. RP. – 76, 84 sts
Row 42, 49: TKS in ea of the next 28, 32 sts. TKS dec over the next 2 sts. TKS in the next 14 sts. TKS dec over the next 2 sts. TKS in the next 29, 33 sts. RP. – 74, 82 sts
Row 43, 50: TKS in ea of the next 27, 31 sts. TKS dec over the next 2 sts. TKS in the next 14 sts. TKS dec over the next 2 sts. TKS in the next 28, 32 sts. RP. – 72, 80 sts
Row 44, 51: TKS in ea of the next 26, 30 sts. TKS dec over the next 2 sts. TKS in the next 14 sts. TKS dec over the next 2 sts. TKS in the next 27, 31 sts. RP. – 70, 78 sts
Row 45, 52: TKS in ea of the next 25, 29 sts. TKS dec over the next 2 sts. TKS in the next 14 sts. TKS dec over the next 2 sts. TKS in the next 26, 30 sts. RP. – 68, 76 sts
Row 46, 53: TKS in ea of the next 24, 28 sts. TKS dec over the next 2 sts. TKS in the next 14 sts. TKS dec over the next 2 sts. TKS in the next 25, 29 sts. RP. – 66, 74 sts
Rows 47-87, 54 – 94: TKS in ea st across. RP. – 66, 74 sts
Row 88, 95: TKS in the next 2 sts, TKS inc in the next sp. TKS in ea of the next 60, 68 sts. TKS inc in the next sp. TKS in ea of the next 3 sts. RP. – 68, 76 sts
Row 89, 96: TKS in ea st across. RP. – 68, 76 sts
Row 90, 97: TKS in the next 2 sts, TKS inc in the next sp. TKS in ea of the next 62, 70 sts. TKS inc in the next sp. TKS in ea of the next 3 sts. RP. – 70, 78 sts
Row 91, 98: TKS in ea st across. RP. – 70, 78 sts
Row 92, 99: TKS in the next 2 sts, TKS inc in the next sp. TKS in ea of the next 64, 72 sts. TKS inc in the next sp. TKS in ea of the next 3 sts. RP. – 72, 80 sts
Row 93, 100: TKS in ea st across. RP. – 72, 80 sts
Row 94, 101: TKS in the next 2 sts, TKS inc in the next sp. TKS in ea of the next 66, 74 sts. TKS inc in the next sp. TKS in ea of the next 3 sts. RP. – 74, 82 sts
Row 95, 102: TKS in ea st across. RP. – 74, 82 sts
Row 96, 103: TKS in the next 2 sts, TKS inc in the next sp. TKS in ea of the next 68, 76 sts. TKS inc in the next sp. TKS in ea of the next 3 sts. RP. – 76, 84 sts
Row 97, 104: TKS in ea st across. RP. – 76, 84 sts
Row 98, 105: TKS in the next 2 sts, TKS inc in the next sp. TKS in ea of the next 70, 78 sts. TKS inc in the next sp. TKS in ea of the next 3 sts. RP. – 78, 86 sts
Row 99, 106: TKS in ea st across. RP. – 78, 86 sts
Row 100, 107: TKS in the next 2 sts, TKS inc in the next sp. TKS in ea of the next 72, 80 sts. TKS inc in the next sp. TKS in ea of the next 3 sts. RP. – 80, 88 sts
Row 101, 108: TKS in ea st across. RP. – 80, 88 sts
Row 102, 109: TKS in the next 2 sts, TKS inc in the next sp. TKS in ea of the next 74, 82 sts. TKS inc in the next sp. TKS in ea of the next 3 sts. RP. – 82, 90 sts
Row 103, 110: TKS in ea st across. RP. – 82, 90 sts
Row 104, 111: TKS in the next 2 sts, TKS inc in the next sp. TKS in ea of the next 76, 84 sts. TKS inc in the next sp. TKS in ea of the next 3 sts. RP. – 84, 92 sts
Row 105, 112: TKS in ea st across. RP. – 84, 92 sts
Row 106, 113: TKS in the next 2 sts, TKS inc in the next sp. TKS in ea of the next 78, 86 sts. TKS inc in the next sp. TKS in ea of the next 3 sts. RP. – 86, 94 sts
Row 107, 114: TKS in ea st across. RP. – 86, 94 sts
Row 108, 115: TKS in the next 2 sts, TKS inc in the next sp. TKS in ea of the next 80, 88 sts. TKS inc in the next sp. TKS in ea of the next 3 sts. RP. – 88, 96 sts
Row 109, 116: TKS in ea st across. RP. – 88, 96 sts
Row 110, 117: TKS in the next 2 sts, TKS inc in the next sp. TKS in ea of the next 82, 90 sts. TKS inc in the next sp. TKS in ea of the next 3 sts. RP. – 90, 98 sts
Row 111, 118: TKS in ea st across. RP. – 90, 98 sts
Row 112, 119: TKS in the next 2 sts, TKS inc in the next sp. TKS in ea of the next 84, 92 sts. TKS inc in the next sp. TKS in ea of the next 3 sts. RP. – 92, 100 sts
Row 113, 120: TKS in ea st across. RP. – 92, 100 sts
Row 114, 121: TKS in the next 2 sts, TKS inc in the next sp. TKS in ea of the next 86, 94 sts. TKS inc in the next sp. TKS in ea of the next 3 sts. RP. – 94, 102 sts
Row 115, 122: TKS in ea st across. RP. – 94, 102 sts
Row 116, 123: TKS in the next 2 sts, TKS inc in the next sp. TKS in ea of the next 88, 96 sts. TKS inc in the next sp. TKS in ea of the next 3 sts. RP. – 96, 104 sts
Row 117, 124: TKS in ea st across. RP. – 96, 104 sts
Row 118, 125: TKS in the next 2 sts, TKS inc in the next sp. TKS in ea of the next 90, 98 sts. TKS inc in the next sp. TKS in ea of the next 3 sts. RP. – 98, 106 sts
Row 119, 126: TKS in ea st across. RP. – 98, 106 sts
Row 120, 127: TKS in the next 2 sts, TKS inc in the next sp. TKS in ea of the next 92, 100 sts. TKS inc in the next sp. TKS in ea of the next 3 sts. RP. – 100, 108 sts
Row 121, 128: TKS in ea st across. RP. – 100, 108 sts
Row 122, 129: TKS in the next 2 sts, TKS inc in the next sp. TKS in ea of the next 94, 102 sts. TKS inc in the next sp. TKS in ea of the next 3 sts. RP. – 102, 110 sts
Row 123, 130: TKS in ea st across. RP. – 102, 110 sts
Row 124, 131: TKS in the next 2 sts, TKS inc in the next sp. TKS in ea of the next 96, 104 sts. TKS inc in the next sp. TKS in ea of the next 3 sts. RP. – 104, 112 sts
Row 125, 132: TKS in ea st across. RP. – 104, 112 sts
Cut yarn and tie off.
Seaming the Sleeve:
Fold the sleeve in half down the length of the piece. Seam together using a whip stitch, starting at the flare of the sleeve and moving toward the shoulder. At the underarm of the sleeve, leave 44, 51 rows unseamed on either side. Match the remaining opening to the front and back panel sides, using the top 4 rows to cap the tops of the panels, overlapping the tops of the front & back panels by 4 stitches.
Sleeve seaming size small (old style sleeve pictured)
Sleeve fitting size Large, new style sleeve pictured. 4 of the 5 stitches at the top of the front panel are overlapped by the top 4 rows of the sleeve.
Seam the sleeve using a whip stitch around the front and back panels, using a one-to-one row/stitch ratio.
Close-up of the sleeve fitting.
Sleeve Border
With 3.50 mm hook, attach yarn at the seam where the sleeve is sewn together.
Row 1: Ch 3 (does not count as first st), LDC 3 times in the same stitch, inserting hook as if to TKS. LDC in ea stitch around the sleeve. Join with a slip stitch in the top of the first dc.
Row 2: Ch 3 (does not count) LDC in the first stitch and 3 times in the next st. LDC in ea stitch around. Join with a slip stitch.
Row 3: Ch 3 (does not count), LDC in ea of the next 2 stitches. LDC 3 times in the next st. LDC in ea stitch around. Join with a slip stitch.
Cut yarn and tie off. You can make the sleeves longer here by adding extra border rounds of LDC.
Close-up of the sleeve border joining seam.
HOOD:
The hood is worked as a separate piece consisting of one large triangle, folded in half when complete. This hood is has a very long point – it’s a lot of hood! If you prefer a slightly shorter hood, seed “Half Hood” instructions below the regular hood instructions. Either size hood can be made and attached to any size Elf Coat.
Working a Shortened Hood (Formerly the Half Hood): This is the alternative to the full size hood design which conserves a little yarn. Like the full hood, it is worked as a separate piece consisting of one large triangle, folded in half when complete and seamed. To shorten it somewhat, I removed one of the two non-increase rows after each increase row in the first part of the design. You can use either hood interchangeably when creating your coat, though, no matter which size you are making! To work the Shortened Hood, skip one of the two non-increase rows between each increase row for the first 76 rows written. Then, resume the Hood pattern as normal at Row 77.
Shortened Hood, above
Full Hood, above
Ch 3.
Row 1: Draw up a loop from the back of each of the next 2 chain stitches. RP. – 3 sts
Row 2: TKS inc in the first space. TKS in the next st. TKS inc in the next space. TKS in the final st. RP. – 5 sts
Rows 3-4: TKS in ea st across. RP. – 5 sts
Row 5: TKS inc in the first space. TKS in the next 3 sts. TKS inc in the next sp. TKS in the final st. RP. – 7 sts
Rows 6-7: TKS in ea st across. RP. – 7 sts
Row 8: TKS inc in the first sp. TKS in the next 5 sts. TKS inc in the next sp. TKS in the final st. RP. – 9 sts.
Rows 9-10: TKS in ea st across. RP. – 9 sts
Row 11: TKS inc in the first sp. TKS in the next 7 sts. TKS inc in the next sp. TKS in the final st. RP. – 11 sts
Row 12-13: TKS in ea st across. RP. – 11 sts
Row 14: TKS inc in the first sp. TKS in the next 9 sts. TKS inc in the next sp. TKS in the final st. RP. – 13 sts
Rows 15-16: TKS in ea st across. RP. – 13 sts
Row 17: TKS inc in the first sp. TKS in the next 11 sts. TKS inc in the next sp. TKS in the final st. RP. – 15 sts
Rows 18-19: TKS in ea st across. RP. – 15 sts
Row 20: TKS inc in the first sp. TKS in the next 13 sts. TKS inc in the next sp. TKS in the final st. RP. – 17 sts
Row 21-22: TKS in ea st across. RP. – 17 sts
Row 23: TKS inc in the first sp. TKS in the next 15 sts. TKS inc in the next sp. TKS in the final st. RP. – 19 sts
Rows 24-25: TKS in ea st across. RP. – 19 sts
Row 26: TKS inc in the first sp. TKS in the next 17 sts. TKS inc in the next sp. TKS in the final st. RP. – 21 sts
Rows 27-28: TKS in ea st across. RP. – 21 sts
Row 29: TKS inc in the first sp. TKS in the next 19 sts. TKS inc in the next sp. TKS in the final st. RP. – 23 sts
Rows 30-31: TKS in ea st across. RP. – 23 sts
Row 32: TKS inc in the first sp. TKS in the next 21 sts. TKS inc in the next sp. TKS in the final st. RP. – 25 sts
Rows 33-34: TKS in ea st across. RP. – 25 sts
Row 35: TKS inc in the first sp. TKS in the next 23 sts. TKS inc in the next sp. TKS in the final st. RP. – 27 sts
Rows 36-37: TKS in ea st across. RP. – 27 sts
Row 38: TKS inc in the first sp. TKS in the next 25 sts. TKS inc in the next sp. TKS in the final st. RP. – 29 sts
Rows 39-40: TKS in ea st across. RP. – 29 sts
Row 41: TKS inc in the first sp. TKS in the next 27 sts. TKS inc in the next sp. TKS in the final st. RP. – 31 sts
Rows 42-43: TKS in ea st across. RP. – 31 sts
Row 44: TKS inc in the first sp. TKS in the next 29 sts. TKS inc in the next sp. TKS in the final st. RP. – 33 sts
Row 45-46: TKS in ea st across. RP. – 33 sts
Row 47: TKS inc in the first sp. TKS in the next 31 sts. TKS inc in the next sp. TKS in the final st. RP. – 35 sts.
Rows 48-49: TKS in ea st across. RP. – 35 sts
Row 50: TKS inc in the first sp. TKS in the next 33 sts. TKS inc in the next sp. TKS in the final st. RP. – 37 sts.
Rows 51-52: TKS in ea st across. RP. – 37 sts
Row 53: TKS inc in the first sp. TKS in the next 35 sts. TKS inc in the next sp. TKS in the final st. RP. – 39 sts
Rows 54-55: TKS in ea st across. RP. – 39 sts
Row 56: TKS inc in the first sp. TKS in the next 37 sts. TKS inc in the next sp. TKS in the final st. RP. – 41 sts
Rows 57-58: TKS in ea st across. RP. – 41 sts
Row 59: TKS inc in the first sp. TKS in the next 39 sts. TKS inc in the next sp. TKS in the final st. RP. – 43 sts
Rows 60-61: TKS in ea st across. RP. – 43 sts
Row 62: TKS inc in the first sp. TKS in the next 41 sts. TKS inc in the next sp. TKS in the final st. RP. – 45 sts
Rows 63-64: TKS in ea st across. RP. – 45 sts
Row 65: TKS inc in the first sp. TKS in the next 43 sts. TKS inc in the next sp. TKS in the final st. RP. – 47 sts
Rows 66-67: TKS in ea st across. RP. – 47 sts
Row 68: TKS inc in the first sp. TKS in the next 45 sts. TKS inc in the next sp. TKS in the final st. RP. – 49 sts
Rows 69-70: TKS in ea st across. RP. – 49 sts
Row 71: TKS inc in the first sp. TKS in the next 47 sts. TKS inc in the next sp. TKS in the final st. RP. – 51 sts
Rows 72-73: TKS in ea st across. RP. – 51 sts
Row 74: TKS inc in the first sp. TKS in the next 49 sts. TKS inc in the next sp. TKS in the final st. RP. – 53 sts
Rows 75-76: TKS in ea st across. RP. – 53 sts.
Row 77: TKS inc in the first sp. TKS in ea of the next 12 sts. (TKS inc in the next sp. TKS in ea of the next 13 sts) 3 times. TKS inc in the next sp. TKS in the final st. RP. – 58 sts
Rows 78-79: TKS in ea st across. RP. – 58 sts
Row 80: TKS inc in the next sp. TKS in ea of the next 14 sts. (TKS inc in the next sp. TKS in ea of the next 14 sts) 3 times. TKS inc in the next sp. TKS in the final st. RP. – 63 sts
Rows 81-82: TKS in ea st across. RP. – 63 sts
Row 83: TKS inc in the next sp. (TKS in ea of the next 15 sts. TKS inc in the next sp) 4 times. TKS in ea of the next 2 sts. RP. – 68 sts
Rows 84-85: TKS in ea st across. RP. – 68 sts
Row 86: TKS in the next st. (TKS inc in the next sp. TKS in ea of the next 16 sts) 4 times. TKS inc in the next sp. TKS in ea of the next 2 sts. RP. – 73 sts
Rows 87-88: TKS in ea st across. RP. – 73 sts
Row 89: TKS in the next st. (TKS inc in the next sp. TKS in ea of the next 17 sts) 4 times. TKS inc in the next sp. TKS in the next 3 sts. RP. – 78 sts
Rows 90-91: TKS in ea st across. RP. – 78 sts
Row 92: TKS in ea of the next 2 sts. (TKS inc in the next sp. TKS in ea of the next 18 sts) 4 times. TKS inc in the next sp. TKS in the next 3 sts. RP. – 83 sts
Rows 93-94: TKS in ea st across. RP. – 83 sts
Row 95: TKS in ea of the next 2 sts. (TKS inc in the next sp. TKS in ea of the next 19 sts) 4 times. TKS inc in the next sp. TKS in ea of the next 4 sts. RP. – 88 sts
Rows 96-97: TKS in ea st across. RP. – 88 sts
Row 98: TKS in ea of the next 3 sts. (TKS inc in the next sp. TKS in ea of the next 20 sts) 4 times. TKS inc in the next sp. TKS in ea of the next 4 sts. RP. – 93 sts
Rows 99-100: TKS in ea st across. RP. – 93 sts
Row 101: TKS in ea of the next 3 sts. (TKS inc in the next sp. TKS in ea of the next 21 sts) 4 times. TKS inc in the next sp. TKS in ea of the next 5 sts. RP. – 98 sts
Rows 102-103: TKS in ea st across. RP. – 98 sts
Row 104: TKS in ea of the next 4 sts. (TKS inc in the next sp. TKS in ea of the next 22 sts) 4 times. TKS inc in the next sp. TKS in ea of the next 5 sts. RP. – 103 sts
Rows 105-106: TKS in ea st across. RP. – 103 sts
Row 107: TKS in ea of the next 4 sts. (TKS inc in the next sp. TKS in ea of the next 23 sts) 4 times. TKS inc in the next sp. TKS in ea of the next 6 sts. RP. – 108 sts
Rows 108-109: TKS in ea st across. RP. – 108 sts
Row 110: TKS in ea of the next 5 sts. (TKS inc in the next sp. TKS in ea of the next 24 sts) 4 times. TKS inc in the next sp. TKS in ea of the next 6 sts. RP. – 113 sts
Rows 111 – 112: TKS in ea st across. RP. – 113 sts
Row 113: TKS in ea of the next 5 sts. (TKS inc in the next sp. TKS in ea of the next 25 sts) 4 times. TKS inc in the next sp. TKS in ea of the next 7 sts. RP. – 118 sts
Rows 114 – 115: TKS in ea st across. RP. – 118 sts
Row 116: TKS in ea of the next 6 sts. (TKS inc in the next sp. TKS in ea of the next 26 sts) 4 times. TKS inc in the next sp. TKS in ea of the next 7 sts. RP. – 123
Rows 117 – 118: TKS in ea st across. RP. – 123 sts
Row 119: TKS in ea of the next 6 sts. (TKS inc in the next sp. TKS in ea of the next 27 sts) 4 times. TKS inc in the next sp. TKS in ea of the next 8 sts. RP. – 128 sts
Rows 120-121: TKS in ea st across. RP. – 128 sts
Row 122: TKS in ea of the next 7 sts. (TKS inc in the next sp. TKS in ea of the next 28 sts) 4 times. TKS inc in the next sp. TKS in ea of the next 8 sts. RP. – 133 sts
Rows 123-124: TKS in ea st across. RP. – 133 sts
Row 125: TKS in ea of the next 7 sts. (TKS inc in the next sp. TKS in ea of the next 29 sts) 4 times. TKS inc in the next sp. TKS in ea of the next 9 sts. RP. – 138 sts
Rows 126-127: TKS in ea st across. RP. – 138 sts
Row 128: TKS in ea of the next 8 sts. (TKS inc in the next sp. TKS in ea of the next 30 sts) 4 times. TKS inc in the next sp. TKS in ea of the next 9 sts. RP. – 143 sts
Rows 129-130: TKS in ea st across. RP. – 143 sts
Row 131: TKS in ea of the next 8 sts. (TKS inc in the next sp. TKS in ea of the next 31 sts) 4 times. TKS inc in the next sp. TKS in ea of the next 10 sts. RP. – 148 sts
Rows 132-133: TKS in ea st across. RP. – 148 sts
Row 134: TKS in ea of the next 9 sts. (TKS inc in the next sp. TKS in ea of the next 32 sts) 4 times. TKS inc in the next sp. TKS in ea of the next 10 sts. RP. – 153 sts
Rows 135 – 151: TKS in ea st across. RP. – 153 sts
Cut yarn and tie off.
Seaming the Hood
Fold the large triangle down the center length so that the right sides of the fabric are facing each other and the wrong sides are out.
Using stitch markers, count from the opening of the hood (the long side) 33 rows down on each side. Mark the 33rd row on each side.
With a tapestry needle and a length of yarn, make a whip stitch seam starting at the point of the hood and seaming toward the opening of the hood.
Seam the hood until you reach the rows marked with stitch markers. Cut yarn. Turn your hood inside out so that the right sides are facing out again. This leaves 33 rows left unseamed on either side.
Shortened Hood pictured above
How did I get the number of rows to leave unseamed? It’s (8+8) to account for the small angled part on each side of the front panel, plus (16+16) to cover the tops of the sleeves, then (25- 8 = 17) to cover the portion of the top of the back panel not already covered by the cap of the sleeves. This equals 65, but I rounded up to 66 to get an whole number when I halved it – so 33 rows left unseamed on either side of the hood.
The hood then is seamed to the collar of the garment (once all sleeves and bodice have been seamed) using a tapestry needle and a length of yarn. Whip stitch the hood, matching the points of the hood opening indicated by the red dots to the beginning of the collar on the front, also indicated by red dots.
Seam the hood around the collar opening, matching stitch for stitch.
Front Border and Closures
We’re almost done!Next up is to use four rows of LDC to add a border across the entire front opening, beginning with the hem, working up the opening of the garment, going around the edge of the hood, and working back down the other side of the front opening. After the third row, we’ll stop and mark the placement of the buttons. For traditional buttonholes, stop to mark the placement after the second row.
Using a 3.50 mm hook, join yarn in the side of the skirt border rows.
Ch 3.
Row 1: 2 LDC in the side of each LDC from the border rows (6 LDC if you did 3 border rows.) 1 LDC in the side of each row across the next wedge, waist band, and front panel. 1 LDC in ea st across the brim of the hood. 1 LDC in the side of each row across the front panel, waist band, and the next wedge. 2 LDC in the side of each LDC of the skirt border.
Row 2: Ch 3, turn. 1 LDC in ea LDC of Row 1. Traditional buttonholes, mark placement here.
Row 3: Ch 3, turn. 1 LDC in ea LDC of Row 2. Loop buttonholes, mark placement here.
Close-up of LDC border
Mark where your buttons will be on one side, and mark an equidistant space on the other side of the border for where you will place your loops or buttonholes. I began with one button/closure on the top and bottom edge of the waist band, then used this measurement (17 sts between each placement) to space the other buttons. I made five button placements total.
Once your button placements have been marked, begin the rest of the rows.
Row 4: Ch 3, turn. 1 LDC in ea st across until you reach a button/closure marker. If you are on the button side, keep working LDC’s. If you are on the closure side, there are two options: You can chain a couple stitches and skip over working a couple stitches, which creates a buttonhole within the band and a tighter closure. I opted to use a loop closure for the small, which leaves the front a little more open when buttoned.
If using a loop closure, chain a loop just big enough to fit the button through, then slip stitch in the same stitch. Continue working LDC’s across the band, stopping to work a chain loop at any point where a closure is marked.
If making traditional buttonholes, stop LDC and chain one before a marked stitch. Skip marked stitch and resume LDC until you reach the next marked stitch, repeat.
Cut yarn and tie off.
Stopping to chain a loop closure
Traditional buttonholes
After finishing the final border row, use a tapestry needle and a length of yarn to attach each button at the marked location on the opposite side of the closures.
Recently I’ve been making a lot of halter tops (hello, 90 degree weather!) and my latest version of last summer’s debut pattern the Acanthus Top was so deep green and foresty that I had to add a little extra somethin’ somethin’..
That leafy fringe across the bottom utilizes the Quirky Leaf Motif, an element that was already included in the pattern, to add an extra border to help catch movement and swing on this cute summer top! I added the instructions for doing this leafy fringe border into the original pattern as an extra option, so everyone can enjoy 🙂
The Acanthus Top is available as a PDF file for purchase in my Ravelry Store , Ko-fi Shop, and Etsy Shop and includes instructions for all the elements seen on this example <3 Best of all it’s available in sizes XS – 2XL!
This top is designed to be great for dancing – most of my personal halter tops end up being danced around in drum circles actually (although not as much lately – waiting patiently for July so I can do that again!) Since it’s such an easy top to move around in, it surely needed a fringe or hanging decoration to accent the joyful movement 🙂
As always I made this halter top in shades of I Love This Cotton! (still looking for a perfect substitute for this yarn so I don’t have to shop at Hobby Lobby). #4 weight yarn makes this project quick and comfortable and I LOOOOOOOVE the wide shoulder straps on it, probably one of the most comfortable halter tops I’ve ever designed!
The leafy crochet necklace I’m wearing is an older FREE design of mine, the Ivy Crown, which you can find on my blog by following the link 🙂 Both these comfy cotton goodies center around my Quirky Leaf Motif, a versatile little shape that you can crochet onto long chains.
I’m dreaming up more crochet halter tops as we speak, they are so fun and fast a #4 cotton yarn, it’s very addicting 🙂
Even more so when you get to morph into your elf self for the occasion <3 Have fun and stay safe out there – and remember to hydrate!
In my last post I was happy to re-release the premium Mandala Top crochet pattern as a FREE offering on my blog – that design was several years old at this point and I wanted to make it more widely available as it’s one of my all-time favorites! The Mandala Top also got a few additional features over the years, namely the cute bell-shaped Drop Sleeves option and the (absolutely essential IMO) Dress Extension which adds more length and flounce to the bottom of the tunic.
Anyway, the Mandala Top Free Pattern post ran a little long, so I’m doing the Mandala Top Add-Ons free patterns in this post! Keep scrolling to get the instructions for both of these features for all 4 sizes, or go to my Ravelry Store , Ko-Fi Shop, or Etsy Shop to get the all-inclusive portable, downloadable, ad-free version by purchasing the Mandala Top PDF!
This whole design looks superb with regular ol’ #4 worsted weight acrylics, and affordable yarn means you can easily create the most colorful mandalas you can imagine! I can’t decide if I love these more in color combos using spare yarn balls, or in single tone neutrals that go with everything <3
Mandala Top Drop Sleeves
Materials:
5.00 mm hook or size needed to obtain gauge
Yarn: #4 worsted weight – yardage given is in addition to the yarn required to complete the main body of the top. Small, Medium, Large: 200 yds X-Large: 285 yds Tapestry Needle Stitch Markers Scissors
Gauge:
4 sts and 2 rows = 1” in dc
Notes: Instructions are given for working the sleeve directly onto the side of the top. For a tutorial on how to work the DCh stitch, refer back to the Mandala Top Pattern
Small, medium, and large instructions are the same, instructions for XL will appear as a secondary option, where differing.
Work the entire Mandala Top Pattern. For the straps, add extra DCh sts according to the sizes below:
Small & Medium: 10 extra DCh
Large: 15 extra DCh
X-Large: 20 extra Dch
Do not weave in the ends of the straps, as you may want to adjust them later.
Pattern for Sleeves
Foundation: Attach yarn 6 sc sts away from the base of the strap at the back of the top – counting toward the armpit, not toward the neckline of the top.
Ch 1, work a sc in the same st. Insert hk into the side bar of the sc, then draw up a loop to begin the first DCh st. YO and draw through both lps on the hook – 1 DCh stitch made. Place marker in this st.
DCh 28 more sts. Insert hk through both side bar of last DCh st and through the stitch 6 sc sts away from the strap on the other side of the top. Draw up a loop, then YO and draw through both lps on the hk. Place marker in this stitch.
Working toward the armpit of the top, not toward the strap, work 1 sc in the next 16 (26) sts, sk the stitch where the front and back of the top are joined, work 1 sc in ea of the next 16 (26) sts. – 60, 80 sts.
The stitches you marked (the very first and very last of the DCh) DO NOT count as stitches for Rnd 1. Skip over them completely when working the instructions for the following round.
Rnd 1: Ch 5 – counts as first tr + ch-1. (sk next st, tr in the next st, ch 1) 29, 39 times. Join with a sl st in the 4th ch of beg ch-5.
Rnd 2: Sl st into the next ch st. Ch 5 – counts as first tr + ch 1. (sk next st, tr in the next ch-1 space, ch 1) 29, 39 times. Join with a sl st in the 4th ch of beg ch-5.
Rnd 3.: Rpt Rnd 2.
Rnd 4: Sl st into the next ch-1 space. Ch 3 – counts as first dc. Dc into the same space, ch 3. (2 dc in the next ch-1 sp, ch 3) 28, 38 times. 2 dc in the next ch-1 space, ch 1, join with a hdc in the 3rd ch of beg ch-3.
Rnd 5: Ch 3- counts as first dc. Dc into the same space, ch 3. (2 dc in the next ch-3 sp, ch 3) 28, 38 times. 2 dc in the next ch-1 space, ch 1, join with a hdc in the 3rd ch of beg ch-3.
Rnd 6: Rpt Rnd 5.
Rnd 7: Ch 4 – counts as first tr. Tr in the same space, ch 3. (2 tr in the next ch-3 space, ch 3) 28, 38 times. 2 tr in the next ch-3 space, ch 1, join with a hdc in the 4th ch of beg ch-4.
Rnd 8: Rpt Rnd 7.
Rnd 9: Rpt Rnd 7.
Cut yarn and tie off.
Repeat foundation and rounds 1-10 on the opposite side. For the second foundation, join your yarn 6 sc sts from the base of the strap on the front side so that you maintain the RS facing. Weave in all ends.
Forming the Adjustable Ring
The adjustable ring draws the straps together in an X at the back of the top to keep them from falling off the shoulder from the additional weight of the sleeves; this design requires that extra length is added to the straps. Though the general guidelines for adding extra length is given, you may want to test the lengths first to check what fits best.
Step 1: With new yarn that is the same color as the straps, ch 6. Bring the straps together in the back and slip the chain around both straps. Join with a sl st in the first ch to form a ring that encircles the straps.
Step 2: Sc into the same stitch. Sc into ea of the next 5 ch sts. Join with a slip stitch to the first sc of the ring. Cut yarn and tie off. Weave in ends, making sure that the ring is not attached to either strap at any point.
Mandala Top Dress Extension
Materials:
5.00 mm hook or size needed to obtain gauge
#4 Worsted Weight yarn (yardage given is in addition to amount needed to complete the main body of the top) Smalls & Mediums: 200 yds Larges & X-Larges: 275 yds Tapestry Needle Scissors
Add more length and flounce to your mandala top by completing this extension pattern for the 3 extra rounds at the bottom of the garment.
Smalls & Mediums Instructions:
Rnd 1: With RS facing, join new yarn in the 2nd ch-8 space from the dc2tog at the side of the top. Ch 7 – counts as first dc + ch 4. Dc in the same space, ch 7. *Dc in the next ch-8 space, ch 4, dc in the same space, ch 4. YO and insert hook under the next ch-4 space. Draw up a loop, YO, and draw through 2 lps on the hook – 2 lps left on the hook. YO and insert hook under next ch-4 space, draw up a loop. YO and draw through 2 lps on the hk, YO again and draw through all 3 lps on the hook – dc2tog made. Ch 4.* (Dc in the next ch sp, ch 4, dc in the same space, ch 7) 31 times. Repeat from *to *. (Dc in the next space, ch 4, dc in the same space, ch 7) 30 times. Dc in the next ch space, ch 4, dc in the same space, ch 4. Tr in the 3rd ch of beg ch-7. 132 chain spaces made.
Rnd 2: Ch 3 – counts as first dc. Dc in the same space, ch 8. (2 dc in the next ch space, ch 8) twice.* 2 dc in the next chain space, ch 4. YO and insert hk under the next ch-4 space. Draw up a loop, YO and draw through 2 lps on the hook – 2 lps left on the hook. YO and insert hook under the next ch-4 space, draw up a loop. YO and draw through 2 lps on the hk, YO again and draw through all 3 lps on the hook – dc2tog made. Ch 4. * (2 dc in the next chain space, ch 8) 62 times. Rpt from * to *. (2 dc in the next chain space, ch 8) 60 times. 2 dc in the next chain space, ch 4, treble in the 3rd ch of beg ch-3. 130 chain spaces made.
Rnd 3: Ch 3 – counts as first dc. Dc in the same space, ch 8. (2 dc in the next chain space, ch 8) twice. .* 2 dc in the next chain space, ch 4. YO and insert hk under the next ch-4 space. Draw up a loop, YO and draw through 2 lps on the hook – 2 lps left on the hook. YO and insert hook under the next ch-4 space, draw up a loop. YO and draw through 2 lps on the hk, YO again and draw through all 3 lps on the hook – dc2tog made. Ch 4. * (2 dc in the next chain space, ch 8) 61 times. Rpt from * to *. (2 dc in the next chain space, ch 8) 60 times. Sl st in the 3rd ch of beg ch-3. 128 chain spaces made.
Cut yarn and tie off. Weave in all ends.
Size Large Instructions:
Rnd 1: With RS facing, join new yarn in the 2nd ch-8 space from the dc2tog at the side of the to.Ch 7 – counts as first dc + ch 4. Dc in the same space, ch 7. *Dc in the next ch-8 space, ch 4, dc in the same space, ch 4. YO and insert hook under the next ch-4 space. Draw up a loop, YO, and draw through 2 lps on the hook – 2 lps left on the hook. YO and insert hook under next ch-4 space, draw up a loop. YO and draw through 2 lps on the hk, YO again and draw through all 3 lps on the hook – dc2tog made. Ch 4. *(Dc in the next ch sp, ch 4, dc in the same space, ch 7) 45 times. Repeat from *to *. (Dc in the next space, ch 4, dc in the same space, ch 7) 44 times. Dc in the next ch space, ch 4, dc in the same space, ch 4. Tr in the 3rd ch of beg ch-7. 188 chain spaces made.
Rnd 2: Ch 3 – counts as first dc. Dc in the same space, ch 8. (2 dc in the next ch space, ch 8) twice.* 2 dc in the next chain space, ch 4. YO and insert hk under the next ch-4 space. Draw up a loop, YO and draw through 2 lps on the hook – 2 lps left on the hook. YO and insert hook under the next ch-4 space, draw up a loop. YO and draw through 2 lps on the hk, YO again and draw through all 3 lps on the hook – dc2tog made (see fig 3). Ch 4. * (2 dc in the next chain space, ch 8) 90 times. Rpt from * to *. (2 dc in the next chain space, ch 8) 88 times. 2 dc in the next chain space, ch 4, treble in the 3rd ch of beg ch-3. 186 chain spaces made.
Rnd 3: Ch 3 – counts as first dc. Dc in the same space, ch 8. (2 dc in the next ch space, ch 8) twice.* 2 dc in the next chain space, ch 4. YO and insert hk under the next ch-4 space. Draw up a loop, YO and draw through 2 lps on the hook – 2 lps left on the hook. YO and insert hook under the next ch-4 space, draw up a loop. YO and draw through 2 lps on the hk, YO again and draw through all 3 lps on the hook – dc2tog made. Ch 4. * (2 dc in the next chain space, ch 8) 89 times. Rpt from * to *. (2 dc in the next chain space, ch 8) 88 times. Sl st in the 3rd ch of beg ch-3. 184 chain spaces made. Cut yarn and tie off. Weave in all ends.
X-Large Instructions:
Rnd 1: With RS facing, join new yarn to any ch-8 space. Ch 7 – counts as first dc + ch . Dc in the same space, ch 7. (Dc in the next space, ch 4, dc in the same space, ch 7) 91 times. Dc in the next ch space, ch 4, dc in the same space, ch 4. Tr in the 3rd ch of beg ch-7. 194 chain spaces made.
Rnd 2: Ch 3 – counts as first dc. Dc in the same space, ch 8. (2 dc in the next ch space, ch 8) 192 times. 2 dc in the next ch space, ch 4, tr in the 3rd ch of beg ch-3. 194 chain spaces made.
Rnd 3: Repeat Round 2.
Cut yarn and tie off. Weave in all ends.
That’s it for this re-release! It’s been so much fun revisiting this pattern and setting up this design to become free and available to everyone, not the least because it’s an excuse to make new versions 😉 If you have any questions about this design please leave me a comment or contact me directly through messages on any of my social media sites!
One more mention before I go – I started playing around with the Mandala Top design after I had finished it to see about adding sleeves and making it a sweater (those are my first drafts below)…
… which after some tweaking and changing things a bit, led directly to the Flower Child Pullover design, a paid PDF pattern in my Ravelry and Etsy stores – in case you’re interested 😉
I’m always looking for the best ways to expand my offerings as I grow and develop as a crochet pattern designer. On one hand, I need to make enough money from my business to pay my bills and care for myself. On the other hand, offering things for free here on my blog is mutually beneficial to me AND you! By offering more free things, people have the chance to see what my premium written patterns are like, and if they like them and want to use them all the time the hope is that they’ll buy the downloadable, ad-free versions 🙂
Offering free patterns also drives up my website and channel views, which in turn make me a little more money from ad revenue- not as much as the paid PDFs, but some. But the best part of this scenario is that through free pattern offerings, more people make awesome things based off of my patterns and when they tag me in their social media posts, I get to see and so do others who then go to find my patterns! 🙂
This is the true definition of a win-win scenario, and to me it applies the theories of Mutual Aid, which I think is important for the future of our society <3 Mutual Aid is offering freely what can be freely given with no presupposition of charity or reward – Mutual Aid is based on the theory that what is good for one of us, is in turn good for all of us, because human society is inextricably connected. We are all just threads in a great universal mandala, you guys.
Anyway, that spiel was leading up to the fact that today I’m re-releasing my previously paid-only crochet pattern, the Mandala Top, here on this blog post for FREE! If you like it you can check out my Tip Jar page here and maybe leave a little somethin’ in the Jar to help fund future offerings. What goes around comes around <3
If you want the downloadable, printable, ad-free PDF version of this pattern, you can still get it in my Ravelry Store , Ko-Fi Shop,or Etsy Shop! The free version also includes the Mandala Top Add-Ons, two bonus features you can add to your basic top design, and the paid version in my shops now include the Add-Ons PDF with the main Mandala Top in one single purchase. They were previously two separate purchases but now they are all included under the Mandala Top listing for the price of a single pattern 😉 Yay! Keep scrolling for the FREE version.
For this re-release, I made a few pearly white Mandala Tops in sizes Large and Small (small is pictured on me here), and I recorded some video tutorial footage (found at the bottom of the page) to help people navigate the Joining Round, which can be a little tricky to interpret just from the written version. I think this new video is helpful and I hope you do too!
For the model photography I went totally shabby chic, pairing my pearly white Mandala tunic with a white lacey dress, a vintage crochet collar I thrifted, and a sweet straw bucket hat because I’m obsessed with Mori Girl and Grandmacore fashion 😉
But this design also great in more colorful versions, such as the super cute hippie girl tunics modeled by my lovely friend Laney above & below.
And, for good measure, the oooooooold picture from the original release of this design, in sweet vintage-y warm browns and pinks <3
Actually, over the years I’ve made a TON of these. They are quick to work once you’re familiar with the pattern and they have always been great sellers for me when I take them to vend at festivals 🙂
Okay, so now that we’re fully inspired, on to the FREE PATTERN!
Mandala Top Pattern
Materials:
5.0 mm hook (or size needed to obtain gauge) 300-400 total yards worsted weight yarn in various colors Tapestry Needle Stitch Markers
Gauge: Round 1 = 5” measured straight across the diameter or 4 sts and 2 rows = 1” in dc
Half Double Crochet (hdc): Between sc and double crochet in height. Yarn over, insert hk into the next stitch. Yarn over and draw up a lp. Yarn over and pull through all three lps on the hk. Equal to 2 chains in length when joining.
Treble Crochet (tr): Equal to 4 chains in length when joining. Yarn over twice and insert hk into the next stitch. Draw up a loop. Yarn over and draw through 2 lps on the hook three times.
Double Treble Crochet (dtr): Yarn over 3 times, insert hook into the next stitch. Yarn over and draw up a loop. Yarn over and draw through 2 lps on the hook 4 times. Equal to 5 chains in length.
Triple Treble Crochet (trtr): Yarn over 4 times, insert hook into the next stitch. Yarn over and draw up a loop. Yarn over and draw through 2 lps on the hook 5 times
Sizes: Small – XL
Notes
Sizing: the openwork mesh structure of the garment allows for a lot of drape and stretch so that it fits a wide variety of body types. When choosing a size, keep in mind that the bust width given is the maximum length the garment will stretch from armpit to armpit without warping the appearance of the pattern.
Color Changing: This pattern is written for 5-6 different colors, but looks great with any amount of color changes. If you are working custom color changes, make sure to start at the same point the last pattern round leaves off unless the pattern indicates you may join the new yarn at any space. If you are using only one color of yarn, you’ll need to end your rounds with an equivalent sized chain space by using the Chain and Stitch Join Method, tutorial linked at the bottom of the next paragraph.
Round Closure and Counting Spaces: Some rounds use a chain and stitch combination to close the round in order to place your hook at the apex of a loop to start the following round. (Ex from Rnd 3 in Small: 2 dc in the next ch-4 space, ch 3. Double in the 3rd ch of the beg ch-3. 16 ch-6 spaces made.) This chain and stitch combination forms a space the same size as the rest of the chain spaces in the round and IS COUNTED as a chain-space in the final count at the end of the round instructions. For instance, the chain and stitch combo example from Rnd 3 counts as one of the 16 (for small or medium) or 20 (for large and x-large) chain-6 spaces for the entire round. For more on this technique, see my comprehensive free tutorial on closing chain-space rounds with the Chain & Stitch Join.
Instructions for Small & Medium Sizes:
To begin, make Magic Ring.
Rnd 1: Ch 9, counts as Trtr plus ch-4. (Trtr into ring, ch 4) 14 times. Trtr into the ring, ch 2, hdc in the 5th chain of beginning ch-9. 16 trtr + ch-4 spaces made. Pull your magic ring closed tightly.
Rnd 2: Ch 4 – counts as first treble. (Treble in the next ch-4 space, ch 4, treble in the same space) 15 times. Treble in the next ch-4 space, ch 4, join with a slip stitch to the 4th chain of beginning ch-4. 16 treble V stitches made. Cut color and tie off.
Rnd 3: Join new color to any ch-4 space. Ch 3 – counts as first dc. Dc in the same ch-4 space, ch-6. (2 dc in the next space, ch 6) 14 times. 2 dc in the next ch-4 space, ch 3. Dc in the 3rd ch of the beg ch-3. 16 ch-6 spaces made.
Rnd 4: Ch 3 – counts as first double. Double in the same ch-6 space, ch 7. (2 dc in the next space, ch 7) 15 times. Join with a sl st in the 3rd ch of beg ch-3. 16 ch-7 spaces made. Cut yarn and tie off.
Rnd 5: Join new color in the middle of any ch-7 space. Ch 6 – counts as dc + ch-3. Dc in the same space, ch 7. ([dc, ch 3, dc, ch7] in the next ch-7 space) 14 times. Dc in the next ch-7 space, ch 3, dc in the same space, ch 3, treble in the 3rd ch of beg ch-6. 32 chain spaces made
Rnd 6: Ch 3, dc in the same space, ch 7. (2 dc in the next chain space, ch 7) 31 times. Join with a sl st to the 3rd ch of beg ch-3. 32 chain spaces. Cut yarn and tie off.
MEDIUMS ONLY: Rnd 7: Rejoin yarn in any ch-7 space. Ch 3 to count as first dc, dc in the same space, ch 8. (2 dc in the next ch space, ch 8) 31 times. Join with a slip stitch to the 3rd ch of beg ch-3. 32 chain spaces. Cut yarn and tie off.
Rnd 7/8 : Join new yarn to any chain space. Ch 3, dc in the same space, ch 8. (2 dc in the next chain space, ch 8) 2 times. Work (2 dtr, ch 8) twice in the next chain space. (2 dc in the next chain space, ch 8) 4 times. Work (2 dtr, ch 8) twice in the next chain space. (2 dc in the next chain space, ch 8) 22 times. 2 dc in the next space, ch 4, treble in the 3rd ch of beg ch-3. 34 ch-8 spaces made.
Chart shows Size M
Rnd 8/9: Sc in the same space, ch 5. (Sc in the next ch-8 space, ch 5) 3 times. Work (2 tr, ch 8, 2 tr, ch 5) in the next ch-8 space. (Sc in the next ch-8 space, ch 5) 5 times. Work (2 tr, ch 8, 2 tr, ch 5) in the next ch-8 space. (Sc in the next ch-8 space, ch 5) 3 times. Sc in the next ch-8 space, ch 8. (Dc in the next ch-8 space, ch 4, dc in the same space, ch 7) 18 times. Dc in the next ch-8 space, ch 4, dc in the same space, ch 8. Join with a sl stitch to the first sc of the round. 55 chain spaces made. Cut yarn and tie off.
If this is the first motif made, complete Rnds 1-8/9 again to form a second motif. If this is your second motif, move on to the joining round in Round 9/10.
The following instructions work the sc border across the top half of both of the mandala motifs. This is mostly covered in the Part 1 of the Mandala Top Joining Video Tutorial, included at the bottom of the page.
JOINING: Rnd 9/10 : Join new yarn in the sixth stitch from end of the last round on the last motif (this will be the second single crochet of round 8/9.) *(1 sc in ea of the next 5 ch stitches, 1 sc in the next sc) 2 times. 1 sc in ea of the next 5 ch stitches, 1 sc in each of the next 2 treble stitches. 1 sc in ea of the next 4 ch stitches, 3 hdc in the next ch stitch. Place marker in the 2nd hdc made. 1 sc in ea of the next 3 ch stitches and in ea of the next 2 treble stitches. (1 sc in ea of the next 5 ch stitches, 1 sc in the next sc) 5 times. 1 sc in ea of the next 5 ch stitches, 1 sc in ea of the next 2 treble stitches. 1 sc in each of the next 3 ch stitches, 3 hdc in the next ch st. Place marker in the 2nd hdc made. 1 sc in ea of the next 4 ch sts, 1 sc in ea of the next 2 treble sts. (1 sc in ea of the next 5 ch sts, 1 sc in the next sc) 2 times. 1 sc in ea of the next 5 sts. *
Align the second motif with the first, making sure the two wrong sides are facing each other. Align the 3rd single crochet stitch from the left of the leftmost set of treble sts (or the right of the rightmost if you are a leftie) with the corresponding stitch on the second motif. Work one sc through both stitches at once. Begin to work the Rnd 9/10 pattern from * to * on the second motif, working ONLY the stitches of the second motif, and working in the direction of the nearest set of trebles. To end the round, insert hook through the next sc and through the corresponding stitch of the opposite motif (the third sc left of the leftmost set of trebles, or right of the rightmost if you are a leftie). Work a sl stitch through both stitches at once. Do not cut or tie off, move on to Round 10/11.
The following instructions work down the side of the two mandala motifs, constructing a join made of chaining and sc back and forth between the two motifs. This is described in Part 2 of the Joining Video Tutorial below, as well as in the charts pictured 🙂
Rnd 10/11: Keeping both motifs aligned, the motif on top (facing you) will be referred to as #1. The motif in back (further away from you) will be #2. You will be working a fagoting stitch join between the two motifs (See fig 3 for chart) . Working away from the nearest set of trebles, ch 3 and sc in the next Ch-5 space of #2. Ch 3, sc in the corresponding ch-5 space of #1. Ch 5, sc in the next ch-8 space of #2, ch 5, sc in the corresponding ch-8 space of #1. Ch 5, sc in the next ch-4 space of #2, ch 5, sc in the corresponding ch-4 space of #1 (fagoting joint completed) Ch 8.
Now we will work across the bottom of only one of the motifs until reaching the other side, where we will work another join.
(2 dc in the next ch space, ch 8) 35 times. (Beginning of next join) Sc in the next ch-4 space, ch 5. Sc in the corresponding space on #2, ch 5. Sc in the next ch-8 space of #1, ch 5. Sc in the corresponding ch space of #2, ch 5. Sc in the next ch-5 space of #1, ch 3, sc in the corresponding space of # 2. Ch 3, join with a slip stitch in the motif-join sc of Rnd 9/10. Cut yarn and tie off.
Rnd 10/11 makes up an extra row on the tunic, making one side slightly longer. This longer side is now the back side. Rnd 11/12 is worked in a single round around the bottom, including both front and back as two halves of the same round. I show where to start this next round in the last part of Part 2 of the video Joining Tutorial.
Rnd 11/12: With RS facing, join new yarn in the 3rd ch-8 space from the last ch-5 in the fagoting join on the back half of the top. Ch 3 to count as first dc. Dc in the same space, ch 8. *2 dc in the next ch-8 space, ch 4. Yarn over and draw up a lp through the next ch-8 space, yo and draw through 2 lps on the hook. Yarn over and draw up a loop through the next free chain space (skipping ch-5 of fagoting join and the chain space it is attached to). Yarn over and draw through 2 lps on the hook. Yarn over and draw through the last 3 lps on the hook – dc2tog made. Ch 4. (2 dc in the next ch space, ch 8) 32 times.* Rpt from * to *. Join with a sl st in the 3rd ch of beg ch-3. Cut yarn and tie off. – 69 ch spaces total.
Proceed to the Straps portion of the instructions 🙂
Instructions for Size Large:
Make Magic Ring.
Rnd 1: Ch 9, counts as Trtr plus ch-4. (Trtr into ring, ch 4) 18 times. Trtr into the ring, ch 2, hdc in the 5th chain of beginning ch-9. 20 trtr + ch-4 spaces made. Pull your magic ring closed tightly.
Rnd 2: Ch 4 – counts as first treble. (Treble in the next ch-4 space, ch 4, treble in the same space) 19 times. Treble in the next ch-4 space, ch 4, join with a slip stitch to the 4th chain of beginning ch-4. 20 treble V stitches made. Cut color and tie off.
Rnd 3: Join new color to any ch-4 space. Ch 3 – counts as first double. Double in the same ch-4 space, ch 6. (2 dc in the next space, ch 6) 18 times. 2 dc in the next ch-4 space, ch 3. Double in the 3rd ch of the beg ch-3. 20 ch-6 spaces made.
See instructions for Small & Medium sizes to view the charted examples of the joins in Rnds 1-5.
Rnd 4: Ch 3 – counts as first double. Double in the same ch-6 space, ch 7. (2 dc in the next space, ch 7) 19 times. Join with a sl st in the 3rd ch of beg ch-3. 20 ch-7 spaces made. Cut yarn and tie off.
Rnd 5: Join new color in the middle of any ch-7 space. Ch 6 – counts as first dc + ch-3. Dc in the same space, ch 7. ([dc, ch 3, dc, ch7] in the next ch-7 space) 18 times. Dc in the next ch-7 space, ch 3, dc in the same space, ch 3, treble in the 3rd ch of beg ch-6. 40 chain spaces made.
Rnd 6: Ch 3, dc in the same space, ch 7. (2 dc in the next chain space, ch 7) 39 times. Join with a sl st in the 3rd ch of beginning ch-3. Cut yarn and tie off. 40 ch spaces made.
Rnd 7: Join new color in the middle of any ch-7 space. Ch 3, dc in the same space, ch 8. (2 dc in the next ch-7 space, ch 8) 38 times. 2 dc in the next space, ch 4, treble in the 3rd ch of beg ch-3. 40 ch-8 spaces made.
Rnd 8: Ch 3, dc in the same space, ch 8. (2 dc in the next ch-8 space, ch 8) 2 more times. Work (2 trtr, ch 8) twice in the next ch-8 space. (2 dc in the next ch-8 space, ch 8) 4 times. Work (2 trtr, ch 8) twice in the next ch-8 space. (2 dc in the next ch-8 space, ch 8) 31 times. Join with a sl st to the 3rd ch of beg ch-3. Cut yarn and tie off. 42 ch-8 spaces made.
Rnd 9: Join new color in the final ch-8 space of Rnd 8. Sc in the same space as join, ch 5. (Sc in the next ch-8 space, ch 5) 3 times. (2 treble, ch 8, 2 treble, ch 5) in the next ch-8 space – 1 treble shell made. (Sc in the next ch-8 space, ch 5) 5 times. (2 tr, ch 8, 2 tr, ch 5) in the next ch-8 space – 2nd treble shell made . (Sc in the next ch-8 space, ch 5) 3 times. Sc in the next ch-8 space, ch 8. (Dc in the next ch-8 sp, ch 4, dc in the same space, ch 7) 26 times. Dc in the next ch-8 sp, ch-4, dc in the same space, ch 8. Join with a sl st to the first sc of the round – 71 chain spaces made. Rpts Rnds 1-9 for second motif.
If this is the completion of Rnd 9 on your first motif, cut yarn and tie off. If this the completion of Rnd 9 on your second motif, do not tie off.
The following instructions work the sc border across the top half of both of the mandala motifs. This is mostly covered in the Part 1 of the Mandala Top Joining Video Tutorial, included at the bottom of the page
Rnd 10 (Joining) : Sl stitch in the next 5 ch sts, sl st in the next sc st. *(1 sc in ea of the next 5 ch stitches, 1 sc in the next sc) 2 times. 1 sc in ea of the next 5 ch stitches, 1 sc in each of the next 2 treble stitches. 1 sc in ea of the next 4 ch stitches, 3 hdc in the next ch stitch. Place a marker in the 2nd hdc. 1 sc in ea of the next 3 ch stitches and in ea of the next 2 treble stitches. (1 sc in ea of the next 5 ch stitches, 1 sc in the next sc) 5 times. 1 sc in ea of the next 5 ch stitches, 1 sc in ea of the next 2 treble stitches. 1 sc in each of the next 3 ch stitches, 3 hdc in the next ch st, place marker in the 2nd hdc made. 1 sc in ea of the next 4 ch sts, 1 sc in ea of the next 2 treble sts. (1 sc in ea of the next 5 ch sts, 1 sc in the next sc) 2 times. 1 sc in ea of the next 5 sts. *
Align the second motif with the first, making sure the two WS are facing each other. Align the 3rd single crochet stitch from the left of the leftmost treble shell (or the right of the rightmost if you are a leftie) with the corresponding stitch on the second motif. Work one sc through both stitches at once. Begin to work the Rnd 10 pattern from * to * on the second motif, working ONLY the stitches of the second motif, and working in the direction of the nearest treble shell. To end the round, insert hook through the next sc and through the corresponding stitch of the opposite motif (the third sc left of the leftmost treble shell, or right of the rightmost if you are a leftie). Work a sl stitch through both stitches at once. Do not tie off.
The following instructions work down the side of the two mandala motifs, constructing a join made of chaining and sc back and forth between the two motifs. This is described in Part 2 of the Joining Video Tutorial below, as well as in the charts pictured 🙂
Rnd 11: Keeping both motifs aligned, the motif on top (facing you) will be referred to as #1. The motif in back (further away from you) will be #2. You will be working a fagoting stitch join between the two motifs. (See fig 5 for chart)Working away from the nearest treble shell, ch 3 and sc in the next Ch-5 space of #2. Ch 3, sc in the corresponding ch-5 space of #1. Ch 5, sc in the next ch-8 space of #2. Ch 5, sc in the corresponding space of #1. Ch 5, sc in the next ch-4 space of #2, Ch 5, sc in the corresponding space of #1. Ch 5, sc in the next ch-7 space of #2, ch 5, sc in the corresponding ch-7 space on #1 – fagoting join completed. Chain 8. Continuing only on #1, (2 dc in the next chain space, ch 8) 49 times. (Beginning of next join) Sc in the next ch-7 space on #1, ch 5. Sc in the corresponding space on #2, ch 5. Sc in the next ch space of #1, ch 5, sc in the corresponding space of #2, ch 5. Sc in the next ch space of #1, ch 5. Sc in the corresponding chain space of #2. Ch 5, sc in the next chain space of #1. Ch 3, sc in the corresponding space of #2, ch 3. Join with a sl stitch to the joining stitch of Rnd 10. Cut yarn and tie off.
Rnd 11 makes up an extra row on the tunic, making one side slightly longer. This longer side is now the back side. Rnd 12 is worked in a single round around the bottom, including both front and back as two halves of the same round.
Rnd 12: With RS facing, join new yarn in the 3rd ch-8 space from the last ch-5 in the fagoting join on the back half of the top. Ch 3 to count as first dc. Dc in the same space, ch 8. *2 dc in the next ch-8 space, ch 4. Yarn over and draw up a lp through the next ch-8 space, yo and draw through 2 lps on the hook. Yarn over and draw up a loop through the next free chain space (skipping ch-5 of fagoting join and the ch space it is attached to). Yarn over and draw through 2 lps on the hook. Yarn over and draw through the last 3 lps on the hook. Ch 4. (2 dc in the next ch space, ch 8) 46 times.* Rpt from * to *. Join with a sl st in the 3rd ch of beg ch-3. Cut yarn and tie off. – 97 ch spaces total.
Proceed to Straps Instructions
Instructions for Size X-Large
Follow instructions for size Large for Rounds 1-5.
Rnd 6: Ch 4 – counts as first treble, tr in the same space, ch 7. (2 tr in the next chain space, ch 7) 38 times. 2 treble in the next chain space, ch 3. Tr in the 4th ch of beg ch-4. 40 chain spaces made.
Rnd 7: Ch 4 – counts as first treble, tr in the same space, ch 8. (2 tr in the next chain space, ch 8) 39 times. Join with a sl st to the 4th ch of beg ch-4. cut yarn and tie off. 40 chain spaces made.
Rnd 8: Join new yarn in any ch-8 space. Ch 3, dc in the same space, ch 8. (2 dc in the next ch-8 space, ch 8) 2 times. Work (2 trtr, ch 8) twice in the next ch-8 space. (2 dc in the next ch-8 space, ch 8) 4 times. Work (2 trtr, ch 8) twice in the next ch-8 space. (2 dc in the next ch-8 space, ch 8) 30 times. Work 2 dc in the next ch-8 space, ch 4, tr in the 3rd ch of beg ch-3. 42 chain spaces made.
Rnd 9: Sc in the same space, ch 5. (Sc in the next ch space, ch 5) 2 times. Sc in the next space, ch 8. (2 treble crochet, ch 8) twice in the next ch-8 space – 1st treble shell made. (Sc in the next ch space, ch 5) 4 times. Sc in the next ch-8 space, ch 8. (2 treble crochet, ch 8) twice in the next ch-8 space- 2nd treble shell made. (Sc in the next ch space, ch 5) 3 times. Sc in the next space, ch 8. (Dc in the next ch sp, ch 4, dc in the same space, ch 7) 26 times. Dc in the next ch space, ch 4, dc in the same space, ch 8. Join with a sl st in the first sc of the round. 71 chain spaces made. Cut yarn and tie off.
Rpt Rnds 1-9 for second motif.
The following instructions work the sc border across the top half of both of the mandala motifs. This is mostly covered in the Part 1 of the Mandala Top Joining Video Tutorial, included at the bottom of the page.
Rnd 10 (Joining): Join new color in the same sc as the ending join of Rnd 9, sc in the same space. *(1 sc in ea of the next 5 ch stitches, 1 sc in the next sc) 3 times. 1 sc in ea of the next 8 ch stitches, 1 sc in each of the next 2 treble stitches. 1 sc in ea of the next 4 ch stitches, 3 hdc in the next ch stitch – place marker in the 2nd hdc made. 1 sc in ea of the next 3 ch stitches and in ea of the next 2 treble stitches. 1 sc in ea of the next 8 ch stitches. (1 sc in the next sc, 1 sc in ea of the next 5 ch sts) 5 times. Sc in the next sc and in ea of the next 8 ch sts. 1 sc in ea of the next 2 treble stitches. 1 sc in each of the next 3 ch stitches, 3 hdc in the next ch st – place marker in 2nd hdc made, 1 sc in ea of the next 4 ch sts, 1 sc in ea of the next 2 treble sts. 1 sc in ea of the next 8 ch sts. (1 sc in the next sc. 1 sc in ea of the next 5 ch sts) 3 times. *
Align the second motif with the first, making sure the two WS are facing each other. Align the 4th single crochet stitch from the left of the leftmost treble shell (or the right of the rightmost if you are a leftie) with the corresponding stitch on the second motif. This should be the next stitch to be worked after finishing the Rnd 10 instructions above. Work one sc through both stitches at once. Begin to work the Rnd 10 pattern from * to * on the second motif, working ONLY the stitches of the second motif, and working in the direction of the nearest treble shell. To end the round, insert hook through the next sc and through the corresponding stitch of the opposite motif (the 4th sc left of the leftmost treble shell, or right of the rightmost if you are a leftie). Work a sl stitch through both stitches at once. Do not tie off.
The following instructions work down the side of the two mandala motifs, constructing a join made of chaining and sc back and forth between the two motifs. This is described in Part 2 of the Joining Video Tutorial below, as well as in the charts pictured 🙂
Rnd 11: Keeping both motifs aligned, the motif on top (facing you) will be referred to as #1. The motif in back (further away from you) will be #2. You will be working a fagoting stitch join between the two motifs. (See fig 6 for chart) Working away from the nearest treble shell, ch 5 and sc in the next Ch-8 space of #2. (Ch 5, sc in the next chain space of #1. Ch 5, sc in the next chain space of #2.) 3 times. Ch 5, sc in the next chain space of #1. Ch 8. (Fagoting join made). Working only in #1, (2 dc in the next chain space, ch 8) 47 times. (Beginning of next join) Sc in the next chain space, ch 5. Sc in the corresponding space on #2, ch 5. (Sc in the next chain space of #1, ch 5. Sc in the corresponding ch space of #2, ch 5) 3 times. Join with a slip stitch in the motif-join sc of Rnd 10. Cut yarn and tie off.
Rnd 11 makes up an extra row on the tunic, making one side slightly longer. This longer side is now the back side. Rnd 12 is worked in a single round around the bottom, including both front and back as two halves of the same round.
Rnd 12: With RS facing, join new yarn in the 3rd ch-8 space from the last ch-5 in the fagoting join on the back half of the top. Ch 3 to count as first dc. Dc in the same space, ch 8. (2 dc in the next ch-8 space, ch 8) twice. *2 dc in the next ch-5 space – the last chain space of the fagoting join, ch 8. 2 dc in the next unworked chain space, ch 8.* (2 dc in the next ch space, ch 8) 46 times.* Rpt from * to *. (2 dc in the next ch space, ch 8) 44 times. Join with a sl st in the 3rd ch of beg ch-3. Cut yarn and tie off. – 93 ch spaces total.
Proceed to the Straps Instructions 🙂
Straps Instructions
For more detailed instructions on working the Double Chain technique, see my free tutorial here.
If you plan on making the Drop Sleeves pattern add-on, work the following extra DCh stitches on each strap. In case you need to adjust the length, do not weave in the ends.
Small & Medium: 10 extra DCh
Large: 13 extra DCh
X-Large: 15 extra Dch
Attach new yarn to the hdc marked with a stitch marker on any of the points on your motifs, ch 1. Sc in the same space as join (#1). Work 1 double chain into the side of the single crochet stitch (#2). DCh 24 (#3). Insert hook into the side of last DCh stitch and also through the corresponding marked hdc on the opposite motif and draw up a loop (#4). Yarn over and draw through both loops on the hook (#5). Secure with a sl st in the next hdc of the motif. Cut yarn and tie off, repeat on the other side for the second strap. Weave in all ends.
Mandala Top Joining Tutorial Video: Part 1
This video starts at the joining round, which is Round 10 for Medium – XL and Rnd 9 for Small.
Mandala Top Joining Tutorial Video: Part 2
Once you’ve finished with your Mandala Top, weave in all ends. This piece looks best if you take the bottom hem and gently stretch the mesh downward, especially at the side joins, to get all the stitches to settle in that direction – creating a nice drapey shape. Pulling out the bottom loops and letting them settle makes a huge difference in the appearance of the finished crochet mesh!
P.S – After I finished the original Mandala Top design years ago, I began to play around with the possibility of adding sleeves and making it more of a layering sweater dress – and thus the Flower Child Pullover was born! You can find that design as a paid PDF in my Ravelry Store and Etsy Shop – in case you are interested 😉
If you’re looking to kick-start your hot girl summer, you should try halter girl summer! Handmade crochet halter tops are the cutest hot-weather accessory and definitely a part of my summer wardrobe every year – so I’m offering Buy-One Get-One for all halter tops in my Ravelry Pattern store! Just put any of my halter top patterns in your cart when buying ANY other pattern (doesn’t have to be a halter top) and use the code “SUMMER21”
This deal starts today and runs through Monday, May 31st Best of all, all the tops pictured below are made with #4 weight 100% cotton so they are both quick to make AND cool to wear
From left to right across the top row: The Acanthus Top, the Sol Halter, the Valkyrie Halter. Left to right across the bottom: The Plus Size Sol Halter, the Mehndi Halter, and the Blossom Vest
If you want something more complex, try out the Feather & Scale halter top, a beautiful magical piece worked in Fine weight yarn:
The PDF version of the Basic Bralette & the Curvy Bralette is also included in the sale – although I do have a free version of those on my blog!
That’s it for today – just the quick sale announcement! I’m working on a new halter top design at the moment so I was inspired to offer some of my previous creations <3 I hope you love!
I’m so pleased to have finally arrived at yet another pattern debut! This design has a bit of a backwards history, since it originally started as a draft for a more complicated pattern (much like my Priestess Coat) – but turned out to have such a different silhouette and structure from the final version, I eventually had to go back and re-engineer it for release as a separate design.
Little did I know this piece would really catch people’s eye when I wore it in some photos for other crochet patterns, and demand was high enough that I set myself to the task of writing it sometime last year – back in August I think? Well, I needed to pin down juuuuuuust the right fit, and write out six total sizes, then get them tested by an awesome group of pattern testers – so here we finally are!
The Cottage Vest is available for purchase as a downloadable, printable PDF in my Ravelry Store , Ko-fi Shop, and Etsy Shop. Read on for more details about this original crochet pattern or follow the links to get the pattern directly 🙂 As always, thank you all so much for your continued support of my art!
Cottage Vest Crochet Pattern
This figure flattering circular vest packs all the charm of the simple life into an easily-constructed and quick crochet project you won’t be able to stop layering over sweet sundresses, plain tees, strappy summer halters or even your favorite overalls 😉 Featuring button-front panels that cradle the bust and a whimsical pointed back, this design is great for any #4 weight yarn and includes lots of instructions for getting the perfect fit!
I drew inspiration everywhere from Turkish vests to dirndls to hobbits to get just the right silhouette on this versatile layering piece which includes instructions for six total sizes XS – 2XL, detailed stitch instructions, and notes on how to modify the front portion and front panel placement for customizing fit – and of course lots of tutorial photos! The Cottage Vest is right at home whether you’re dressing up for Ren fairs, for dancing or just for puttering around the Shire.
Materials Needed: 5.50 mm hook (or size needed to obtain gauge)Lion Brand Pound of Love (#4 weight yarn, 454 g / 1020 yd, 100% Acrylic) – 1 skein OR XS-SM: 250 yds MD-LG: 350-375 yds XL-2XL: 400-450 yds (yardage approximated)
Finished Measurements (Bust, Length from Collar to Center back point). XS: 26”, 18” SM: 28”, 19” MD: 32”, 21” LG: 36”, 22” XL: 40”, 23” 2XL: 44”, 24”
***Note on Sizing: Measurements given are approximate for finished garment laying flat – this does not take into account the stretch of the piece. The Cottage Vest is designed for an “undersized” fit that supports the bust and therefore the measurements for each size’s overall width is made smaller than standard to serve that purpose. However, the pattern easily accommodates how to add more rows to expand the width if necessary; this is written into the instructions for the rounds after the armholes and for the Front Panels.
Language: English Pattern is written in US crochet terminology.
I think I must have made about 20 of these things getting the pattern ratios right! The really nice thing about them is that they look great with cheapie acrylic worsted weight yarn, so you don’t have to rush out and get a special yarn or worry much about matching a substitute yarn – what you need is likely already in your stash 🙂
I also think these sweet little vests are perfect for adding and creating more fanciful features, like little waistcoat pockets, interesting appliques or designs on the back, or fabric features like flouncy hems 🙂 I haven’t tried any of that yet because I was too busy with the math part, but I likely will in the future!
But for now, I’m off to dig in the dirt a little and enjoy this lovely spring weather 😉